
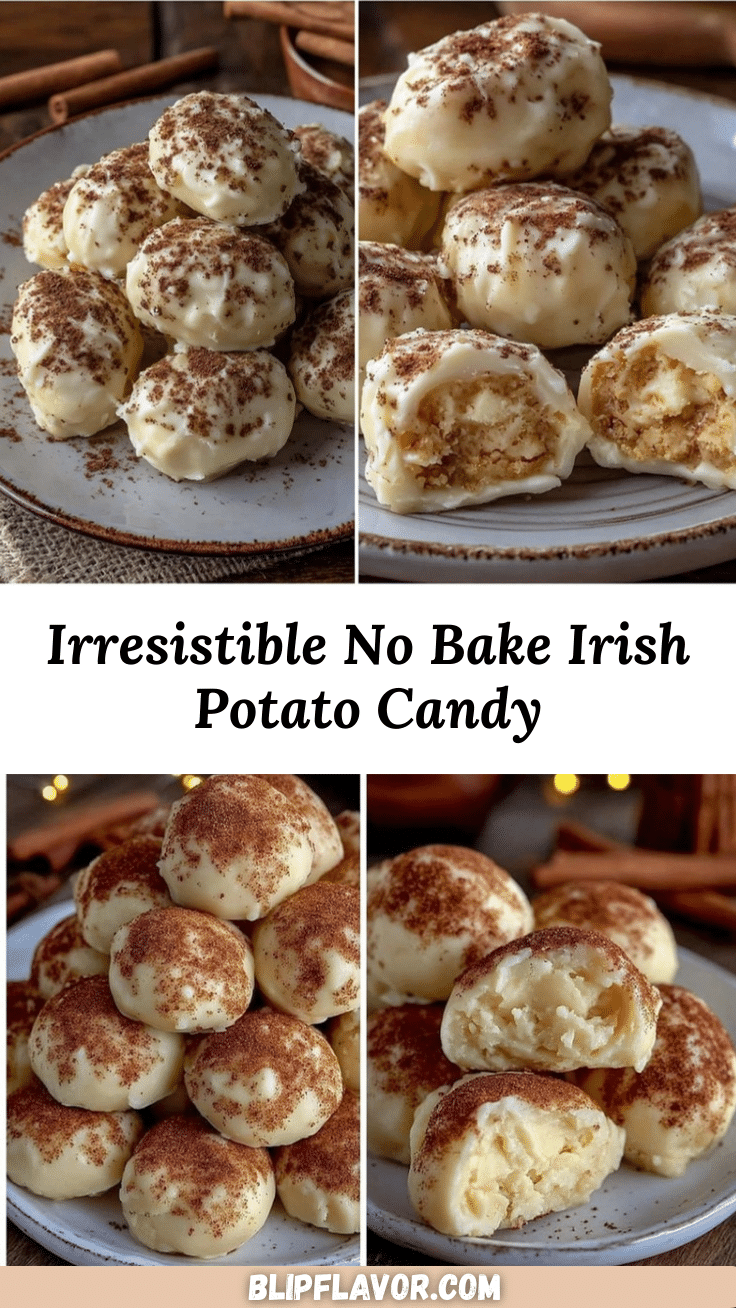
Let me tell you, the first whiff of cinnamon and vanilla drifting from a bowl of Irish Potato Candy is enough to make my kitchen feel like a little slice of home. There’s something magical about the way these tiny, cocoa-dusted candies look—soft, rustic rounds speckled with spice, so inviting you just want to pop one in your mouth. The texture is a delight: creamy, almost fudgy, with the faint crunch of coconut, and a sweet warmth that lingers after each bite. Honestly, the first time I made Irish Potato Candy, I was standing in my grandmother’s kitchen, knee-high to a grasshopper, watching her roll these perfect little treats and dust them with cinnamon. The air was thick with laughter, and the counter was crowded with curious hands ready to sneak a taste. It was one of those moments—where you just stop, take it all in, and realize you’ve stumbled onto something special.
This recipe isn’t just a dessert—it’s a memory, a tradition, and a pure, nostalgic comfort that I wish I’d discovered years before I actually did. On rainy weekends, when the world feels a little gray, whipping up a batch of Irish Potato Candy is my go-to for brightening up the day. My family can’t resist sneaking them off the tray before they’ve even set, and I can’t really blame them! They’re dangerously easy, no bake, and come together with ingredients you probably have on hand. Whether you’re looking to wow guests during St. Patrick’s Day, treat your kids to something fun, or simply add a sweet touch to your Pinterest dessert board, this Irish Potato Candy recipe hits the mark every time.
I’ve tested (and retested, in the name of research, of course) this recipe so many times that it’s become a staple for family gatherings and cozy afternoons. If you’re after that “warm hug” feeling from your food, bookmark this one. You know you’re onto something truly special when a recipe makes you pause and smile—and trust me, these little candies do just that.
Why You’ll Love This Irish Potato Candy Recipe
After years of baking, candy-making, and experimenting with family favorites, I can honestly say this Irish Potato Candy recipe is a keeper. It’s chef-tested (by yours truly!), grandma-approved, and always a hit with my picky eaters. Here’s what makes it stand out:
- Quick & Easy: Comes together in under 20 minutes—no oven, no fuss. Perfect for busy weeknights or last-minute guests.
- Simple Ingredients: No fancy trips to the store needed. Most of these are pantry staples, so you can whip up a batch anytime the craving hits.
- Perfect for Celebrations: These candies are a must for St. Patrick’s Day, but honestly, they’re fun for any holiday, bake sale, or cozy get-together.
- Crowd-Pleaser: Kids love the cinnamon “potato” look, adults rave about the flavor, and they disappear faster than you’d think.
- Unbelievably Delicious: The combination of creamy coconut, sweet vanilla, and spicy cinnamon is pure comfort food. It’s the kind of treat that brings people together.
What sets this recipe apart? Well, I blend my coconut extra fine for the smoothest texture, and I use just the right touch of cinnamon for a realistic “potato” look. Some recipes are too sweet or too gritty, but this one is perfectly balanced—rich, not cloying, and with just enough nostalgia to bring a smile. I’ve tried swapping in low-carb sweeteners and dairy-free options, and it still works beautifully. When you bite into one, it’s not just good—it’s the kind of candy that makes you close your eyes and savor every second.
Whether you’re hoping to impress friends with something unique, or just want a sweet treat to enjoy with a cup of tea, this Irish Potato Candy recipe is the answer. It’s fast, fun, and absolutely delicious—so don’t be surprised if it becomes a new tradition in your house too!
What Ingredients You Will Need
This Irish Potato Candy recipe proves you don’t need fancy ingredients to make a memorable treat. Every component works together to create bold flavor and that signature, creamy texture—without any baking required. Here’s what you’ll need:
- For the Candy Mixture:
- Cream Cheese, softened (4 oz / 113 g): The base that makes the candies extra creamy. I like Philadelphia for the smoothest texture.
- Unsalted Butter, softened (2 tbsp / 28 g): Adds richness and helps the mixture hold together.
- Powdered Sugar (2 cups / 240 g): Creates the sweetness and structure. I’ve found Domino brand works well for consistent results.
- Vanilla Extract (1 tsp / 5 ml): Adds a cozy flavor. Use real vanilla if possible for best taste.
- Shredded Sweetened Coconut (1 1/2 cups / 120 g): Provides texture and subtle chew. You can use unsweetened if you prefer less sugar.
- For the Coating:
- Ground Cinnamon (2 tbsp / 16 g): For rolling the candies and giving them their classic “potato” look.
- Cocoa Powder (optional, 1 tsp / 2 g): Sometimes I mix a little cocoa with cinnamon for deeper color (not traditional, but looks great!).
- Substitutions & Options:
- Dairy-Free Cream Cheese: Works well if you need a vegan version. (Go for Kite Hill or Tofutti brands.)
- Butter Substitute: Use plant-based butter for a vegan treat.
- Less Sweet: Use unsweetened coconut and reduce powdered sugar by 1/4 cup if you prefer a milder flavor.
- Flavor Boosts: Add a splash of almond extract for a twist, or swap out vanilla for Irish cream extract if you’re feeling festive.
I rely on fine shredded coconut for the best texture—large flakes can make the candy too chewy. If you don’t have cinnamon, a mix of nutmeg and cocoa will give a similar “earthy” look. You can even use food-safe gloves to keep things tidy when rolling!
Equipment Needed
- Mixing Bowl: A medium-sized bowl works perfectly for combining everything.
- Hand Mixer or Stand Mixer: Makes creaming the butter and cream cheese a breeze (but a sturdy wooden spoon will do in a pinch).
- Measuring Cups & Spoons: Accuracy matters here, especially with powdered sugar.
- Rubber Spatula: Helps scrape down the sides and get every last bit of the mixture out.
- Small Cookie Scoop or Spoon: For shaping the candies evenly. I’ve used everything from melon ballers to teaspoons, and they all work!
- Shallow Dish or Plate: For rolling the candies in cinnamon.
- Wax Paper or Parchment Paper: To set the candies after rolling. It keeps them from sticking to the plate or each other.
If you don’t have a mixer, don’t sweat it—a little elbow grease gets the job done. For rolling, gloves help keep your hands clean (especially if the mixture gets sticky). Honestly, I’ve made these with just a fork and a bowl at a friend’s house, and they still turned out great. If you’re looking for budget-friendly tools, Dollar Store spatulas and thrifted bowls work just fine—no need to break the bank.
Preparation Method

- Prep Your Ingredients: Let cream cheese and butter sit out for about 30 minutes until softened. Measure the powdered sugar and coconut so you’re ready to go.
- Cream Together Butter & Cream Cheese (2 minutes): In a mixing bowl, beat the softened butter (2 tbsp / 28 g) and cream cheese (4 oz / 113 g) until smooth and fluffy. If using a hand mixer, start on low to avoid splatters. The mixture should look pale and creamy.
- Add Powdered Sugar (3-4 minutes): Gradually add powdered sugar (2 cups / 240 g), about 1/2 cup at a time, mixing after each addition. The mixture will thicken and start to look like frosting. If you notice lumps, switch to high speed for 30 seconds.
- Mix in Vanilla Extract (30 seconds): Pour in vanilla (1 tsp / 5 ml) and blend until incorporated. The aroma at this stage is heavenly!
- Fold in Shredded Coconut (1 minute): Use a spatula to gently fold in coconut (1 1/2 cups / 120 g). The mixture should be thick and sticky—almost like cookie dough. If it feels too runny, add 2-3 tbsp more powdered sugar.
- Shape the Candies (5-7 minutes): Scoop out teaspoon-sized portions and roll them between your palms to form small oval shapes (like mini potatoes). Each candy should be about 1 inch long. If the mixture sticks, chill for 10 minutes to firm up.
- Roll in Cinnamon (2 minutes): Place ground cinnamon (2 tbsp / 16 g) in a shallow dish. Roll each candy until fully coated. For a darker look, add a pinch of cocoa powder to the cinnamon.
- Set on Wax Paper (1 minute): Arrange the coated candies on wax or parchment paper. Let them sit at room temperature for 20-30 minutes to firm up.
- Serve or Store: Enjoy immediately or transfer to an airtight container. These candies keep well in the fridge for up to a week—if they last that long!
Troubleshooting: If your mixture feels too sticky, chill it for 10-15 minutes before rolling. Too dry? Add a teaspoon of milk or extra cream cheese. For perfectly shaped candies, use a cookie scoop for uniform size. The key is getting the mixture thick enough to hold its shape but soft enough to bite into—don’t worry if it’s not perfect, rustic is part of the charm.
Cooking Tips & Techniques
Let’s face it, Irish Potato Candy is easy, but it’s the little tricks that make it truly great. Over the years, I’ve learned a few things (sometimes the hard way!):
- Soften Ingredients Properly: Butter and cream cheese need to be soft, but not melted. If they’re too warm, the candies won’t hold their shape.
- Sift Powdered Sugar: For the smoothest texture, sift your powdered sugar before adding. This prevents lumps and gives that classic creamy bite.
- Chill the Mixture: If your kitchen’s warm, pop the mixture in the fridge for 10-15 minutes before rolling. It’s a lifesaver for sticky hands.
- Don’t Overmix: Blend just until smooth after each addition. Overmixing can make the candy tough or grainy.
- Shape Quickly: The mixture firms up fast. Work in small batches, and keep unused mix covered to prevent drying.
- Rolling Technique: Use gentle pressure and roll candies into rough ovals—don’t worry about perfection! The “potato” look is part of the fun.
- Multitasking: While the mixture chills, set up your rolling station and wax paper. Makes cleanup much easier!
- Consistency Matters: If candies flatten out, add a bit more powdered sugar. If they crack, they’re too dry—add a tiny splash of milk.
- Lesson Learned: One time I forgot to sift the sugar and ended up with lumpy candies. Not the end of the world, but trust me, that extra step is worth it!
Irish Potato Candy is forgiving, so don’t stress. With these tips, you’ll get a batch that’s creamy, sweet, and absolutely adorable—just like grandma used to make.
Variations & Adaptations
One of my favorite things about Irish Potato Candy is how versatile it is. You can switch up flavors, textures, and even make it fit your dietary needs—here’s how:
- Gluten-Free Version: The classic recipe is already gluten-free, but double-check your powdered sugar and vanilla for hidden gluten.
- Vegan Adaptation: Use dairy-free cream cheese and plant-based butter. Swap in unsweetened coconut for less sugar.
- Nutty Twist: Add 1/4 cup finely chopped pecans or walnuts to the mix for a little crunch. My uncle prefers them this way—says it’s the “grown-up” version.
- Chocolate Lovers: Mix 1 tbsp cocoa powder into the candy mix for a chocolate-coconut treat. Roll in cocoa instead of cinnamon for a deeper flavor.
- Seasonal Flavors: Around the holidays, I add a pinch of pumpkin spice or chai spice to the coating. It’s a hit at winter parties!
- Keto-Friendly: Use powdered erythritol and unsweetened coconut. The taste stays spot on, and it’s lower in carbs.
- Personal Favorite: Once, I tucked a mini chocolate chip inside each candy—my kids went wild for the surprise center!
Feel free to experiment—these candies are tough to mess up. Whether you’re swapping ingredients for allergies or just for fun, there’s a version for everyone.
Serving & Storage Suggestions
Irish Potato Candy is best served chilled, straight from the fridge. The texture’s creamy and the flavors pop when they’re cold. Arrange them on a pretty plate, sprinkle a little extra cinnamon for drama, and you’ve got a dessert that looks as good as it tastes.
Pair with strong Irish tea, coffee, or even hot cocoa for a cozy treat. I love serving these alongside fruit or nut platters at parties—they balance out the sweet with something fresh.
For storage, keep the candies in an airtight container in the refrigerator. They’ll stay good for up to a week, though I’ve rarely seen them last that long! If you want to freeze, layer them with parchment paper in a freezer-safe container. Thaw in the fridge before serving.
Reheating isn’t necessary, but if they firm up too much, let them sit at room temp for 10 minutes. The cinnamon coating actually gets tastier over time—almost like it “settles in” and deepens. Honestly, they only get better.
Nutritional Information & Benefits
Here’s the scoop for one Irish Potato Candy (about 20g):
- Calories: ~70
- Fat: 3g
- Carbs: 9g
- Sugar: 8g
- Protein: 1g
Coconut adds a bit of fiber and healthy fats, while cream cheese packs some calcium and protein. If you use lower sugar or vegan options, you can easily adjust the carbs and calories. This recipe is naturally gluten-free and can be made dairy-free with simple swaps. Just watch out for coconut allergy—it’s a big part of the recipe.
I love that you can make these candies lighter or richer, depending on your needs. It’s a sweet treat that fits into almost any lifestyle—just enjoy in moderation (as hard as that is!).
Conclusion
If you’ve been searching for an easy, no-bake, old-fashioned treat that brings people together, Irish Potato Candy is it. The creamy coconut center, cozy cinnamon coating, and nostalgic charm make it one of my all-time favorites. It’s the kind of recipe you’ll come back to again and again—whether for holidays, gifting, or just a little pick-me-up on a rainy day.
Customize to your heart’s content—swap in vegan ingredients, add nuts, or play with flavors. What matters most is making it yours, and sharing the fun with family and friends. I love this recipe because it’s simple, forgiving, and absolutely delicious. Give it a try, and let me know how you make it your own!
Drop your thoughts below, share your favorite twists, or pin this for later (trust me, your Pinterest board needs it!). Here’s to sweet moments, cozy kitchens, and treats that make life a little brighter!
FAQs
Is Irish Potato Candy actually made with potatoes?
Nope! Despite the name, there are no potatoes in Irish Potato Candy. The candies just look like tiny spuds thanks to the cinnamon coating.
Can I make Irish Potato Candy ahead of time?
Absolutely! These keep well in the fridge for up to a week, so you can make them in advance for parties or gifts.
What’s the best way to prevent the mixture from sticking to my hands?
Chill the candy mixture for 10-15 minutes before rolling, or lightly dust your hands with powdered sugar to keep things tidy.
Can I freeze Irish Potato Candy?
Yes! Place them in a freezer-safe container with parchment paper between layers. Thaw in the fridge before serving for best texture.
Is this recipe gluten-free?
It is! Just double-check your powdered sugar and flavorings to make sure there’s no hidden gluten.
Pin This Recipe!
Irish Potato Candy

This easy, no-bake Irish Potato Candy is a nostalgic, old-fashioned treat with a creamy coconut center and a cozy cinnamon coating. Perfect for holidays, gifting, or a sweet pick-me-up, these candies come together in minutes and are naturally gluten-free.
- Prep Time: 10 minutes
- Cook Time: 0 minutes
- Total Time: 20 minutes
- Yield: 24 candies 1x
- Category: Dessert
- Cuisine: American
Ingredients
- 4 oz (113 g) cream cheese, softened
- 2 tbsp (28 g) unsalted butter, softened
- 2 cups (240 g) powdered sugar
- 1 tsp (5 ml) vanilla extract
- 1 1/2 cups (120 g) shredded sweetened coconut
- 2 tbsp (16 g) ground cinnamon (for coating)
- 1 tsp (2 g) cocoa powder (optional, for coating)
Instructions
- Let cream cheese and butter sit out for about 30 minutes until softened. Measure the powdered sugar and coconut.
- In a mixing bowl, beat the softened butter and cream cheese until smooth and fluffy (about 2 minutes).
- Gradually add powdered sugar, about 1/2 cup at a time, mixing after each addition until the mixture thickens and looks like frosting (3-4 minutes).
- Mix in vanilla extract until incorporated (30 seconds).
- Fold in shredded coconut with a spatula until the mixture is thick and sticky (1 minute). If too runny, add 2-3 tbsp more powdered sugar.
- Scoop out teaspoon-sized portions and roll between your palms to form small oval shapes (like mini potatoes), about 1 inch long. If sticky, chill for 10 minutes.
- Place ground cinnamon (and cocoa powder, if using) in a shallow dish. Roll each candy until fully coated.
- Arrange the coated candies on wax or parchment paper. Let them sit at room temperature for 20-30 minutes to firm up.
- Enjoy immediately or transfer to an airtight container. Store in the fridge for up to a week.
Notes
For best texture, use fine shredded coconut and sift powdered sugar before mixing. If the mixture is too sticky, chill before rolling. Vegan and keto adaptations are easy with dairy-free cream cheese, plant-based butter, and powdered erythritol. Store candies chilled for best flavor and texture.
Nutrition
- Serving Size: 1 candy (about 20g)
- Calories: 70
- Sugar: 8
- Sodium: 20
- Fat: 3
- Saturated Fat: 2
- Carbohydrates: 9
- Fiber: 1
- Protein: 1
Keywords: Irish potato candy, no bake candy, coconut candy, St. Patrick's Day dessert, old-fashioned treat, gluten-free dessert, easy candy recipe


