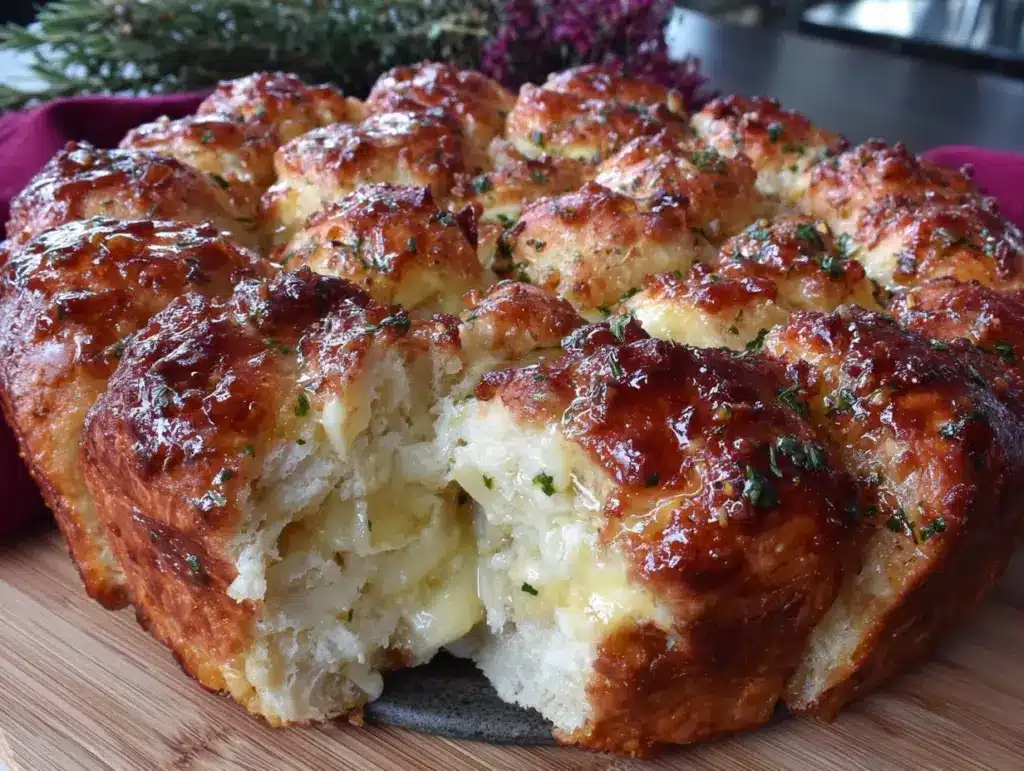
“You sure these rolls won’t steal the show?” my partner asked skeptically while I brushed the last batch with melted garlic butter. Honestly, I wasn’t sure either—these crispy pull-apart garlic butter rolls had started as a bit of a happy accident on a night when I was scrambling to get dinner on the table after a long day. The plan was simple: something quick, comforting, and easy to share. Yet, as the buttery aroma filled the kitchen and the golden crusts crackled under my fingers, I realized these rolls had quietly claimed their spot as a dinner table favorite.
It wasn’t the first time a recipe like this became my go-to. I remember evenings when the chaos of work and errands left me with little patience for complicated meals, but the craving for something warm and homemade couldn’t be ignored. These rolls, with their crispy edges and soft, garlicky center, fit that craving perfectly. Over a couple of weeks, I found myself making them multiple times, tweaking the butter-to-garlic ratio, adjusting the bake time, and even sneaking in a sprinkle of fresh herbs here and there. The result? A recipe that’s simple enough for a weeknight but impressive enough to pair with any dinner, from a cozy soup to a hearty roast.
There’s something quietly satisfying about tearing into these rolls—the way the crust breaks with a satisfying crunch, the soft pull-apart texture inside, and that unmistakable garlicky butter flavor that wraps around your taste buds like a warm hug. I’ve lost count of how many times these have saved dinner or turned a casual meal into a mini celebration. It’s not just bread; it’s the kind of comfort that makes you pause, take a deep breath, and appreciate a moment of calm amid the rush.
So, if you’re looking for a recipe that’s easy, crowd-pleasing, and packed with flavor, these crispy pull-apart garlic butter rolls are about to become your new favorite dinner companion. No fuss, no fancy ingredients—just pure, buttery goodness that feels like home.
Why You’ll Love This Recipe
Having tested this recipe through various tweaks and trials (and lots of hungry dinners), I can vouch for why these rolls are a staple in my kitchen. Here’s what makes them stand out:
- Quick & Easy : Ready to eat in under an hour, these rolls fit perfectly into busy weeknights or spontaneous dinner plans.
- Simple Ingredients : No hunting for rare spices or fancy cheeses—just pantry basics and fresh garlic.
- Perfect for Dinner : Whether you’re serving a soup, stew, or roast, these rolls complement any meal with their crispy, buttery charm.
- Crowd-Pleaser : From kids to adults, everyone gravitates toward these rolls, making them great for family dinners or casual get-togethers.
- Unbelievably Delicious : The crispy edges contrast with the soft interior, all kissed by rich garlic butter—a texture and flavor combo that feels indulgent but not heavy.
What sets this recipe apart is the layering of flavor and texture. Instead of just mixing garlic into butter, I melt it gently to infuse the butter with that robust aroma, then brush it generously over the rolls before and after baking. This double coating is what gives the crust that crave-worthy crispness and deep flavor. Also, the pull-apart style means you get perfectly portioned rolls that bake evenly and encourage sharing, which I find makes dinner feel more connected and casual.
This recipe isn’t just a side dish; it’s the kind of bread that makes you close your eyes after the first bite and smile. It’s comforting, unpretentious, and honestly, a little addictive. Plus, it’s easy to customize with herbs or cheese if you’re in the mood to mix things up. If you want a cozy dinner companion that you can whip up with everyday ingredients, these garlic butter rolls are ready to become your new favorite.
What Ingredients You Will Need
This recipe uses simple, wholesome ingredients to deliver bold flavor and that signature texture without any fuss. You probably already have most of these in your pantry, which is part of the magic—no last-minute grocery trips needed!
- All-purpose flour (about 3 ½ cups / 440g) – The base for our dough, providing structure and chew.
- Active dry yeast (2 ¼ teaspoons / 1 packet) – For that perfect rise and airy crumb.
- Sugar (2 tablespoons) – Feeds the yeast and adds a touch of sweetness.
- Warm water (1 cup / 240ml) – Activates the yeast (around 110°F / 43°C, just warm to the touch).
- Milk (½ cup / 120ml, whole or 2%) – Adds richness and tenderness.
- Unsalted butter (4 tablespoons / 56g, softened) – For the dough and for the garlic butter coating.
- Garlic cloves (4 large, minced) – The star flavor. Fresh is best, but garlic paste works in a pinch.
- Salt (1 ½ teaspoons) – Balances the flavors and enhances the dough.
- Egg (1 large, for egg wash) – Gives the rolls a beautiful golden crust.
- Fresh parsley (optional, finely chopped) – Adds a fresh, herbaceous note to the garlic butter.
For the garlic butter, I recommend using a quality unsalted butter like Kerrygold for its creamy texture and clean flavor. If you need a dairy-free alternative, swap in a plant-based butter that melts well. When selecting your garlic, go for firm bulbs without soft spots to ensure that punchy, fresh flavor.
One tip: If you want to add a little extra flair, sprinkle some grated Parmesan over the tops right before baking. I’ve done this on lazy Sunday dinners, and it gives the rolls a lovely savory edge. For a gluten-free twist, you can substitute up to half the flour with a gluten-free blend, but the texture will be slightly different—still delicious though!
Equipment Needed
- Mixing bowls – A large bowl for the dough and a small one for the garlic butter.
- Stand mixer with dough hook (optional) – Speeds up kneading but you can knead by hand if you prefer.
- Measuring cups and spoons – For precise ingredient amounts.
- Pastry brush – Essential for evenly coating the rolls with garlic butter and egg wash.
- 9×13-inch baking pan or similar size – To arrange the rolls so they bake close together and pull apart easily.
- Kitchen thermometer (optional) – Handy for checking water temperature to activate yeast properly.
- Plastic wrap or kitchen towel – For covering dough during rising.
Personally, I’ve found that a stand mixer saves my hands, especially when making multiple batches, but kneading by hand gives you a better feel for the dough’s texture. The pastry brush is something I never skip—it makes all the difference in getting that shiny, flavorful crust. For budget-friendly options, a silicone brush works just as well as a natural bristle one, and you can find good baking pans at reasonable prices online or at kitchen stores.
Preparation Method

- Activate the yeast: In a small bowl, combine 1 cup (240ml) warm water (about 110°F / 43°C) with 2 tablespoons sugar and 2 ¼ teaspoons active dry yeast. Stir gently and let it sit for 5-10 minutes until it’s foamy and bubbling. If it doesn’t foam, your yeast might be old—start over with fresh yeast.
- Mix wet ingredients: In a large bowl or the stand mixer bowl, whisk ½ cup (120ml) milk with 4 tablespoons softened unsalted butter until combined. Add 1 ½ teaspoons salt and 1 large egg, then mix well.
- Combine dough: Add the foamy yeast mixture to the wet ingredients. Gradually stir in 3 ½ cups (440g) all-purpose flour, mixing until a shaggy dough forms. If the dough feels too sticky, add flour 1 tablespoon at a time; if too dry, add a splash of milk.
- Knead the dough: Knead on a floured surface for about 8-10 minutes by hand or 5-7 minutes with a stand mixer fitted with a dough hook. The dough should be smooth, elastic, and slightly tacky but not sticky. If it sticks excessively, sprinkle a bit more flour.
- First rise: Shape dough into a ball and place it in a lightly greased bowl. Cover with plastic wrap or a damp kitchen towel. Let it rise in a warm spot for 1 to 1 ½ hours, or until doubled in size.
- Prepare garlic butter: While the dough rises, melt 4 tablespoons unsalted butter in a small saucepan over low heat. Add 4 minced garlic cloves and cook gently for 1-2 minutes until fragrant but not browned. Stir in 1 tablespoon finely chopped fresh parsley if using. Remove from heat and set aside.
- Shape rolls: Once risen, punch down the dough and turn it onto a floured surface. Divide into 12 equal pieces (about 70g / 2.5 oz each). Roll each piece into a ball. Arrange the balls close together in a greased 9×13-inch baking pan so they just touch.
- Brush with garlic butter: Generously brush the tops of the dough balls with half the garlic butter mixture. Cover loosely with plastic wrap and let the rolls rise again for 30 minutes until puffed.
- Preheat oven & egg wash: Preheat your oven to 375°F (190°C). Beat 1 egg with 1 tablespoon water to create an egg wash. Brush the rolls gently with the egg wash for a shiny, golden crust.
- Bake: Bake the rolls for 20-25 minutes, until golden brown and crispy on the edges. If the tops brown too fast, loosely tent with foil halfway through baking.
- Final garlic butter glaze: Remove rolls from the oven and immediately brush with the remaining warm garlic butter. This seals in moisture and amps up the flavor.
- Cool slightly and serve: Let the rolls cool for 5-10 minutes before serving. The pull-apart nature means everyone can grab a warm, buttery piece—perfect for dipping in soup or alongside your favorite dinner.
Cooking Tips & Techniques
One key to these rolls’ success is managing the dough’s texture. When I first tried this recipe, I rushed the kneading and ended up with dense rolls. Patience is your friend here—knead until the dough springs back when pressed and feels smooth. That elasticity means the gluten has developed well, giving you soft, airy rolls.
Another trick is the double garlic butter brushing. Brushing before baking lets the flavor soak in, while the post-bake glaze locks in moisture and adds that irresistible shine. I’ve learned that if you skip the second brush, the rolls feel a bit dry and less flavorful, so don’t skip it!
Watch the oven temperature closely. Too hot and the rolls brown too quickly on top but stay doughy inside; too low and you lose that crispy edge. If your oven runs hot, tent with foil after 15 minutes to prevent burning. It’s a small step that saves a lot of frustration.
Finally, don’t skimp on rising times. The dough needs a full rise to develop flavor and fluffiness. I sometimes prep the dough in the morning and let it rise slowly in the fridge for a deeper taste, then shape and bake in the evening. It’s a handy trick when your schedule demands flexibility.
Variations & Adaptations
These rolls are a great base for experimenting. Here are a few variations I’ve tried and loved:
- Herb & Cheese Twist : Add ½ cup shredded mozzarella or Parmesan into the dough or sprinkle on top before baking. Mix fresh rosemary or thyme into the garlic butter for an earthy note.
- Spicy Garlic Rolls : Stir ¼ teaspoon red pepper flakes into the garlic butter for a subtle heat that pairs wonderfully with chili or spicy stews.
- Whole Wheat Option : Substitute half the all-purpose flour with whole wheat flour for a nuttier flavor and a bit more fiber, adjusting liquid as needed.
- Dairy-Free Version : Use a plant-based butter and unsweetened almond or oat milk in place of dairy. The rolls stay soft and flavorful without the dairy.
- Sweet Garlic Butter Rolls : Add a teaspoon of honey to the garlic butter and sprinkle some coarse sea salt on top before baking for a sweet-savory combo that’s fantastic with roasted chicken.
One personal favorite is the herb and cheese version—especially when paired with a bowl of creamy asparagus risotto. The melty cheese and herbaceous garlic butter bring a lovely richness that makes dinner feel extra special.
Serving & Storage Suggestions
These rolls are best served warm, fresh from the oven, so the garlic butter is still luscious and the crust is crispy. I like to place them in the center of the table so everyone can pull apart pieces and enjoy the communal vibe. They go beautifully alongside almost any dinner, especially soups, stews, or a simple roasted chicken.
If you have leftovers (which is rare), store them in an airtight container at room temperature for up to two days. For longer storage, wrap tightly in foil or plastic wrap and freeze for up to 3 months. To reheat, pop them in a 350°F (175°C) oven for 10-12 minutes until warm and crispy again. Microwaving makes them soft but loses that satisfying crunch.
Flavors actually mellow a bit after a day, making the garlic butter more subtle but still delicious. I’ve sometimes sliced cooled rolls and toasted them lightly the next day for garlic bread-style snacks—delicious with a drizzle of olive oil or a sprinkle of Parmesan.
Nutritional Information & Benefits
Each roll (approximately 70g / 2.5 oz) contains roughly:
| Calories | 180-210 kcal |
|---|---|
| Fat | 8-10g (mostly from butter) |
| Carbohydrates | 25-28g |
| Protein | 4-5g |
| Fiber | 1-2g (less if using all-purpose flour) |
Garlic itself is known for its antioxidant properties and potential heart health benefits, which makes these more than just tasty dinner rolls—they add a little wellness boost too. Using unsalted butter lets you control the sodium, and you can always reduce the butter slightly to lighten them up, although that buttery richness is hard to beat.
For those watching carbs or gluten, swapping part of the flour for almond flour or using gluten-free blends can make these rolls fit your dietary needs. Just be aware texture will change—still delicious, but a bit different.
Conclusion
These crispy pull-apart garlic butter rolls have quietly become a hero recipe for busy dinners and relaxed nights alike. They’re approachable, satisfying, and carry that perfect balance of crispy crust and soft, buttery center that feels like a warm welcome at the dinner table.
Whether you stick to the classic garlic butter or try one of the variations, these rolls invite you to slow down, savor simple ingredients, and share a bite with loved ones. I’ve loved how they bring people together without stress or complicated steps—just good food made from scratch.
Give them a try alongside a comforting dinner like my honey lemon glazed salmon or a fresh vegetable side, and you might find yourself reaching for this recipe again and again. I’d love to hear how you customize your garlic butter rolls, so please leave a comment and share your tweaks and stories. Happy baking!
FAQs About Crispy Pull-Apart Garlic Butter Rolls
Can I use instant yeast instead of active dry yeast?
Yes, you can substitute instant yeast. Use about 2 teaspoons and mix it directly with the flour. You might skip the initial activation step and proceed with mixing the dough right away.
How do I keep the rolls soft inside but crispy outside?
The double brushing with garlic butter—before and after baking—helps keep the inside moist while creating a crispy crust. Also, baking at 375°F (190°C) allows for even cooking without drying the interior.
Can I prepare the dough ahead of time?
Absolutely. After the first rise, punch down the dough, cover tightly, and refrigerate overnight. The next day, shape, let rise again, and bake as usual for deeper flavor and flexible timing.
What if I don’t have fresh garlic?
Fresh garlic is best, but you can use garlic powder or garlic paste in a pinch. Adjust the amount to taste—start with 1 teaspoon of powder or 1 tablespoon of paste in the butter.
How do I make these rolls vegan?
Swap butter for a plant-based alternative and use a non-dairy milk like almond or oat. Replace the egg wash with a mixture of plant milk and maple syrup or skip it altogether—the rolls will still bake nicely, just less glossy.
Pin This Recipe!
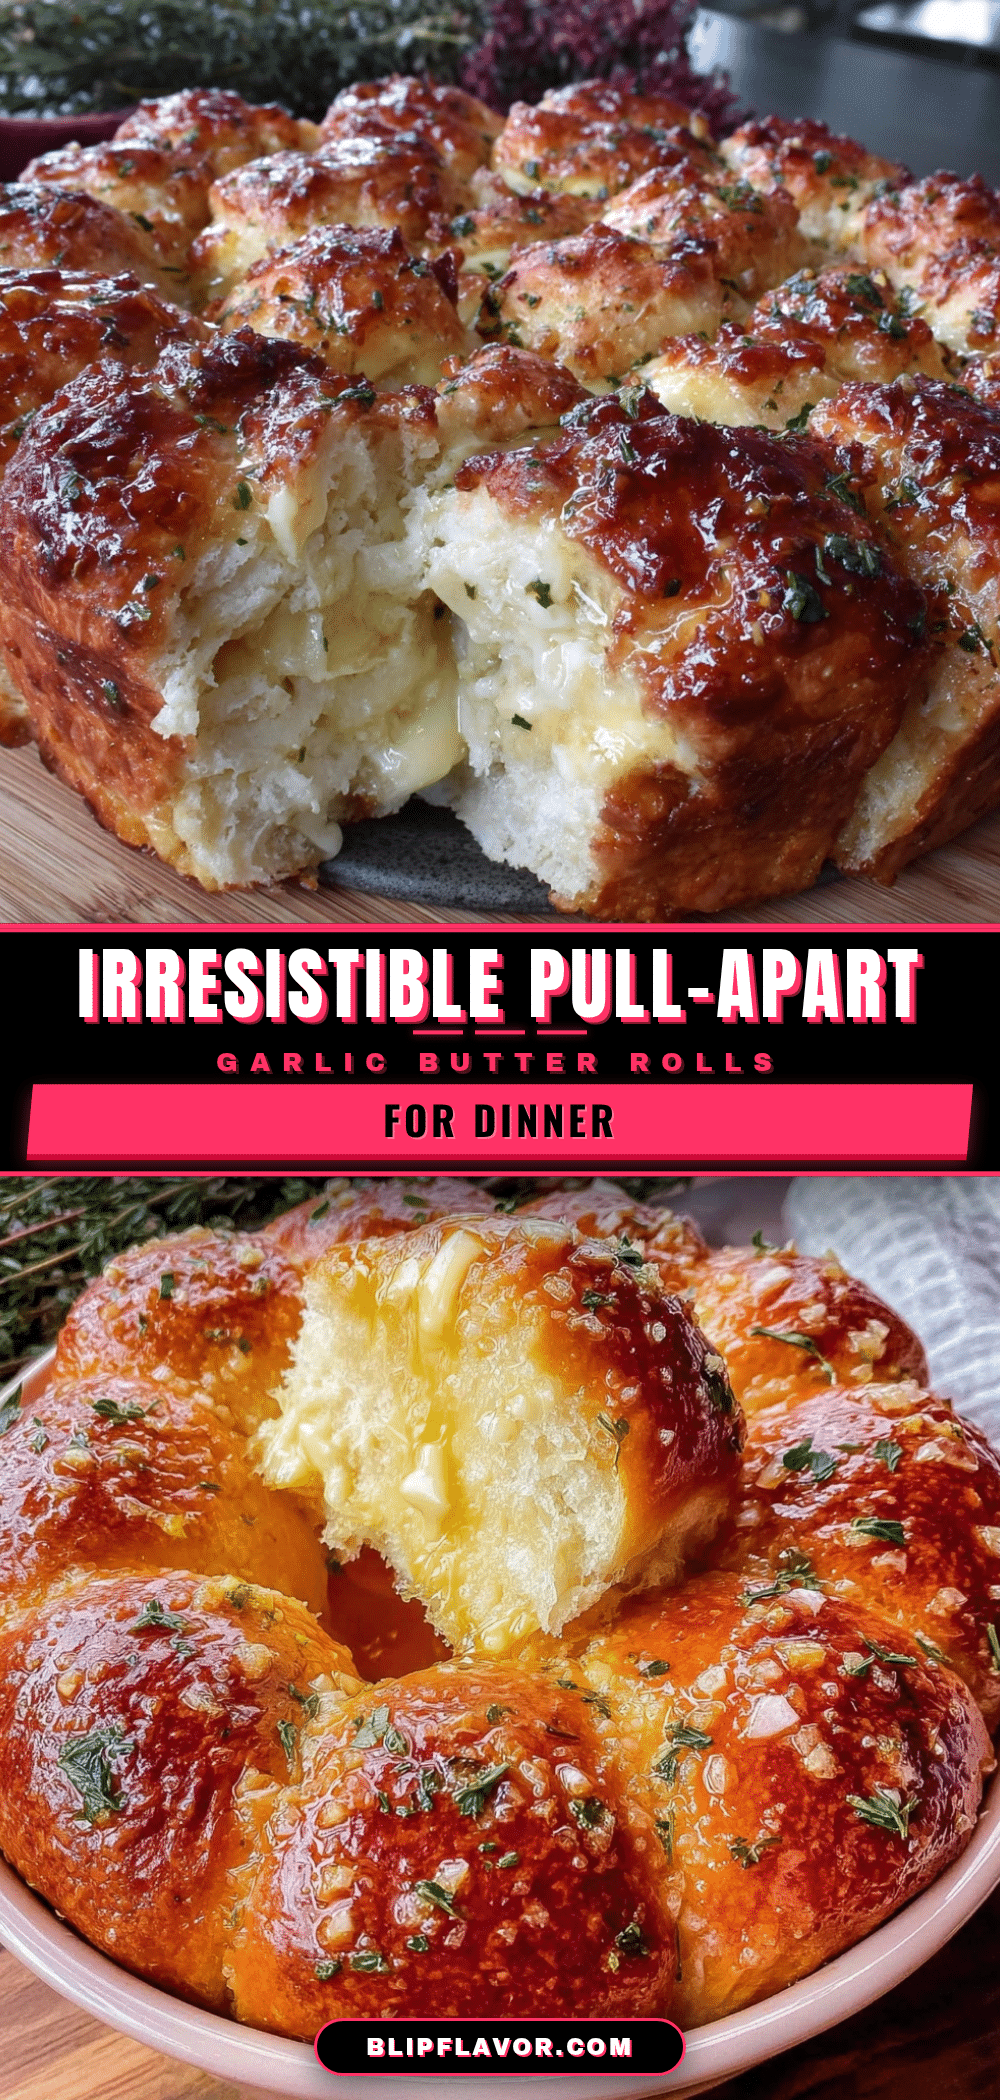
Crispy Pull-Apart Garlic Butter Rolls Easy Homemade Dinner Recipe
These crispy pull-apart garlic butter rolls feature a golden crust with a soft, garlicky center, perfect for quick, comforting dinners and easy sharing.
- Prep Time: 20 minutes
- Cook Time: 25 minutes
- Total Time: 1 hour 15 minutes
- Yield: 12 rolls 1x
- Category: Side Dish
- Cuisine: American
Ingredients
- 3 ½ cups (440g) all-purpose flour
- 2 ¼ teaspoons (1 packet) active dry yeast
- 2 tablespoons sugar
- 1 cup (240ml) warm water (about 110°F / 43°C)
- ½ cup (120ml) milk (whole or 2%)
- 4 tablespoons (56g) unsalted butter, softened
- 4 large garlic cloves, minced
- 1 ½ teaspoons salt
- 1 large egg (for egg wash)
- 1 tablespoon water (for egg wash)
- 1 tablespoon finely chopped fresh parsley (optional)
Instructions
- Activate the yeast: In a small bowl, combine 1 cup (240ml) warm water (about 110°F / 43°C) with 2 tablespoons sugar and 2 ¼ teaspoons active dry yeast. Stir gently and let it sit for 5-10 minutes until foamy.
- Mix wet ingredients: In a large bowl or stand mixer bowl, whisk ½ cup (120ml) milk with 4 tablespoons softened unsalted butter until combined. Add 1 ½ teaspoons salt and 1 large egg, then mix well.
- Combine dough: Add the foamy yeast mixture to the wet ingredients. Gradually stir in 3 ½ cups (440g) all-purpose flour until a shaggy dough forms. Adjust flour or milk as needed for texture.
- Knead the dough: Knead on a floured surface for 8-10 minutes by hand or 5-7 minutes with a stand mixer dough hook until smooth, elastic, and slightly tacky.
- First rise: Shape dough into a ball, place in a lightly greased bowl, cover with plastic wrap or damp towel, and let rise in a warm spot for 1 to 1 ½ hours until doubled in size.
- Prepare garlic butter: Melt 4 tablespoons unsalted butter in a small saucepan over low heat. Add 4 minced garlic cloves and cook gently for 1-2 minutes until fragrant. Stir in 1 tablespoon chopped parsley if using. Remove from heat.
- Shape rolls: Punch down dough, turn onto floured surface, divide into 12 equal pieces (~70g each), roll each into a ball, and arrange close together in a greased 9×13-inch baking pan.
- Brush with garlic butter: Brush tops of dough balls with half the garlic butter. Cover loosely and let rise again for 30 minutes until puffed.
- Preheat oven & egg wash: Preheat oven to 375°F (190°C). Beat 1 egg with 1 tablespoon water and brush rolls for a shiny golden crust.
- Bake: Bake rolls for 20-25 minutes until golden brown and crispy on edges. Tent with foil halfway if tops brown too fast.
- Final garlic butter glaze: Remove rolls from oven and immediately brush with remaining warm garlic butter.
- Cool slightly and serve: Let rolls cool 5-10 minutes before serving.
Notes
Double brushing with garlic butter before and after baking creates a crispy crust and moist interior. If oven runs hot, tent rolls with foil after 15 minutes to prevent burning. For a deeper flavor, refrigerate dough overnight after first rise. Variations include adding cheese, herbs, or red pepper flakes. For dairy-free, use plant-based butter and non-dairy milk; omit egg wash or replace with plant milk and maple syrup.
Nutrition
- Serving Size: 1 roll (approximatel
- Calories: 180210
- Sugar: 3
- Sodium: 250
- Fat: 810
- Saturated Fat: 5
- Carbohydrates: 2528
- Fiber: 12
- Protein: 45
Keywords: garlic butter rolls, pull-apart rolls, dinner rolls, homemade bread, easy bread recipe, garlic rolls, crispy rolls


