“Hey, did you seriously make dirt cups for graduation?” my niece asked, squinting at the colorful push pops I just handed her. Honestly, I wasn’t sure how these Oreo dirt cup push pops with gummy grad caps would turn out when I first threw the idea together—no fancy molds, just a hodgepodge of leftover ingredients and a last-minute craving for something fun and easy. The kitchen was a mess, the clock was ticking, and the grad party was in less than an hour. But somehow, these playful treats stole the show.
I remember rummaging through the pantry, spotting the classic Oreo cookies I’d bought months ago, and wondering if they’d still be good for something more than just a snack. Then I found a bag of gummy candies—those little grad caps on a whim seemed perfect for a playful topper. I was skeptical at first. Dirt cups? Push pops? It sounded like a kid’s snack, not exactly party fare for a crowd of teens and adults. But hey, after one bite, I realized this was the kind of recipe that sneaks up on you—comfort food with a silly twist that makes everyone smile.
The best part? They were ridiculously easy and no-fuss, fitting perfectly into my chaotic party prep. I made enough that people kept asking for seconds, and the gummy grad caps were a hit for photos (and sneaky snacking). These Oreo dirt cup push pops became my go-to graduation treat—not just because they’re tasty, but because they capture that carefree, celebratory vibe with just a bit of sweet nostalgia. Plus, they’re portable, mess-free, and kid-approved, which is basically the dream for any host.
By the end of the night, I realized these push pops aren’t just dessert—they’re a little moment of joy in a cup. And that’s why they stick with me every graduation season.
Why You’ll Love This Recipe
This recipe isn’t just your average dirt cup—it’s a crowd-pleaser with a nostalgic punch, perfect for graduation parties or any celebratory gathering. From my many tests and tweaks, here’s why these Oreo dirt cup push pops have earned a permanent spot in my recipe box:
- Quick & Easy: Ready in under 30 minutes, perfect for last-minute party prep or when you want something fun without the hassle.
- Simple Ingredients: Uses pantry staples like Oreos and pudding mix, plus gummy candies you can find anywhere—no complicated shopping trips.
- Perfect for Graduation Parties: The gummy grad caps add a playful, thematic touch that’s both adorable and Instagrammable.
- Crowd-Pleaser: Kids and adults alike can’t resist digging into this layered treat, and the push pop format keeps it neat and portable.
- Unbelievably Delicious: The creamy pudding, crunchy Oreo crumbs, and chewy gummies create a fun texture combo that’s just right—not too sweet, not too heavy.
What makes these push pops different from other dirt cups? Well, layering the Oreo crumbs and pudding in push pop containers gives every bite a perfect balance of cream and crunch. Plus, that gummy grad cap on top? It’s not just decoration—it’s a little celebration in itself. I tried a version with chocolate pudding once, but the classic vanilla pudding with crushed Oreos steals the show every time.
Honestly, these treats are the kind that make you smile with your mouth full and think, “Yep, this is exactly what a graduation party dessert should be.” They’re easy enough for busy hosts but special enough for the occasion. If you want a sweet that’s fuss-free and full of charm, these Oreo dirt cup push pops fit the bill.
What Ingredients You Will Need
This recipe uses simple ingredients that come together to create a fun, layered dessert—no complicated components or hard-to-find items. Most are pantry staples, which makes it great for spontaneous celebrations or quick dessert fixes.
- Vanilla Pudding Mix: Instant pudding, about 3.4 oz (96 g) package, for that creamy base. You can use sugar-free or dairy-free mixes if needed.
- Milk: 2 cups (480 ml) whole or 2% milk, room temperature for smooth pudding.
- Oreos: 18-20 cookies, crushed into fine crumbs. I prefer original Oreos for that classic chocolate flavor, but Double Stuf works if you want it a bit sweeter.
- Whipped Topping: 1 cup (240 ml), either store-bought or homemade, to lighten the pudding layers and add fluffiness.
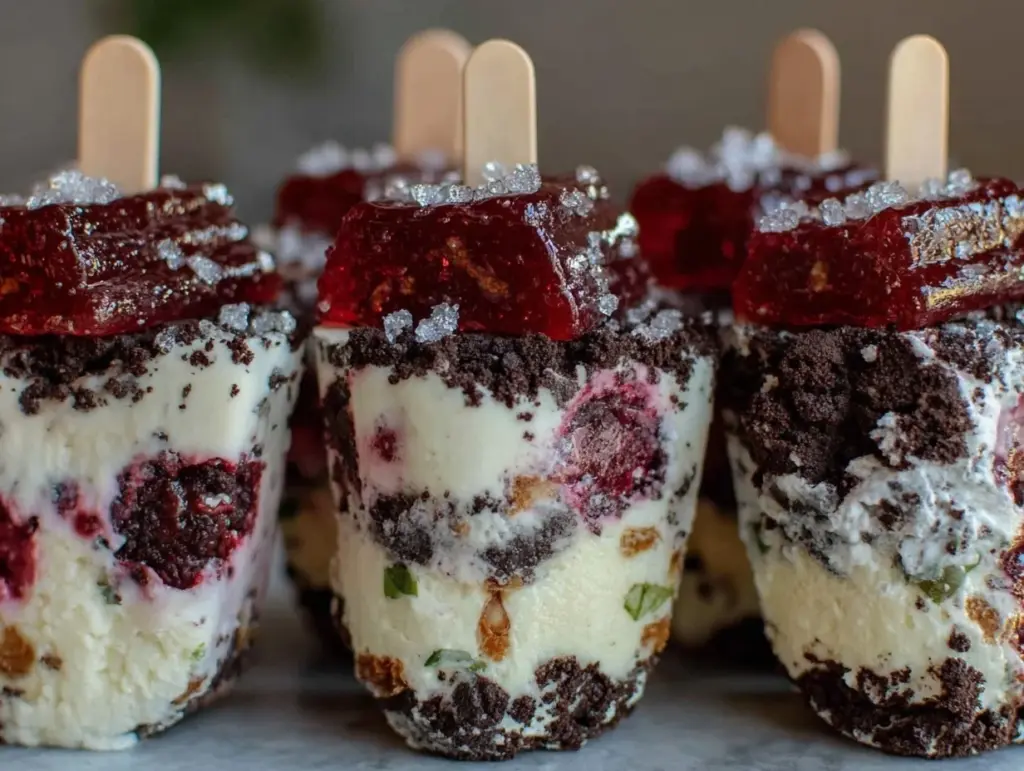
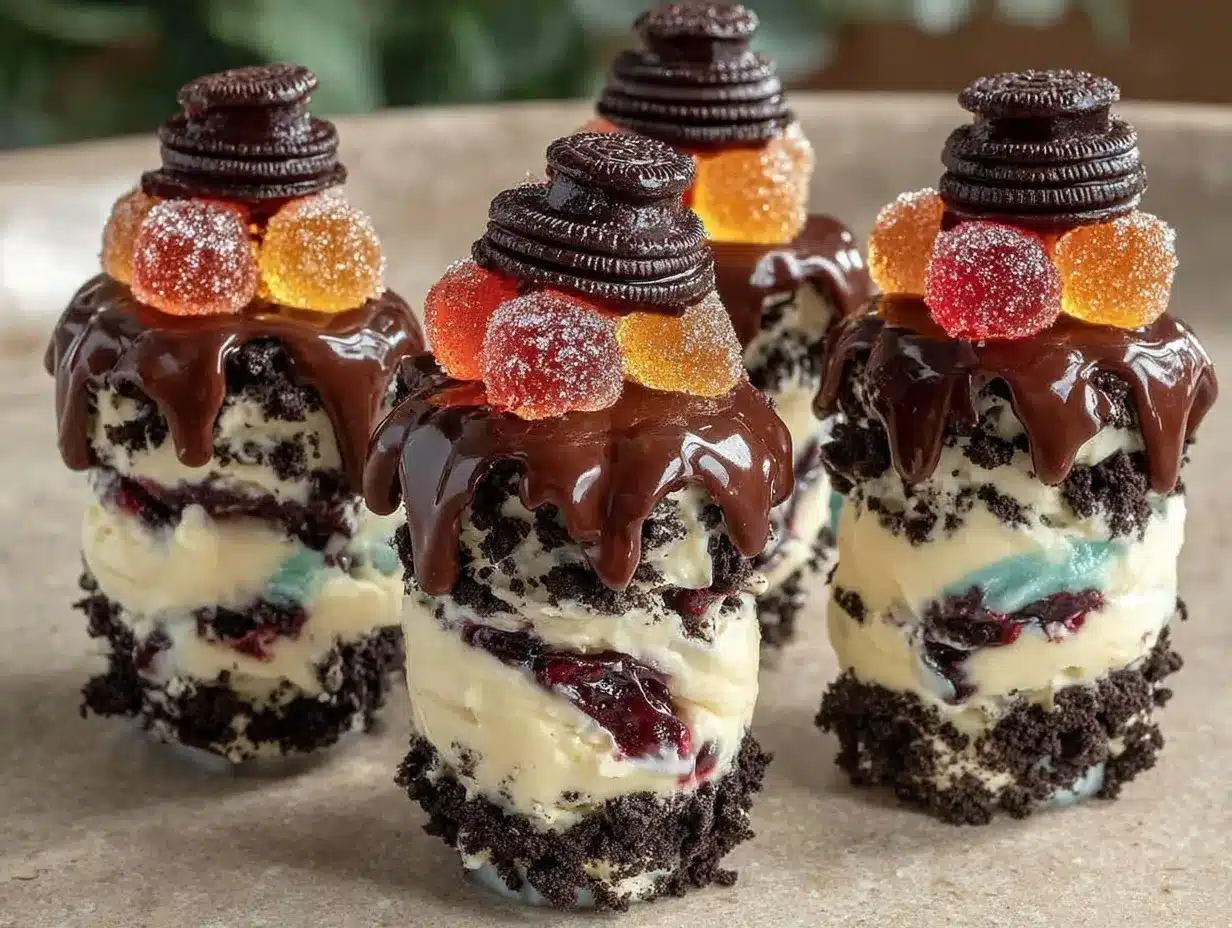
- Gummy Grad Caps: About 12 pieces, available at party stores or online candy shops. These add the perfect finishing touch and a fun chew.
- Optional Mix-ins: Mini chocolate chips or crushed nuts for extra texture (about ½ cup / 75 g).
If you’re craving a seasonal twist, fresh berries can be added between the layers instead of some Oreos, or swap vanilla pudding with chocolate or butterscotch for a different vibe. For a gluten-free version, look for gluten-free sandwich cookies or substitute with gluten-free chocolate wafers.
Personally, I like to buy pudding mixes from the brand Jell-O because they set nicely and have a clean vanilla flavor that pairs perfectly with the Oreos. For whipped topping, homemade whipped cream works wonders if you want to skip store-bought stuff and keep it fresh.
Equipment Needed
- Push Pop Containers: Essential for the layered presentation and portability. You can find these on Amazon or party stores. If you don’t have push pops, small clear plastic cups with lids work fine too.
- Mixing Bowls: One large bowl for pudding, another for crushed cookies.
- Electric Mixer or Whisk: To prepare the pudding smoothly and whip the topping if homemade.
- Food Processor or Zip Bag and Rolling Pin: For crushing Oreos into fine crumbs. I use a zip bag and rolling pin when in a pinch—no fancy gadgets needed.
- Spoon or Small Spatula: For layering pudding and cookie crumbs neatly into the push pops.
If you’re on a budget, the zip bag method for crushing cookies and simple plastic cups as push pop alternatives keep things affordable and practical. I’ve tried reusable push pop containers too—they clean easily and cut down on waste, which is a win for busy hosts.
Preparation Method
- Crush the Oreos: Place 18-20 Oreo cookies in a large zip-top bag. Use a rolling pin or heavy pan to crush them into fine crumbs, leaving a few slightly bigger chunks for texture. Set aside about ½ cup (75 g) for topping later. (Prep time: 5 minutes)
- Prepare the Pudding: In a mixing bowl, whisk together the instant vanilla pudding mix and 2 cups (480 ml) of milk. Beat for about 2 minutes until thickened and smooth. If you notice lumps, keep whisking a bit longer—smoothness is key here. (Prep time: 5 minutes)
- Fold in Whipped Topping: Gently fold 1 cup (240 ml) of whipped topping into the pudding to lighten the texture. Use a spatula and slow motions to keep it fluffy. (Prep time: 3 minutes)
- Layer the Push Pops: Start by spooning about 2 tablespoons (30 ml) of crushed Oreos into the bottom of each push pop container. Next, add 3 tablespoons (45 ml) of the pudding mixture, then repeat the layers until the container is nearly full. Leave about 1 tablespoon (15 ml) space at the top for the finishing crumbs. (Assembly time: 10 minutes)
- Top with Oreo Crumbs and Gummy Grad Caps: Sprinkle the reserved crushed Oreos on top of each push pop, then place one gummy grad cap gently on each. This little cap seals the deal on the graduation theme and adds a chewy surprise. (Finishing time: 5 minutes)
- Chill: Refrigerate the assembled push pops for at least 1 hour to let the pudding set and the flavors meld. They taste even better cold, and the layers hold together nicely when served. (Chilling time: 1 hour)
Pro tip: If your pudding mixture feels too thick after folding in the whipped topping, stir in a splash of milk (1-2 tablespoons / 15-30 ml) to loosen it slightly. Also, don’t overfill the push pops — leaving a little room prevents spills when pushing up the dessert.
Cooking Tips & Techniques
Getting these Oreo dirt cup push pops just right means paying attention to a few simple details. From my many attempts (and a few whoops!), here are some tips that make the process smoother:
- Crush Oreos to the Right Texture: Too fine and you lose the fun crunch; too chunky and it’s hard to layer evenly. Aim for mostly fine crumbs with some chunkier bits for texture contrast.
- Whip Your Topping Lightly: If making whipped cream at home, stop whipping right as soft peaks form so it folds easily into the pudding without deflating.
- Layer with Care: Use a small spoon or spatula for neat layers. It’s tempting to dump it in, but neat layers make it look way more impressive (and prettier in photos!).
- Chill Time is Crucial: Don’t skip the chill. It helps the pudding set firmly so when you push the pop up, the layers hold together instead of falling apart.
- Make Ahead: These push pops can be prepared the day before, which is a lifesaver on busy party days. Just keep them covered in the fridge.
I once forgot to chill mine before the party, and the pudding was too soft—lesson learned! Also, when adding gummies on top, press them gently so they stick without sinking into the crumbs.
Variations & Adaptations
These Oreo dirt cup push pops are super flexible. Here are some ways I’ve tweaked them or suggest you try for different occasions or dietary needs:
- Chocolate Lover’s Version: Swap vanilla pudding for chocolate pudding and top with mini chocolate chips for extra richness. It’s decadence in a push pop.
- Fruit-Infused: Add a layer of fresh sliced strawberries or raspberries between pudding and Oreos for a tangy twist. Perfect for spring or summer parties.
- Gluten-Free Option: Use gluten-free chocolate sandwich cookies and make sure your pudding mix is gluten-free. This way, everyone can enjoy the fun.
- Vegan Adaptation: Use dairy-free vanilla pudding mix, plant-based milk, and coconut whipped topping. Choose vegan gummy candies for the grad caps.
- Nutty Crunch: Mix in chopped toasted pecans or almonds with the Oreos for a little extra bite and a hint of warmth.
One of my favorite variations was making a mini “celebration” push pop with edible gold sprinkles on top—kind of a nod to the champagne cupcakes I made for my last party. If you like that idea, you might enjoy the champagne cupcakes recipe too.
Serving & Storage Suggestions
Serve these Oreo dirt cup push pops chilled for the best texture and flavor. They’re perfect for handing out at graduation ceremonies, party buffet tables, or even as a fun after-dinner treat.
Pair them with light drinks like iced tea or lemonade, or for a brunch celebration, they fit right alongside a spread that includes dishes like quiche lorraine or fresh fruit platters.
For storage, keep the push pops refrigerated, tightly covered with their lids or wrapped in plastic wrap to prevent drying out. They last well for 2-3 days but are best eaten within 24 hours for freshness.
If you need to make them ahead and freeze, it’s possible but I recommend thawing overnight in the fridge and stirring gently before serving, as the texture may change slightly.
Flavors actually deepen after a few hours in the fridge, so making them in advance can improve taste and presentation. Just remember the gummy caps can soften a bit, so add them right before serving if possible.
Nutritional Information & Benefits
Each push pop serving (about 1 container) contains approximately:
| Calories | 220-250 kcal |
|---|---|
| Fat | 10-12 g |
| Carbohydrates | 32-35 g |
| Protein | 3-4 g |
| Sugar | 22-25 g |
This dessert provides a fun treat with calcium from the milk and some protein from the pudding. Of course, it’s an indulgence more than a health food, but the portion control of push pops helps keep servings reasonable.
For those mindful of allergens, remember this recipe contains dairy and gluten (unless you swap ingredients), and gummies may contain gelatin or artificial colors. You can customize with allergen-friendly substitutes to fit your needs.
Conclusion
If you’re looking for a graduation treat that’s as fun to make as it is to eat, these Oreo dirt cup push pops with gummy grad caps hit the mark. They bring together playful textures, simple ingredients, and a festive vibe without any stress or mess.
Feel free to tweak the layers or toppings to suit your taste or party theme—this recipe invites creativity as much as it delivers satisfaction. Personally, I love how these treats bring a sense of lighthearted celebration and nostalgia to any table.
Try them for your next party, and I bet you’ll find yourself making these again and again. If you do, I’d love to hear how you customized your push pops or any fun twists you added!
Frequently Asked Questions
Can I make these Oreo dirt cup push pops ahead of time?
Yes! They actually taste better after chilling for a few hours or overnight. Just add the gummy grad caps right before serving for the best texture.
What if I don’t have push pop containers?
You can use small clear cups or jars with lids. Layer the ingredients the same way, and serve with spoons instead of pushing up the dessert.
Can I use another cookie instead of Oreos?
Absolutely! Chocolate wafer cookies or gluten-free sandwich cookies work well. Just crush them finely for best layering.
Are gummy grad caps necessary?
Not at all. They’re a fun decorative touch, but you can swap them for chocolate chips, sprinkles, or any candy you prefer.
Can this recipe be made dairy-free?
Yes! Use dairy-free pudding mix, plant-based milk, coconut or soy whipped topping, and vegan gummies to make it suitable for dairy-free diets.
Pin This Recipe!
Delicious Oreo Dirt Cup Push Pops Recipe Easy Homemade Graduation Treats
These Oreo dirt cup push pops are a fun, easy, and nostalgic dessert perfect for graduation parties. Layered with creamy vanilla pudding, crunchy Oreo crumbs, and topped with gummy grad caps, they are portable, mess-free, and kid-approved.
- Prep Time: 15 minutes
- Cook Time: 0 minutes
- Total Time: 1 hour 15 minutes
- Yield: 12 servings 1x
- Category: Dessert
- Cuisine: American
Ingredients
- 3.4 oz (96 g) instant vanilla pudding mix
- 2 cups (480 ml) whole or 2% milk, room temperature
- 18–20 Oreo cookies, crushed into fine crumbs
- 1 cup (240 ml) whipped topping, store-bought or homemade
- About 12 gummy grad caps
- Optional: ½ cup (75 g) mini chocolate chips or crushed nuts
Instructions
- Crush 18-20 Oreo cookies in a large zip-top bag using a rolling pin or heavy pan into fine crumbs, leaving some chunks for texture. Set aside ½ cup (75 g) for topping.
- In a mixing bowl, whisk together the instant vanilla pudding mix and 2 cups (480 ml) milk for about 2 minutes until thickened and smooth.
- Gently fold 1 cup (240 ml) whipped topping into the pudding mixture to lighten the texture.
- Layer the push pop containers starting with 2 tablespoons (30 ml) of crushed Oreos, then 3 tablespoons (45 ml) of pudding mixture, repeating layers until nearly full, leaving 1 tablespoon (15 ml) space at the top.
- Top each push pop with the reserved Oreo crumbs and place one gummy grad cap on top.
- Refrigerate the assembled push pops for at least 1 hour to let the pudding set and flavors meld.
Notes
If pudding mixture is too thick after folding in whipped topping, stir in 1-2 tablespoons (15-30 ml) milk to loosen. Do not overfill push pops to prevent spills. Chill at least 1 hour before serving. Add gummy caps just before serving for best texture. Can be made a day ahead and stored covered in fridge. For gluten-free, use gluten-free cookies and pudding mix. For dairy-free, use dairy-free pudding mix, plant-based milk, and vegan whipped topping and gummies.
Nutrition
- Serving Size: 1 push pop container
- Calories: 235
- Sugar: 24
- Sodium: 150
- Fat: 11
- Saturated Fat: 5
- Carbohydrates: 34
- Fiber: 1
- Protein: 3.5
Keywords: Oreo dirt cups, push pops, graduation treats, easy dessert, layered pudding dessert, gummy grad caps, party dessert


