Imagine this: sunlight pours through your kitchen windows, jazz is humming quietly in the background, and the bright, citrusy scent of freshly squeezed orange juice mingles with the tantalizing bubbles of chilled champagne. There’s a little fizz in the air—literally. That’s the magic of a perfect mimosa bar. The first time I set up a mimosa bar for a lazy Sunday brunch, I didn’t realize how quickly it would become the centerpiece of our gathering. The vibrant colors of fresh fruit, the clinking of glasses, and just the right amount of sparkle made everyone stop and smile—that kind of moment where you pause, take it all in, and think, “Yep, this is something special.”
Years ago, when I was knee-high to a grasshopper, brunch meant scrambled eggs and maybe a slice of toast if we were lucky. Somewhere along the way, brunch got a glow-up, and honestly, I couldn’t be happier about it. I stumbled onto the idea of a mimosa bar while trying to recreate a little hotel brunch magic at home. Turns out, it’s dangerously easy, and it brings that “wow” factor without the fuss. My friends still talk about that first mimosa bar—how Aunt Linda kept topping off her glass with more pineapple juice and my cousin tried every single fruit garnish “for science.” (You know what? I can’t blame them.)
This perfect mimosa bar with fresh fruit garnishes isn’t just about fancy drinks—it’s a whole vibe. Whether you’re hosting a bridal shower, Mother’s Day brunch, or just want to brighten up your Pinterest board, this setup screams celebration. It’s become our staple for birthdays, girls’ nights, and anytime we need a little extra sparkle in our lives. After testing and tweaking (in the name of research, of course), I can promise you: this is the mimosa bar you’ll want to bookmark, pin, and revisit again and again. It’s pure, nostalgic comfort with a twist—and honestly, it just feels like a warm hug in a glass.
Why You’ll Love This Recipe
Let’s face it—there are brunches, and then there are brunches with a mimosa bar. I’ve set up more brunch spreads than I can count, and nothing gets the party started like a beautiful mimosa station. Over the years, I’ve learned a few things (sometimes the hard way) that make this recipe a true crowd-pleaser and foolproof for hosts of all skill levels.
- Quick & Easy: Comes together in under 20 minutes—no sweat, no stress, just a few simple steps and you’re ready to pour.
- Simple Ingredients: You don’t need a specialty store run. Most of these items are probably in your fridge or fruit bowl right now.
- Perfect for Entertaining: Whether it’s a bridal shower, Mother’s Day, or a surprise brunch for your friends, this mimosa bar feels special but is totally manageable.
- Crowd-Pleaser: I’ve seen picky eaters, adventurous foodies, and even “I don’t drink much” types all get excited to mix and match their own glass. It’s interactive and fun!
- Unbelievably Delicious: The mix of fresh juices and colorful fruit garnishes takes a classic mimosa to new heights—no one can resist going back for seconds (or thirds).
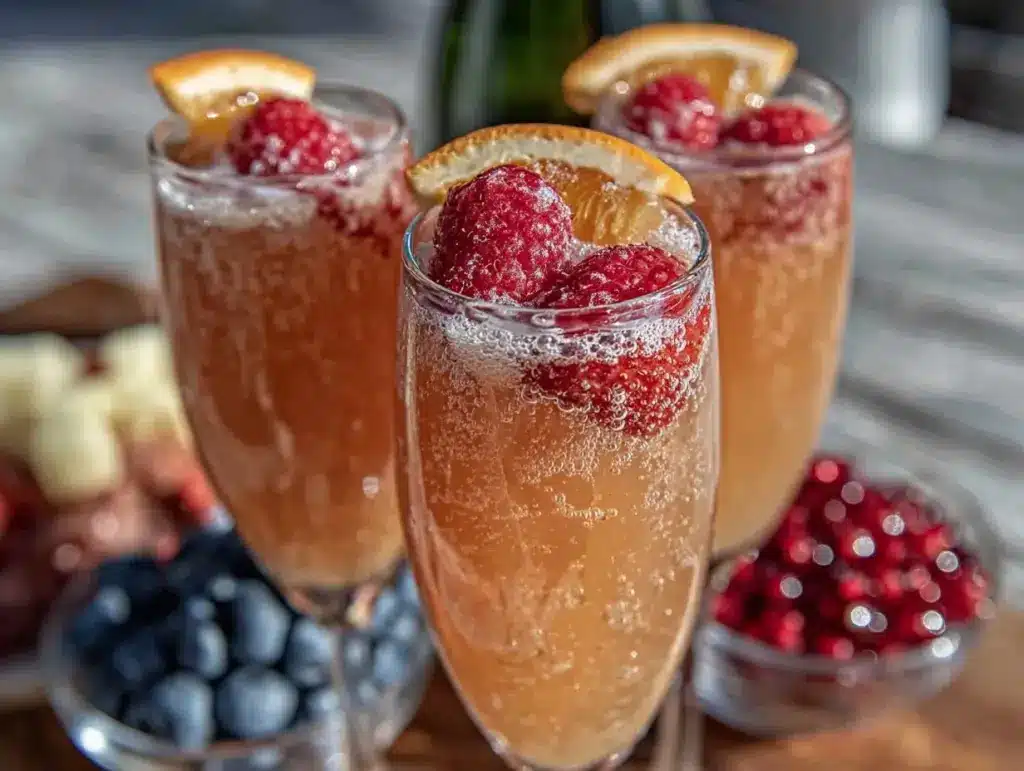
What really sets this perfect mimosa bar apart is the focus on fresh fruit garnishes and real juice. No store-bought “mimosa blend” or syrupy concentrates here. You’ll get that clean, crisp taste and a pop of color in every glass—and you can taste the difference.
I’ve played around with a bunch of combinations (some successful, some a little wild), but this bar is my best version. It’s flexible for any crowd—kids can enjoy the juices and garnishes with sparkling water, while adults can get creative with their bubbly. There’s no wrong way to enjoy it, and that’s the joy. It’s comfort food in a glass—nostalgic, a little fancy, and completely customizable. If you want to impress without stress, or just turn a regular weekend into something memorable, this mimosa bar is for you.
What Ingredients You Will Need
This perfect mimosa bar uses fresh, vibrant ingredients that deliver flavor, color, and that little bit of “wow” with every sip. The beauty is that everything is easy to find, and there’s plenty of room to swap in your favorites or what you have on hand. Here’s what you’ll need:
- Chilled Champagne or Sparkling Wine (Brut or dry Prosecco)—look for a bottle that’s crisp and not too sweet. (You don’t need to splurge on the fancy stuff; I like La Marca Prosecco or Freixenet Cava for great value.)
- Freshly Squeezed Orange Juice—you can’t beat fresh, but high-quality store-bought works in a pinch.
- Other Juice Options:
- Pineapple Juice (adds tropical sweetness)
- Peach Nectar (perfect for a Bellini-style twist)
- Cranberry Juice (for a tart, festive option)
- Mango Juice (for a sunny, golden glass)
- Pomegranate Juice (deep color and tangy flavor)
- Fresh Fruit Garnishes: (the real showstoppers!)
- Strawberries, sliced (classic and always loved)
- Raspberries (pop them right in the glass for a ruby red sparkle)
- Orange Slices (thin wheels look gorgeous on the rim)
- Pineapple Spears (for a vacation vibe)
- Blueberries (they float beautifully in bubbly)
- Kiwi Slices (a fun, green twist)
- Peach Slices (if you can find ripe ones—so juicy!)
- Mint Leaves (for a refreshing herbal note)
- Optional Extras:
- Edible Flowers (if you want to go all out)
- Sugar Rims (run a wedge of citrus around the glass and dip in fine sugar for sparkle)
Ingredient tips: If you’re in a pinch, frozen fruit works great for garnishes (plus, they keep your drink chilled). For the juices, try to pick “not from concentrate” options for the freshest taste. And if you want to go low-sugar, pick light or unsweetened juices. When entertaining, I always grab a few extra oranges and strawberries—those go the fastest! You can also offer a non-alcoholic sparkling cider or seltzer for guests who don’t drink.
Equipment Needed
- Champagne Flutes (or stemless wine glasses)—I love using mismatched thrifted glasses for a quirky look.
- Carafes or Small Pitchers for juices—clear glass looks so pretty and lets everyone see the colors.
- Ice Bucket or Wine Chiller for keeping bubbly cold—I’ve used a simple mixing bowl with ice in a pinch.
- Cutting Board and Sharp Knife for prepping fruit (a paring knife works well for garnishes).
- Small Bowls or Plates for fruit garnishes—ramekins, teacups, or even muffin tins work in a pinch.
- Serving Tongs or Toothpicks for picking up fruit—mini skewers add a special touch.
- Optional: Citrus zester if you want to add a little zest on top, and a small jar for mint leaves.
If you don’t have a wine chiller, wrap a damp towel around your champagne bottle and pop it in the freezer for 15 minutes before serving—works like a charm. For budget-friendly entertaining, dollar store glassware or mason jars have saved me plenty of times. Just remember, the setup doesn’t have to be fancy to be fun!
Preparation Method

-
Chill all beverages ahead of time.
Pop your champagne, sparkling wine, or non-alcoholic bubbly in the fridge overnight (or at least 3 hours before serving). Juices should be cold, too—nothing ruins a mimosa faster than warm juice! -
Prep your fruit garnishes.
Wash all fruit thoroughly, pat dry, and slice as needed:- Strawberries: Remove stems and slice lengthwise.
- Oranges: Cut into thin wheels or half-moons.
- Kiwis: Peel and slice into thin rounds.
- Pineapple: Cut into spears or small wedges (remove the tough core).
- Raspberries, blueberries: Leave whole.
- Peach: Slice thinly if using.
Tip: Prep fruit up to 4 hours ahead and keep covered in the fridge so it stays fresh.
-
Set up your mimosa bar.
On a counter or table, line up carafes of each juice with small label cards (if you’re feeling fancy). Arrange bowls of fruit garnishes, a small jar of mint, and any edible flowers. Place champagne or sparkling wine in an ice bucket for easy pouring. -
Prepare glasses.
Set out champagne flutes or glasses. If you’re doing sugar rims, run a wedge of orange or lemon around the rim and dip in fine sugar, then let dry for a minute. -
Mix your mimosa!
For the classic ratio, fill each glass 1/2 to 2/3 full with sparkling wine (about 3 oz/90 mL), then top with 1 to 2 oz (30–60 mL) juice of choice. Gently stir.- Warning: Pour the bubbly first to reduce foam and prevent overflow.
Sensory cue: You want to see those bubbles dancing and hear a soft fizz.
-
Add your fruit garnish.
Let guests add their favorite garnishes—berries, citrus wheels, pineapple, mint, or anything that catches their eye. No wrong way to do it! -
Enjoy!
Encourage everyone to mix and match. If you have kids or non-drinkers, sparkling water or ginger ale makes a lovely substitute.
Personal tip: I like to set up the bar on a tray or cutting board—it makes cleanup a breeze and looks pulled together. And don’t be afraid to let the kids help assemble the garnishes (just keep the bubbly out of reach!).
Cooking Tips & Techniques
Over many brunches (and a few sticky mishaps), I’ve picked up some tricks for a foolproof mimosa bar. Here’s what I wish someone had told me sooner:
- Keep everything cold: Warm juice and flat bubbly are a letdown. If you forget to chill the wine, just add frozen fruit to the glass for instant chill and a pop of color.
- Don’t overfill glasses: Mimosas fizz up quickly! Pour slowly and leave enough room for guests to add fruit and stir.
- Pre-slice garnishes: Do it before your guests arrive. I once tried to slice strawberries last minute and missed half the conversation!
- Offer variety: People love choices. At least 2–3 juice options and 3–5 fruit garnishes are perfect for a small group. For bigger crowds, go wild with more colors and flavors.
- Use clear containers: The more colors, the better the Instagram shots (just speaking from experience).
- Refill as needed: Keep backup bottles and fruit in the fridge to replenish. Nothing like running out of orange juice right when the party’s getting good!
- Clean as you go: Sparkling wine can get sticky. A quick wipe with a damp cloth now and then keeps things tidy.
- Make it interactive: A sign with mixing suggestions (“Try pineapple juice + mango + mint!”) inspires guests to get creative.
And a quick caution: Champagne bottles can be tricky to open (trust me, I’ve sent more than one cork flying across the kitchen). Hold the bottle at a 45-degree angle, twist the bottle (not the cork), and ease it out slowly for a gentle “pop” instead of a rocket launch. Above all, have fun with it—mimosas are meant to be playful and easygoing!
Variations & Adaptations
The best thing about a mimosa bar is that you can mix it up for any crowd or occasion. Here are some of my favorite ways to customize:
- Dietary Adaptations: For a non-alcoholic version, swap the bubbly for sparkling apple cider or club soda. Works great for kids, expecting moms, or anyone skipping alcohol.
- Seasonal Twists: In winter, add blood orange juice and pomegranate arils for a festive look. Summer? Try watermelon juice with basil or fresh mango puree. In autumn, pear nectar with a cinnamon stick is surprisingly good!
- Flavor Boosts: Add a splash of elderflower liqueur for adults, or use coconut water instead of juice for a lighter, tropical mimosa. You can also use flavored sparkling wines for a fun twist.
- Allergen Swaps: If you have citrus allergies in the group, apple or grape juice are tasty alternatives. For stone fruit allergies, stick with berries and melon.
- Personal Favorite: My go-to is peach nectar with a few raspberries and a mint sprig. Tastes like summer in a glass!
Don’t be afraid to get creative. Sometimes the best combinations happen when you’re just using up what’s in the fridge. (I once made a “kiwi-berry” mimosa by accident, and it’s been a staple ever since!)
Serving & Storage Suggestions
Mimosas are best served ice cold and freshly mixed. Here’s how to keep everything tasting and looking its best:
- Serving: Serve mimosas immediately after mixing so the bubbles stay lively. Set up your bar on a pretty tray with a few fresh flowers for a picture-perfect presentation. Champagne flutes look elegant, but any stemmed glass works.
- Pairings: Mimosas pair beautifully with quiche, fresh pastries, fruit salad, or savory brunch casseroles. I love adding a cheese board for an extra touch.
- Storing Juices & Garnishes: Prep and chill juices and garnishes up to 24 hours ahead. Store sliced fruit in airtight containers with a damp paper towel to keep them fresh.
- Storing Leftover Bubbly: If you have leftover champagne (rare, but it happens!), seal with a wine stopper and refrigerate for up to 2 days. It’ll be less bubbly but still tasty.
- Reheating: No need to reheat—but if your bubbly gets warm, just add more ice or frozen fruit before serving.
- Flavor Development: Sliced fruit can soak up flavors if stored together—sometimes a happy accident! Just keep strong flavors (like mint) separate until serving.
Nutritional Information & Benefits
A classic mimosa (about 5 oz/150 mL) averages 90–120 calories, depending on juice and bubbly. Using fresh juice provides a boost of vitamin C, antioxidants, and a little fiber from fruit garnishes. Opting for lower-sugar juices or sparkling water keeps it even lighter. Most mimosas are gluten-free and can be adapted for vegan or low-carb diets by choosing suitable juices and alcohol.
Potential allergens: Watch for citrus or berry sensitivities. If using edible flowers, check that they’re food-safe (not all flowers are edible!).
My wellness take? Mimosas are a treat, but using real fruit and juice means you’re getting a little nutrition with your celebration. Just remember: moderation is key. Brunch is about joy and togetherness—not counting every calorie.
Conclusion
This perfect mimosa bar with fresh fruit garnishes is more than just a brunch idea—it’s an invitation to celebrate, connect, and create memories. With its playful setup and customizable flavors, it’s sure to become your go-to for holidays, birthdays, or whenever you need a little extra sparkle in your day.
I love this recipe because it brings people together, lets everyone get creative, and always sparks laughter (and maybe a few new favorite combos). Don’t be afraid to make it your own—swap in your favorite juices, try wild garnishes, or keep it classic. The possibilities are endless, and honestly, that’s the fun of it all.
So why not give it a try for your next brunch? I’d love to hear your favorite mimosa combos, garnishes, or any fun twists you add. Leave a comment, share a photo, or pin this for your next get-together. Cheers to bubbly moments and beautiful gatherings—here’s to your perfect mimosa bar!
FAQs
How much champagne do I need for a mimosa bar?
Plan on one 750 mL (25 oz) bottle of champagne or sparkling wine for every 5–6 guests if everyone has one mimosa. For bigger brunches, grab a couple of bottles—mimosas go fast!
What’s the best non-alcoholic substitute for champagne in mimosas?
Sparkling apple cider, club soda, or non-alcoholic sparkling wines all work great. They keep the bubbles but skip the alcohol—perfect for kids or anyone skipping booze.
Can I use store-bought juice for my mimosa bar?
Absolutely! Fresh-squeezed tastes best, but high-quality, not-from-concentrate store-bought juice is a great shortcut. Just make sure it’s well-chilled before serving.
What are the best fruits for garnishing mimosas?
Strawberries, raspberries, orange slices, blueberries, pineapple, peach, and kiwi are all great choices. Mint leaves or edible flowers add a special touch, too.
How far in advance can I prep the mimosa bar?
You can prep juices and slice fruit up to one day ahead. Store everything in airtight containers in the fridge. Set up the bar just before guests arrive to keep it fresh and festive.
Pin This Recipe!
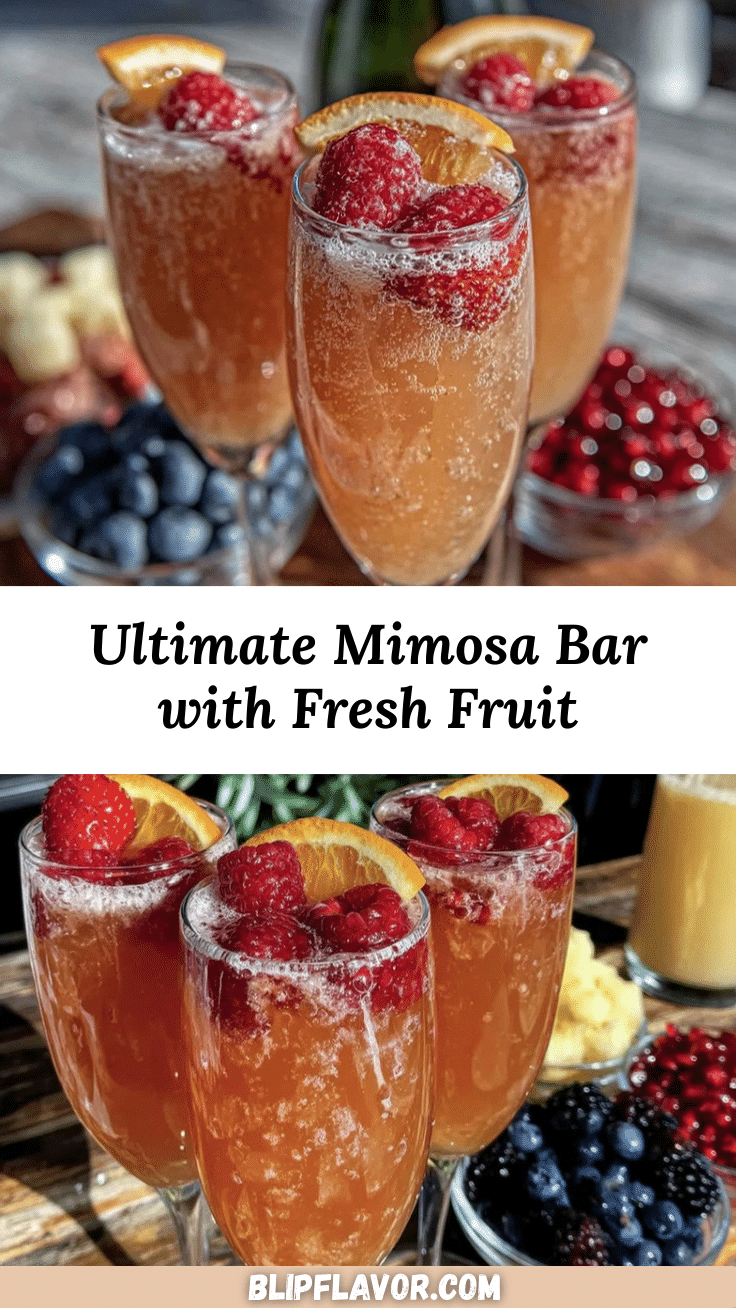
Perfect Mimosa Bar Ideas: 7 Easy Fresh Fruit Garnishes for Brunch

Create a vibrant mimosa bar for brunch with chilled bubbly, fresh juices, and a variety of colorful fruit garnishes. This interactive setup is perfect for celebrations and lets guests mix and match their favorite flavors.
- Prep Time: 15 minutes
- Cook Time: 0 minutes
- Total Time: 15 minutes
- Yield: 8 servings 1x
- Category: Drinks
- Cuisine: American
Ingredients
- 1–2 bottles chilled Champagne or sparkling wine (Brut or dry Prosecco, 750 mL each)
- 2 cups freshly squeezed orange juice
- 1 cup pineapple juice
- 1 cup peach nectar
- 1 cup cranberry juice
- 1 cup mango juice
- 1 cup pomegranate juice
- 1 cup strawberries, sliced
- 1 cup raspberries
- 1 cup blueberries
- 2 oranges, sliced into wheels
- 1/2 pineapple, cut into spears
- 2 kiwis, peeled and sliced
- 2 peaches, sliced
- 1/2 cup mint leaves
- Edible flowers (optional)
- Fine sugar for glass rims (optional)
Instructions
- Chill all beverages overnight or at least 3 hours before serving. Ensure champagne/sparkling wine and juices are cold.
- Wash all fruit thoroughly, pat dry, and slice as needed: strawberries (remove stems, slice lengthwise), oranges (thin wheels or half-moons), kiwis (peel and slice), pineapple (spears or wedges, remove core), raspberries and blueberries (leave whole), peaches (slice thinly).
- Set up your mimosa bar: arrange carafes of each juice, bowls of fruit garnishes, mint leaves, and edible flowers. Place champagne or sparkling wine in an ice bucket.
- Prepare glasses: set out champagne flutes or stemless wine glasses. For sugar rims, run a wedge of citrus around the rim and dip in fine sugar, then let dry.
- Mix your mimosa: fill each glass 1/2 to 2/3 full with sparkling wine (about 3 oz), then top with 1 to 2 oz juice of choice. Gently stir.
- Add fruit garnish: let guests add their favorite garnishes—berries, citrus wheels, pineapple, mint, or edible flowers.
- Serve immediately and encourage guests to mix and match juices and garnishes. For non-alcoholic options, offer sparkling water or ginger ale.
Notes
Prep fruit up to 4 hours ahead and keep covered in the fridge. Use frozen fruit for garnishes to keep drinks cold. Offer at least 2–3 juice options and 3–5 fruit garnishes for variety. For non-alcoholic mimosas, use sparkling cider or club soda. Always chill beverages well before serving.
Nutrition
- Serving Size: 1 mimosa (about 5 oz
- Calories: 100
- Sugar: 10
- Sodium: 10
- Carbohydrates: 12
- Fiber: 1
Keywords: mimosa bar, brunch drinks, fruit garnishes, champagne cocktails, easy brunch ideas, party drinks, entertaining, mimosa recipe


