Let me tell you, the moment those fluffy red velvet waffles started sizzling on my griddle, the air filled with a warm, inviting aroma that practically begged me to grab a fork right then and there. You know that rich, velvety scent of cocoa mingled with a hint of vanilla and a dash of sweetness? That’s exactly the kind of sensory magic these waffles deliver. The first time I made these, I was instantly hooked—honestly, it was one of those rare mornings where you pause, take a deep breath, and just smile because you know you’re onto something truly special.
Years ago, when I was knee-high to a grasshopper, red velvet was always that fancy cake reserved for celebrations. So, stumbling upon this recipe felt like discovering a secret shortcut to pure, nostalgic comfort—only now, it’s in waffle form, which, let’s face it, makes breakfast way more exciting. I remember testing this recipe on a rainy weekend, hoping to brighten up a gloomy day. My family couldn’t stop sneaking these waffles off the cooling rack (and I can’t really blame them). It soon became a staple for weekend brunches and even holiday mornings.
You know what makes these fluffy red velvet waffles with cream cheese syrup so irresistible? They’re dangerously easy to whip up but deliver that rich, indulgent flavor that feels like a warm hug. Whether you want to impress guests, treat your kids, or just brighten up your Pinterest cookie board with a vibrant red twist, this recipe is your go-to. After testing it a handful of times in the name of research, of course, I guarantee these waffles will become one of your favorites too. So go ahead—bookmark this one!
Why You’ll Love This Recipe
This recipe is truly a gem, combining the classic charm of red velvet with the crispy, airy comfort of waffles. Having made these numerous times, I’ve gathered some key reasons you’ll want to keep this recipe close:
- Quick & Easy: Ready in under 30 minutes, perfect for busy mornings or last-minute brunch plans.
- Simple Ingredients: No need to hunt for obscure items; most are pantry staples you probably already own.
- Perfect for Special Occasions: Whether it’s Valentine’s Day, birthdays, or a cozy weekend, these waffles fit right in.
- Crowd-Pleaser: Kids and adults alike rave about the balance of sweet cocoa and the tangy cream cheese syrup.
- Unbelievably Delicious: The fluffy texture combined with that luscious cream cheese drizzle is next-level comfort food.
What really sets this recipe apart is the cream cheese syrup—a little twist that amps up the richness without overpowering the waffles. Instead of a plain syrup, this one adds a smooth, tangy layer that makes each bite feel like a mini celebration. Plus, the batter’s perfectly balanced with just the right amount of cocoa and a splash of buttermilk for that tender crumb. Honestly, it’s comfort food reimagined—faster to make but with all the soul-soothing satisfaction you crave.
What Ingredients You Will Need
This recipe uses simple, wholesome ingredients to deliver that bold red velvet flavor and fluffy waffle texture without any fuss. Most are pantry staples, and you’ll find some easy substitutions along the way.
- All-purpose flour: 2 cups (240g) – the base for that tender waffle structure.
- Cocoa powder: 2 tablespoons (unsweetened) – for that classic red velvet hint.
- Baking powder: 2 teaspoons – to help those waffles rise beautifully.
- Baking soda: 1 teaspoon – adds a little extra lift and lightness.
- Salt: ½ teaspoon – balances sweetness.
- Granulated sugar: ¾ cup (150g) – brings the perfect sweetness.
- Buttermilk: 1 ½ cups (360ml) – adds moisture and tang (can substitute with milk + 1 tbsp vinegar).
- Vegetable oil: ½ cup (120ml) – keeps waffles moist and tender.
- Large eggs: 2, room temperature – for structure and richness.
- Vanilla extract: 2 teaspoons – enhances flavor depth.
- Red food coloring: 2 tablespoons – the signature red hue (gel works best for vibrant color).
- Cream cheese: 6 ounces (170g), softened – the star ingredient in the syrup.
- Powdered sugar: 1 cup (120g) – sweetens the syrup smoothly.
- Milk: ¼ cup (60ml) – thins the syrup to a drizzle-able consistency.
- Butter: 2 tablespoons, melted – adds richness to the syrup.
If you want to make these gluten-free, swap the all-purpose flour for a gluten-free flour blend I trust, like Bob’s Red Mill 1-to-1. For dairy-free, use coconut or almond milk in place of buttermilk and substitute cream cheese with a dairy-free cream cheese alternative. I always recommend using a good quality cocoa powder like Hershey’s for the best flavor punch.
Equipment Needed
- Waffle iron: Essential for cooking the waffles; a Belgian waffle maker works wonderfully for a thick, fluffy texture.
- Mixing bowls: One large for dry ingredients, one medium for wet ingredients.
- Whisk and spatula: For blending ingredients smoothly without overmixing.
- Measuring cups and spoons: Accurate measurements make all the difference.
- Hand mixer or stand mixer: Optional, but helpful for whipping the cream cheese syrup to a silky finish.
If you don’t have a waffle iron, a griddle or non-stick skillet can suffice, but you won’t get that signature waffle shape and texture. For budget-friendly options, simple electric waffle makers from brands like Black+Decker work great. Just remember to clean your waffle maker promptly to keep it in tip-top shape (a little brush after it cools works wonders).
Preparation Method
- Preheat your waffle iron according to the manufacturer’s instructions. This usually takes about 5-7 minutes, which gives you time to prep the batter.
- Mix dry ingredients: In a large bowl, sift together 2 cups (240g) all-purpose flour, 2 tablespoons unsweetened cocoa powder, 2 teaspoons baking powder, 1 teaspoon baking soda, and ½ teaspoon salt. This ensures even distribution and a light texture.
- Combine sugar and wet ingredients: In a separate bowl, whisk ¾ cup (150g) granulated sugar with 1 ½ cups (360ml) buttermilk, ½ cup (120ml) vegetable oil, 2 large eggs (room temperature), 2 teaspoons vanilla extract, and 2 tablespoons red food coloring until smooth and well incorporated.
- Make the batter: Slowly pour the wet mixture into the dry ingredients, folding gently with a spatula. Don’t overmix—lumps are okay! Overworking the batter can make waffles tough instead of fluffy.
- Cook the waffles: Lightly grease the waffle iron if needed (I like using a spray or brushing with a bit of melted butter). Pour about ¾ cup (180ml) batter onto the center, close the lid, and cook for 4-5 minutes or until the waffles are crisp on the outside but tender inside. You’ll know they’re done when the steam stops and the waffle easily lifts away.
- Prepare the cream cheese syrup: While waffles cook, beat 6 ounces (170g) softened cream cheese with 1 cup (120g) powdered sugar, ¼ cup (60ml) milk, and 2 tablespoons melted butter until smooth and pourable. Adjust milk as needed for drizzling consistency.
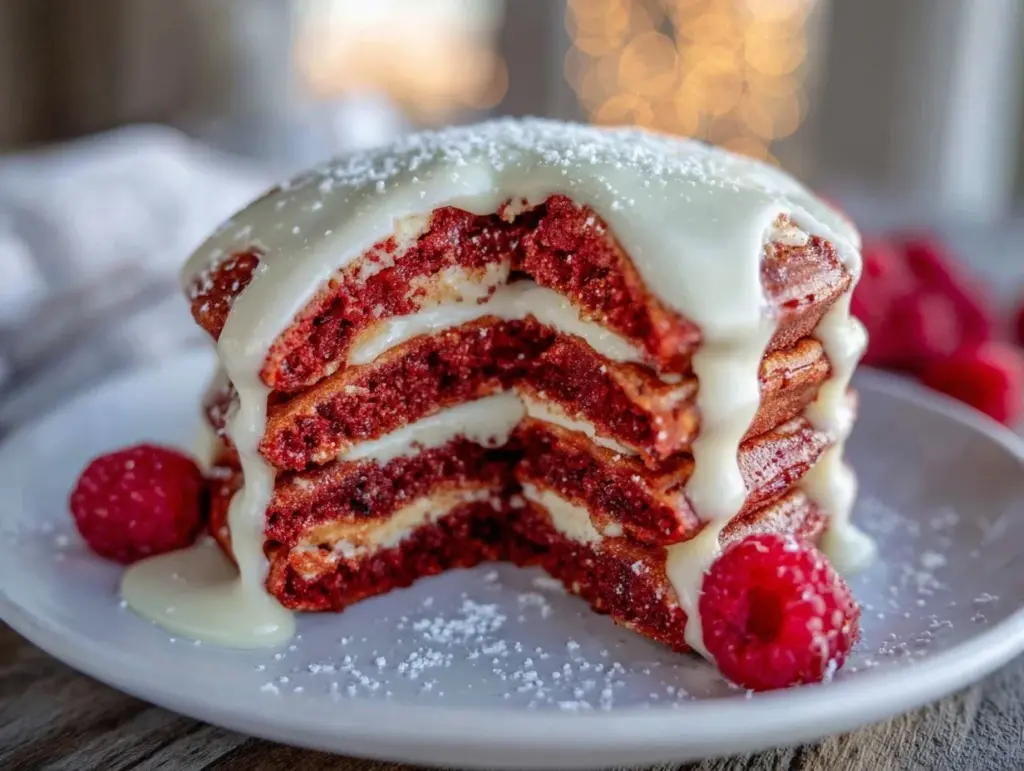
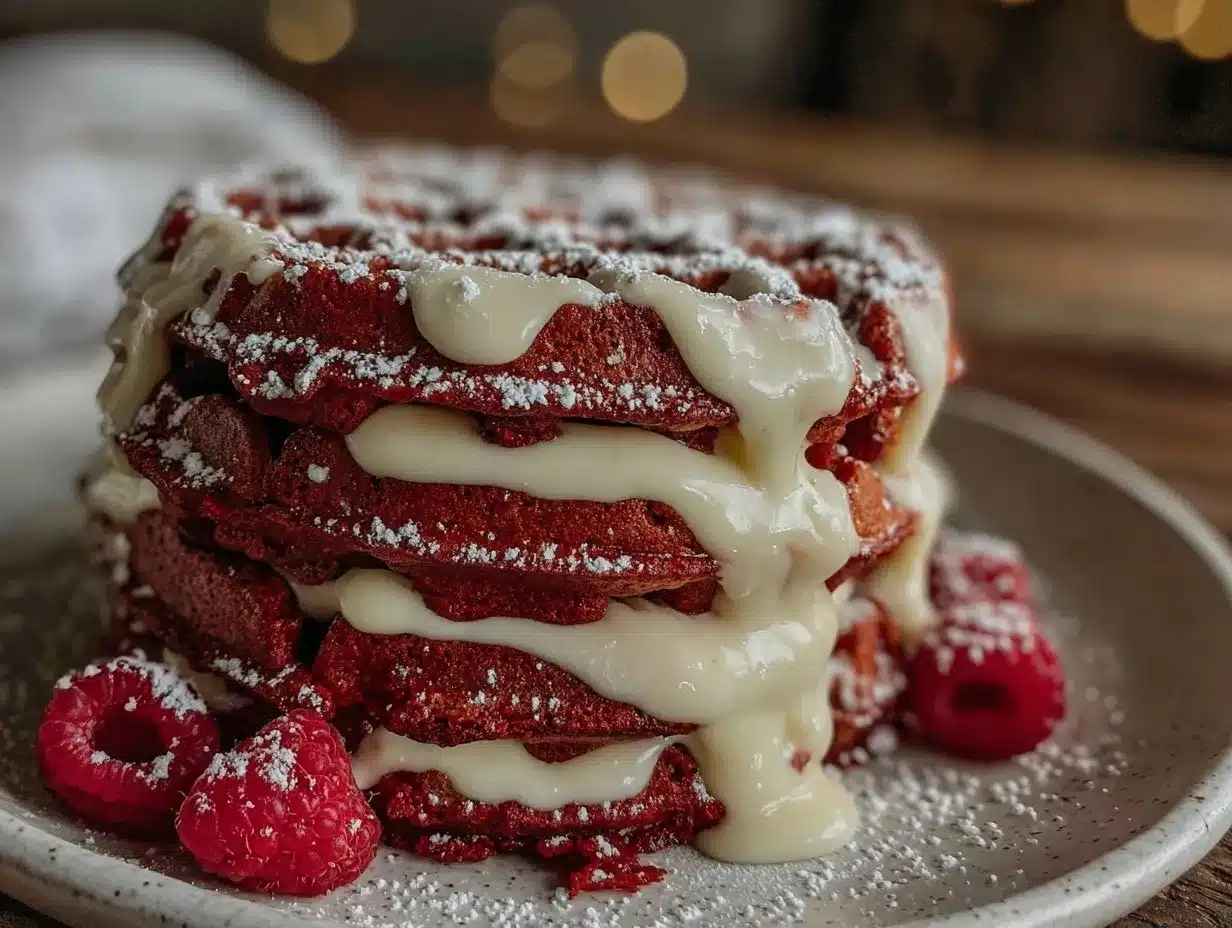
- Serve immediately: Stack waffles on plates and generously drizzle with cream cheese syrup. Add a sprinkle of powdered sugar or fresh berries if you want to get fancy!
If your batter feels too thick, add a splash more buttermilk. Conversely, if too runny, a touch more flour will help. Keep cooked waffles warm in a 200°F (90°C) oven while you finish the batch to keep them crisp and delicious.
Cooking Tips & Techniques
There are a few tricks I’ve picked up after some trial and error that really make a difference with these red velvet waffles. First, don’t skip the buttermilk—it’s the secret behind that tender crumb and mild tang. If you don’t have buttermilk, mixing 1 ½ cups milk with 1 ½ tablespoons vinegar or lemon juice and letting it sit for 5 minutes works just fine.
When mixing the batter, less is more: stir just until combined. Overmixing activates gluten and makes waffles chewy, which nobody wants. Also, preheat your waffle iron thoroughly for crispy edges. If you struggle with waffles sticking, a light brush of oil or non-stick spray before cooking usually fixes that.
On my first few tries, I rushed the cooking time, resulting in soggy waffles—patience is key here. Wait until the steam slows and the waffle is golden red. Multitasking is your friend: whip up the syrup while waffles cook to save time. Lastly, for extra fluffiness, separate eggs and beat the whites to soft peaks before folding them into the batter—though this is optional if you want a quicker version.
Variations & Adaptations
Want to switch things up or accommodate dietary needs? Here are some of my favorite ways to play with this recipe:
- Chocolate Lovers’ Twist: Add mini chocolate chips to the batter for extra bursts of melty goodness.
- Gluten-Free Version: Use a gluten-free 1-to-1 baking flour blend. The texture stays surprisingly fluffy!
- Dairy-Free Adaptation: Swap buttermilk with almond or oat milk plus a splash of apple cider vinegar. Use a dairy-free cream cheese for the syrup.
- Seasonal Flair: Stir in fresh raspberries or blueberries for a fruity surprise. It adds a nice tart contrast to the sweet waffles.
- Spiced Red Velvet: Add a pinch of cinnamon and nutmeg to the dry ingredients for a cozy, warm flavor profile.
Personally, I once made these with a coconut cream cheese syrup to impress a friend who’s vegan. It was a hit! Don’t hesitate to experiment and make this recipe your own.
Serving & Storage Suggestions
These fluffy red velvet waffles with cream cheese syrup are best served hot off the griddle for that perfect contrast between crisp edges and soft centers. I like to pile them high, drizzle the luscious cream cheese syrup generously, and garnish with fresh strawberries or a dusting of powdered sugar for a pretty presentation.
They pair wonderfully with a cup of freshly brewed coffee or a glass of cold milk—ideal for a brunch that feels indulgent yet cozy. If you’re serving a crowd, keep cooked waffles warm in a 200°F (90°C) oven on a wire rack to maintain crispness without getting soggy.
To store leftovers, wrap waffles tightly in plastic wrap or place in an airtight container and refrigerate for up to 3 days. Reheat in a toaster or oven to bring back the crispiness—microwaving works but can make them a bit soft. You can also freeze cooked waffles individually in a zip-top bag for up to 2 months. Just pop them straight into the toaster when you want a quick treat.
Flavors actually deepen after resting, so if you make the syrup ahead, it tastes even better the next day. Just give it a quick stir before drizzling.
Nutritional Information & Benefits
Each serving of these red velvet waffles (one waffle with cream cheese syrup) roughly contains:
| Calories | Fat | Carbohydrates | Protein |
|---|---|---|---|
| 350 | 18g | 40g | 7g |
Thanks to buttermilk and eggs, these waffles provide a decent amount of protein and calcium. Cocoa powder adds antioxidants, while the cream cheese syrup offers a dose of healthy fats from butter and cream cheese. If you want a lighter option, reduce the sugar slightly or swap some all-purpose flour for whole wheat for extra fiber.
This recipe is naturally gluten-containing but easy to adapt for gluten-free diets. It does contain dairy and eggs, so keep that in mind if you have allergies. Overall, it’s a delicious treat that fits well into balanced eating—perfect for special mornings when you want something comforting but not overly indulgent.
Conclusion
Fluffy red velvet waffles with cream cheese syrup are a total game-changer for breakfast or brunch. They combine the nostalgic flavors of red velvet cake with the fun, crispy comfort of waffles, plus a tangy, creamy drizzle that makes every bite memorable. You’ll want to make these your own by tweaking ingredients or adding your favorite toppings.
I love this recipe because it brings joy and a little bit of celebration to everyday mornings. Honestly, it’s become a family favorite and a go-to for gifting brunch goodies. So give it a try, and don’t forget to share your twists or questions below—I’m always excited to hear how you make these waffles your own!
Happy cooking, and here’s to many delicious mornings ahead!
Frequently Asked Questions
Can I make the batter ahead of time?
Yes! You can prepare the batter up to 24 hours in advance and keep it covered in the fridge. Just give it a gentle stir before cooking.
What if I don’t have red food coloring?
You can skip it, but the waffles won’t have that iconic red hue. For a natural alternative, try beet juice, but adjust the amount as it can affect batter consistency.
Can I use a regular syrup instead of cream cheese syrup?
Of course! Maple syrup works well, but the cream cheese syrup adds a special tangy richness that pairs perfectly with red velvet flavor.
How do I prevent waffles from sticking to the waffle iron?
Make sure your waffle iron is well preheated and lightly greased with oil or non-stick spray before each batch. Avoid using butter as it can burn and cause sticking.
Are these waffles suitable for meal prepping?
Absolutely! They freeze well and reheat nicely in the toaster, making them perfect for quick breakfasts throughout the week.
Pin This Recipe!

Fluffy Red Velvet Waffles with Cream Cheese Syrup
These fluffy red velvet waffles combine the nostalgic flavors of red velvet cake with a crispy, airy waffle texture, topped with a luscious cream cheese syrup for a tangy, indulgent breakfast treat.
- Prep Time: 10 minutes
- Cook Time: 15 minutes
- Total Time: 25 minutes
- Yield: 6 servings 1x
- Category: Breakfast
- Cuisine: American
Ingredients
- 2 cups (240g) all-purpose flour
- 2 tablespoons unsweetened cocoa powder
- 2 teaspoons baking powder
- 1 teaspoon baking soda
- ½ teaspoon salt
- ¾ cup (150g) granulated sugar
- 1 ½ cups (360ml) buttermilk (or milk + 1 tbsp vinegar)
- ½ cup (120ml) vegetable oil
- 2 large eggs, room temperature
- 2 teaspoons vanilla extract
- 2 tablespoons red food coloring (gel preferred)
- 6 ounces (170g) cream cheese, softened
- 1 cup (120g) powdered sugar
- ¼ cup (60ml) milk
- 2 tablespoons butter, melted
Instructions
- Preheat your waffle iron according to the manufacturer’s instructions (about 5-7 minutes).
- In a large bowl, sift together all-purpose flour, cocoa powder, baking powder, baking soda, and salt.
- In a separate bowl, whisk granulated sugar with buttermilk, vegetable oil, eggs, vanilla extract, and red food coloring until smooth.
- Slowly pour the wet mixture into the dry ingredients, folding gently with a spatula. Do not overmix; lumps are okay.
- Lightly grease the waffle iron if needed. Pour about ¾ cup (180ml) batter onto the center, close the lid, and cook for 4-5 minutes or until waffles are crisp outside and tender inside.
- While waffles cook, beat softened cream cheese with powdered sugar, milk, and melted butter until smooth and pourable. Adjust milk for desired consistency.
- Serve waffles immediately, stacked and generously drizzled with cream cheese syrup. Optionally, garnish with powdered sugar or fresh berries.
Notes
Do not overmix the batter to keep waffles fluffy. Preheat waffle iron thoroughly for crispy edges. Keep cooked waffles warm in a 200°F (90°C) oven on a wire rack to maintain crispness. For extra fluffiness, optionally beat egg whites separately and fold in gently.
Nutrition
- Serving Size: 1 waffle with cream
- Calories: 350
- Sugar: 20
- Sodium: 350
- Fat: 18
- Saturated Fat: 6
- Carbohydrates: 40
- Fiber: 2
- Protein: 7
Keywords: red velvet waffles, cream cheese syrup, breakfast waffles, fluffy waffles, easy waffle recipe, brunch recipe, red velvet dessert