
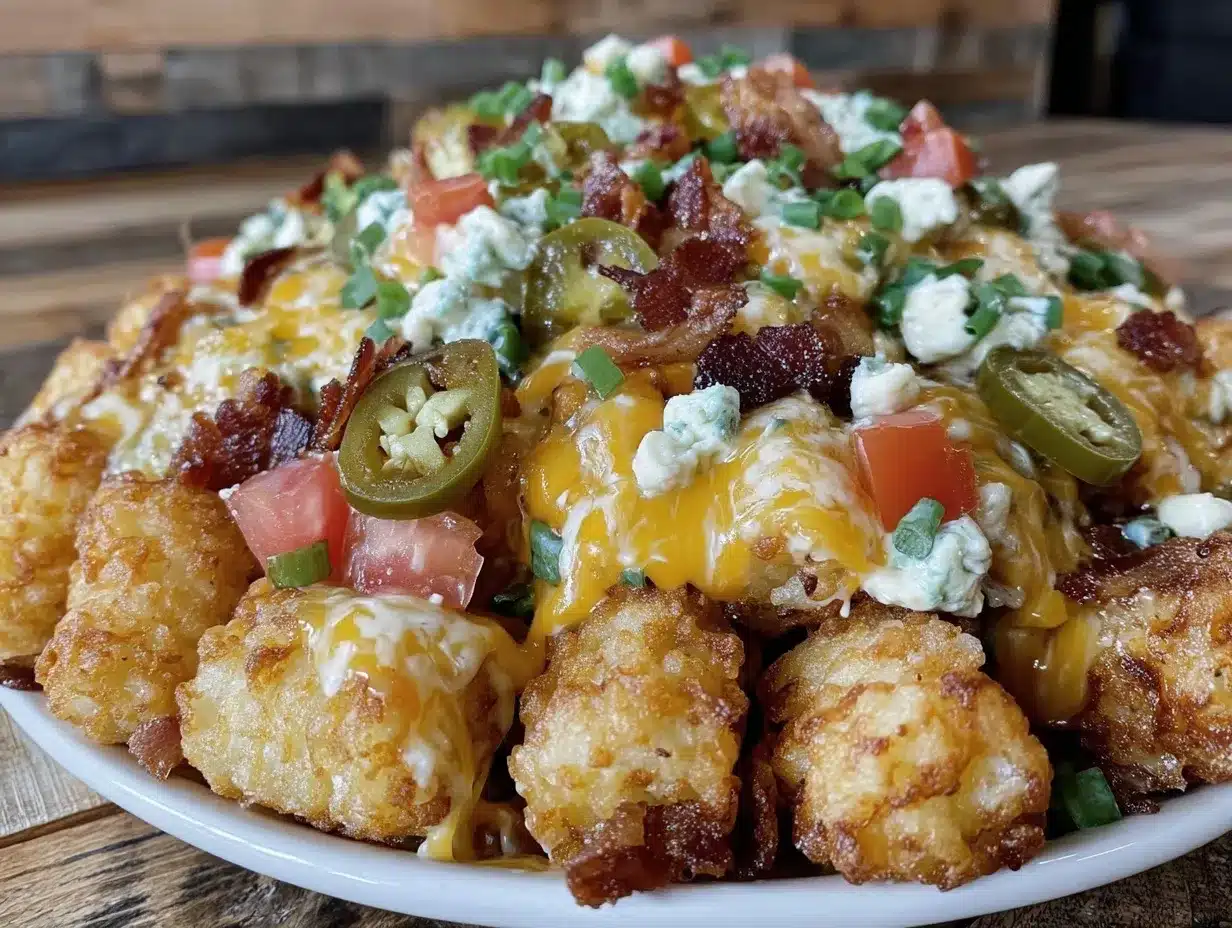
Imagine this: You open your oven, and a wave of sizzling, savory goodness hits you right in the face. The golden tater tots are crackling, the cheddar is bubbling into gooey rivers, and the smoky aroma of bacon drifts through the kitchen like a promise you know is about to be kept. That’s what you get with these Crispy Loaded Tater Tot Nachos with Bacon & Cheddar—the kind of snack that makes you do a little happy dance right there at the oven door.
The first time I threw together this recipe was during a rainy Saturday, stuck inside with a fridge full of odds and ends. I was searching for something fun—something that would perk up a gloomy afternoon and maybe use up that bag of tater tots I’d stashed in the freezer. The moment I took my first bite, I was instantly hooked. It was the kind of moment where you pause, take a deep breath, and just smile because you know you’re onto something truly special. I swear, if comfort food had a mascot, it would be this pile of crispy, cheesy, bacon-loaded goodness.
Growing up, my grandma would always whip up cheesy potatoes for Sunday supper—layers of spuds, cheddar, and a sprinkle of bacon. This recipe? It’s like that, but with way less work and way more crunch. When I set a tray of these nachos down in front of my family, folks start circling like hungry hawks. My husband can’t stop sneaking bites before I’ve even drizzled on the sour cream, and the kids? Let’s just say, if there’s a better way to get them to the table, I haven’t found it yet.
Honestly, these Crispy Loaded Tater Tot Nachos are dangerously easy. They’re perfect for game day munching, last-minute parties, or brightening up your Pinterest board with mouthwatering snack ideas. Trust me, I’ve “tested” this recipe more times than I care to admit (all in the name of research, of course). Over time, it’s become our go-to for movie nights, potlucks, and those evenings when you just need a little extra joy. There’s a reason friends ask for this recipe, and why you’re going to want to bookmark this one—it’s the kind of snack that feels like a warm hug, every single time.
Why You’ll Love This Recipe
Let’s face it—everyone needs a go-to snack that delivers big flavor with minimal fuss. I’ve made these Crispy Loaded Tater Tot Nachos with Bacon & Cheddar dozens of times, so you’re getting all my best tips, family seal of approval, and a recipe that’s been adjusted for perfection. Here’s why you’ll be coming back for seconds (and thirds):
- Quick & Easy: Ready in under 35 minutes, so you can whip up a crave-worthy snack without hovering over the stove all day.
- Simple Ingredients: Nothing fancy here—you probably have everything on hand. Frozen tater tots, bacon, cheddar cheese, green onions, and a few toppings are all you need.
- Perfect for Sharing: Whether it’s a party appetizer, movie night munchies, or a fun dinner for the kids, these nachos fit any occasion. They’re a Pinterest favorite for a reason!
- Crowd-Pleaser: I kid you not—these fly off the tray at every gathering. Kids, adults, picky eaters, you name it. Everyone loves the crispy tots, melty cheese, and smoky bacon combo.
- Unbelievably Delicious: The crunch of the tots, that ultra-cheesy pull, the salty bacon, and the fresh pop of green onions. It’s next-level comfort food that never disappoints.
What sets this recipe apart? For starters, I bake the tater tots longer than the package says, flipping them halfway for maximum crispiness. There’s nothing worse than a soggy tot, and honestly, you deserve better! I layer the cheese and bacon so every bite gets that perfect mix of flavors. Plus, the customizable toppings mean you can make your nachos as loaded (or as simple) as you like.
This isn’t just another tater tot recipe—it’s the one you’ll make when you want to impress guests without breaking a sweat. It’s the snack you’ll crave after a long day, or when you need that nostalgic comfort without a ton of effort. And trust me, the first bite? It’s the kind that makes you close your eyes and savor. Whether you’re a nacho fan or just love crispy, cheesy snacks, you’re about to find a new favorite.
What Ingredients You Will Need
This recipe uses simple, wholesome ingredients to deliver bold flavor and that irresistible, crunchy-cheesy texture. Most of these are pantry or fridge staples, making this snack a breeze to throw together any time. Here’s what you’ll need for the ultimate Crispy Loaded Tater Tot Nachos with Bacon & Cheddar:
- Frozen tater tots (32 oz / 900 g): The base of our nachos—look for your favorite brand. I like Ore-Ida for their consistent crispiness.
- Thick-cut bacon (6 slices / about 150 g): Cooked and crumbled. Thick-cut holds up well and brings extra flavor. Turkey bacon works if you prefer.
- Shredded cheddar cheese (2 cups / 200 g): Sharp or medium cheddar melts beautifully. Try a mix of cheddar and Monterey Jack for extra gooeyness.
- Green onions (3, thinly sliced): For a fresh pop of color and flavor.
- Sour cream (for topping): Adds creamy tang. Use Greek yogurt for a lighter option.
- Diced tomatoes (1 medium, optional): Adds juiciness and a fresh bite.
- Jalapeños (sliced, optional): For a little heat. Fresh or pickled both work.
- Fresh cilantro (chopped, optional): For garnish and a hint of brightness.
- Salt & black pepper (to taste): Sprinkle a little over the tots before baking to amp up the flavor.
Ingredient tips & swaps:
- Use vegan cheese and skip the bacon for a dairy-free, vegetarian version. Coconut bacon is a good alt!
- Smoked gouda or pepper jack cheese brings a bolder flavor if you want to switch things up.
- Chopped red onion or scallions work in place of green onion.
- For gluten-free, double-check your tater tot brand—most are, but it’s good to be sure.
- Don’t have fresh tomatoes? A spoonful of your favorite salsa adds a fun twist.
Honestly, you can pile on whatever you love—think leftover chili, black beans, or even a fried egg for brunch nachos. The beauty is, this recipe is as flexible as your cravings!
Equipment Needed
You don’t need any fancy gadgets for this recipe—just reliable, everyday kitchen tools. Here’s what you’ll want on hand for your loaded tater tot nachos:
- Baking sheet (or two): A large, rimmed sheet pan works best to spread the tots in a single layer. If you’re doubling the recipe, use two pans.
- Parchment paper or silicone baking mat: Helps with easy cleanup and prevents sticking. If you’re out, a light spray of cooking oil on the sheet works fine.
- Oven-safe spatula or tongs: For flipping the tots and transferring nachos to your platter.
- Sharp knife & cutting board: For slicing bacon, green onions, and any extra toppings.
- Paper towels: To drain bacon after cooking (keeps it crispy).
- Mixing bowls (optional): For tossing tots with seasoning or prepping toppings.
If you don’t have a baking sheet, a casserole dish will do in a pinch, though you may not get quite as much crispiness. I’ve tried both, and honestly, the sheet pan wins for even browning. For a budget-friendly kitchen, dollar store sheet pans get the job done—just avoid stacking tots too thickly.
Pro tip: If you make nachos a lot, a reusable silicone baking mat is a game-changer. It’s super easy to clean and keeps food from sticking—even gooey cheese peels right off. But parchment works just as well for these loaded tater tot nachos.
Preparation Method
-
Preheat and Prep: Preheat your oven to 425°F (220°C). Line a large rimmed baking sheet with parchment paper or a silicone mat for easy cleanup.
Tip: Let the oven get fully hot before adding the tots. This helps them crisp up nicely. -
Spread the Tots: Arrange 32 oz (900 g) of frozen tater tots in a single, even layer on your baking sheet. Don’t overcrowd; space means more crispiness!
Sprinkle lightly with salt and black pepper. -
Bake Until Golden: Bake the tater tots for 25 minutes, flipping them halfway (at about the 12-13 minute mark). They should be sizzling and deep golden brown.
If your oven runs hot, check at 20 minutes. If you want ultra-crispy tots, leave them in for an extra 3–5 minutes. -
Cook the Bacon: While the tots bake, cook 6 slices (about 150 g) of thick-cut bacon in a skillet over medium heat until crispy—about 8–10 minutes. Drain on paper towels and crumble once cool.
Shortcut: Use pre-cooked bacon crumbles if you’re in a hurry. - Prep Toppings: While everything bakes, shred 2 cups (200 g) of cheddar cheese, thinly slice 3 green onions, dice 1 medium tomato, slice jalapeños, and chop cilantro if using.
-
Assemble the Nachos: Once the tots are golden and crispy, push them close together on the baking sheet (using a spatula). Sprinkle evenly with half the cheese, then half the bacon. Repeat with the rest of the cheese and bacon.
Layering tip: This double layering means every tot gets that cheesy, bacon-y goodness. -
Melt & Finish: Return the pan to the oven for 5–7 minutes, just until the cheese is melted and bubbling.
If you like crispy cheese edges, broil for 1–2 minutes (watch closely—cheese burns fast!). -
Add Toppings: Remove from the oven. Immediately scatter green onions, tomatoes, jalapeños, and cilantro over the hot nachos.
Let the nachos cool for 2–3 minutes. This helps keep the cheese from sliding right off when you serve. -
Serve & Enjoy: Dollop with sour cream (or Greek yogurt) and dig in while everything’s hot and melty!
Tip: For parties, serve nachos straight on the sheet pan for easy sharing.
Troubleshooting: If your tots aren’t crispy, bake longer before adding toppings. If the cheese isn’t melting, tent with foil for a few minutes. And if things get messy, just remember—that’s part of the fun!
Cooking Tips & Techniques
Here are my tried-and-tested tips for the crunchiest, cheesiest tater tot nachos ever (learned from a few flops along the way):
- Crispiness is Key: Bake the tots longer than the package says. Flipping them halfway means every side gets golden. Soggy tots are the enemy of good nachos—don’t rush this step.
- Don’t Overload the Pan: Crowding traps steam and makes for limp tots. If doubling the recipe, use two pans. Trust me—it’s worth the extra dish.
- Layer Like a Pro: Sprinkle cheese and bacon in two layers, not just on top. This makes every bite cheesy, not just the first one.
- Broil, But Don’t Burn: A quick broil gives crispy cheese edges but can go from perfect to burnt in seconds. I’ve ruined a batch or two before (don’t walk away during broiling!).
- Keep Bacon Separate: Cook bacon separately and add before the final cheese melt. Baking it with the tots can make it soggy.
- Pre-Prep Toppings: Have all your toppings ready to go before the cheese comes out of the oven. Nachos wait for no one!
- Multitask Smart: Cook bacon and prep toppings while tots bake. You’ll have everything done at the same time—no scrambling.
- Cheese Matters: Shred your own cheese if you can—pre-shredded has anti-caking agents that don’t melt as well. But in a pinch, bagged cheese works too.
- Serving Hack: For parties, serve on the sheet pan lined with parchment. It keeps things casual and cleanup is a breeze.
Don’t stress if things aren’t “perfect”—nachos are meant to be a little messy and a lot of fun. Every batch gets easier, and honestly, even the flops get eaten around here!
Variations & Adaptations
Loaded tater tot nachos are practically begging for customization. Here are my favorite ways to change things up (and a few allergy-friendly options):
- Vegetarian: Skip the bacon and add black beans or grilled corn for hearty, meatless nachos. A sprinkle of smoked paprika brings that bacon-y flavor.
- Spicy Southwest: Swap cheddar for pepper jack, add pickled jalapeños, and drizzle with chipotle crema or hot sauce. For a real kick, toss tots with taco seasoning before baking.
- Breakfast-Style: Top finished nachos with scrambled eggs, cooked breakfast sausage, and a drizzle of salsa. A brunch crowd-pleaser!
- BBQ Chicken: Shred cooked chicken, toss with BBQ sauce, and use in place of bacon. Tastes like a tailgate in nacho form.
- Gluten-Free & Dairy-Free: Most tater tots are gluten-free, but check your brand. Use vegan cheese and coconut bacon for a dairy-free, plant-based version.
- Low-Carb: Replace tots with roasted cauliflower florets (roast until crispy, follow the same cheese/bacon method). Not quite the same, but surprisingly tasty!
One of my favorite spins: I’ve layered on leftover chili and topped with diced red onion and avocado—total comfort food, with extra veggies snuck in. Feel free to get creative based on what’s in your fridge!
Serving & Storage Suggestions
These nachos are at their best piping hot, with gooey cheese and crispy tots. Here’s how to serve and store your Crispy Loaded Tater Tot Nachos with Bacon & Cheddar for maximum enjoyment:
- Serving: Serve straight from the oven, either on the baking sheet for casual gatherings or transfer to a large platter for fancier vibes. Scatter toppings right before serving so everything stays fresh.
- Garnishes: Add extra sliced green onions, pickled jalapeños, salsa, guacamole, or a drizzle of ranch dressing. Pair with an ice-cold beer, lemonade, or sparkling water to round things out.
- Storing Leftovers: Cool completely, then transfer to an airtight container. Store in the fridge for up to 2 days. Tots will soften but can be crisped up again.
- Reheating: Bake leftovers in a 400°F (200°C) oven for 8–10 minutes, or air fry for 5 minutes, to restore crispness. Microwave works in a pinch but won’t bring back the crunch.
- Make-Ahead: Bake tots and prep toppings in advance, then assemble and bake with cheese just before serving. Great for parties or meal prep.
Honestly, these nachos rarely last long enough for leftovers at my house, but they’re just as tasty on day two with a quick reheat. The flavors even deepen a bit overnight—if you can resist eating them all at once!
Nutritional Information & Benefits
Here’s an estimate per serving (based on 6 generous portions):
- Calories: Approx. 400–450 kcal
- Protein: 12–15 g
- Carbohydrates: 36–40 g
- Fat: 25–29 g
- Sodium: 750–900 mg
Key benefits: Tater tots provide quick energy, while cheddar cheese and bacon offer protein and satisfying fat. Green onions, tomatoes, and jalapeños add antioxidants and a little vitamin C boost. If you use Greek yogurt instead of sour cream, you’ll sneak in extra protein, too.
Dietary notes: Easily made gluten-free (check your tots!) and adaptable for vegetarians or dairy-free diets with a couple swaps. Contains dairy and pork (bacon), so adjust for allergies as needed.
From a wellness perspective, this recipe is pure comfort food—meant to be enjoyed, shared, and savored. Pair with a big salad or veggie side for a more balanced meal if you like!
Conclusion
If you’re after a snack that brings the crunch, the cheese pull, and all the comforting, nostalgic flavors you crave, these Crispy Loaded Tater Tot Nachos with Bacon & Cheddar are it. They’re fuss-free, endlessly customizable, and always a hit—whether you’re hosting game day or just need a little pick-me-up after a long week.
Don’t be afraid to make these nachos your own! Try different cheeses, play with toppings, or turn them into a meal with chili or pulled chicken. The best recipes are the ones that fit your mood (and your fridge contents), and this one’s a keeper for sure.
Honestly, I love this recipe because it brings folks together—everyone grabs a tot, piles on their favorite extras, and digs in. If you give this a try, drop a comment below, share your twists, or snap a pic for Pinterest. I can’t wait to see how you make these tater tot nachos your own. Happy snacking, friends!
FAQs About Crispy Loaded Tater Tot Nachos with Bacon & Cheddar
Can I make these tater tot nachos ahead of time?
You can bake the tater tots and prep all your toppings in advance. Just assemble with cheese and bacon, then finish baking right before serving so everything stays crispy and melty. Perfect for party prep!
How do I keep the tater tots crispy?
Don’t overcrowd the pan, and bake the tots longer than the package directs—flipping halfway through. Adding cheese and bacon only at the end helps keep the tots from getting soggy.
What’s the best way to reheat leftovers?
Oven or air fryer is your friend here! Bake at 400°F (200°C) for 8–10 minutes, or air fry for 5 minutes. This brings back the crunch. Microwave will heat them up but won’t keep them crispy.
Can I make these nachos vegetarian or gluten-free?
Absolutely! Skip the bacon (or use coconut bacon or black beans) for vegetarian nachos. Most tater tots are gluten-free, but check the package to be sure. Use dairy-free cheese for a vegan version.
What other toppings go well on tater tot nachos?
Try black beans, salsa, avocado, pickled jalapeños, shredded chicken, or even a fried egg for brunch. Honestly, the sky’s the limit—use whatever you love or have on hand!
Pin This Recipe!
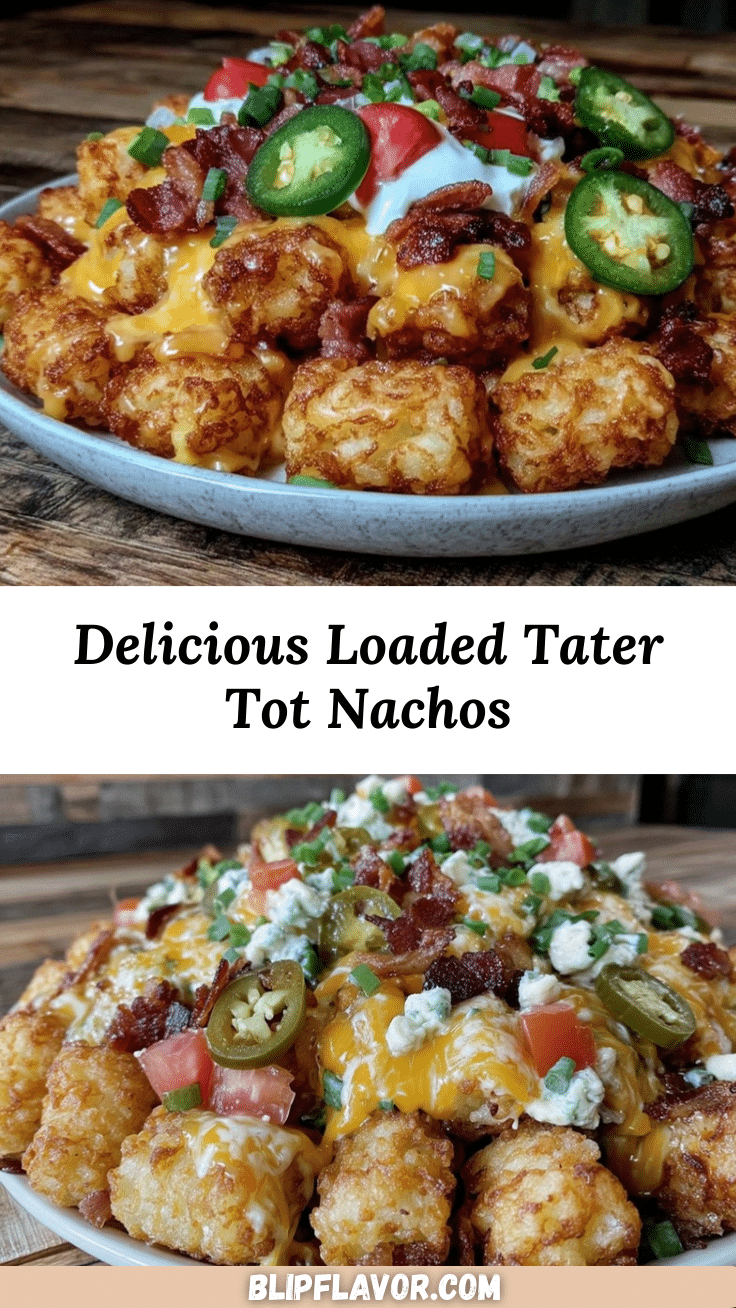
Crispy Loaded Tater Tot Nachos with Bacon & Cheddar

These crispy loaded tater tot nachos are the ultimate comfort snack, featuring golden tater tots topped with gooey cheddar cheese, smoky bacon, and fresh toppings. Perfect for game day, parties, or a fun family dinner, they’re quick to make and endlessly customizable.
- Prep Time: 10 minutes
- Cook Time: 30 minutes
- Total Time: 40 minutes
- Yield: 6 servings 1x
- Category: Appetizer
- Cuisine: American
Ingredients
- 32 oz frozen tater tots (about 900 g)
- 6 slices thick-cut bacon (about 5–6 oz), cooked and crumbled
- 2 cups shredded cheddar cheese (about 8 oz)
- 3 green onions, thinly sliced
- Sour cream, for topping
- 1 medium tomato, diced (optional)
- Jalapeños, sliced (optional)
- Fresh cilantro, chopped (optional)
- Salt and black pepper, to taste
Instructions
- Preheat oven to 425°F (220°C). Line a large rimmed baking sheet with parchment paper or a silicone mat.
- Arrange frozen tater tots in a single, even layer on the baking sheet. Sprinkle lightly with salt and black pepper.
- Bake tater tots for 25 minutes, flipping halfway through. Bake until deep golden and crispy. For extra crispiness, bake an additional 3–5 minutes if desired.
- While tots bake, cook bacon in a skillet over medium heat until crispy (about 8–10 minutes). Drain on paper towels and crumble.
- Prep toppings: shred cheddar cheese, slice green onions, dice tomato, slice jalapeños, and chop cilantro if using.
- Once tots are crispy, push them close together on the baking sheet. Sprinkle evenly with half the cheese and half the bacon. Repeat with remaining cheese and bacon.
- Return pan to oven for 5–7 minutes, until cheese is melted and bubbling. For crispy cheese edges, broil for 1–2 minutes, watching closely.
- Remove from oven and immediately scatter green onions, tomatoes, jalapeños, and cilantro over the nachos.
- Let cool for 2–3 minutes, then dollop with sour cream and serve hot.
Notes
Bake tater tots longer than package directions for extra crispiness. Layer cheese and bacon in two stages for maximum flavor. For vegetarian, skip bacon and add black beans or corn. Most tater tots are gluten-free, but check your brand. Serve straight from the sheet pan for easy sharing. Customize toppings as desired.
Nutrition
- Serving Size: About 1/6 of the rec
- Calories: 400450
- Sugar: 24
- Sodium: 750900
- Fat: 2529
- Saturated Fat: 1215
- Carbohydrates: 3640
- Fiber: 34
- Protein: 1215
Keywords: tater tot nachos, bacon cheddar nachos, loaded tots, party snack, game day appetizer, comfort food, easy nachos, sheet pan nachos


