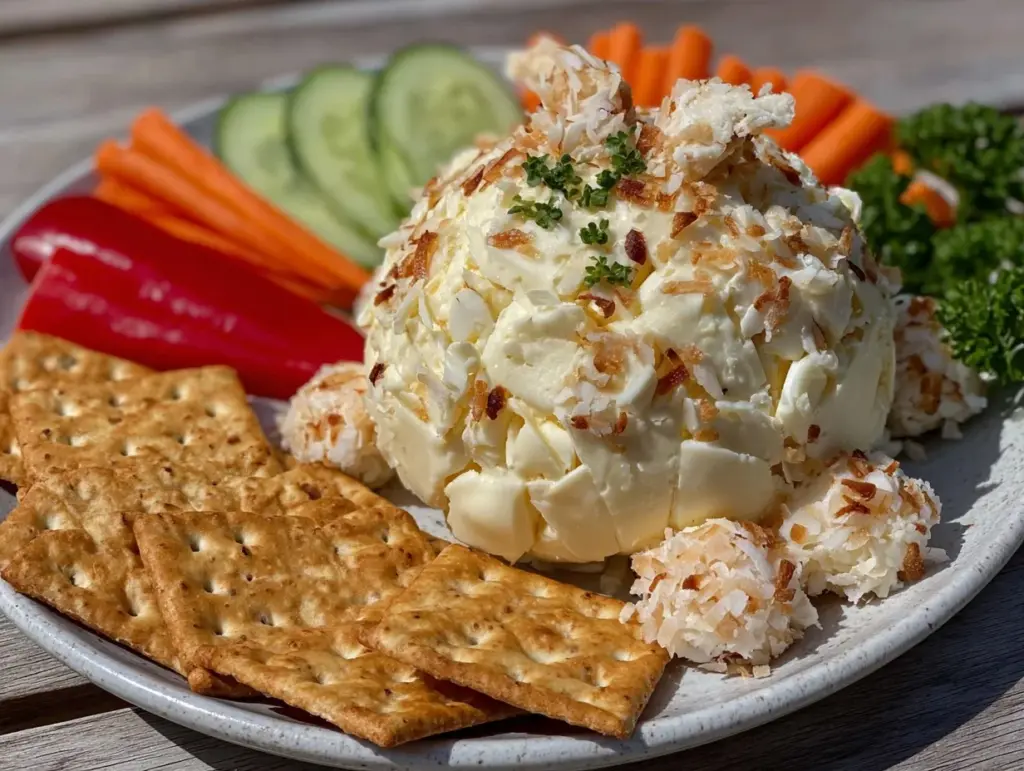
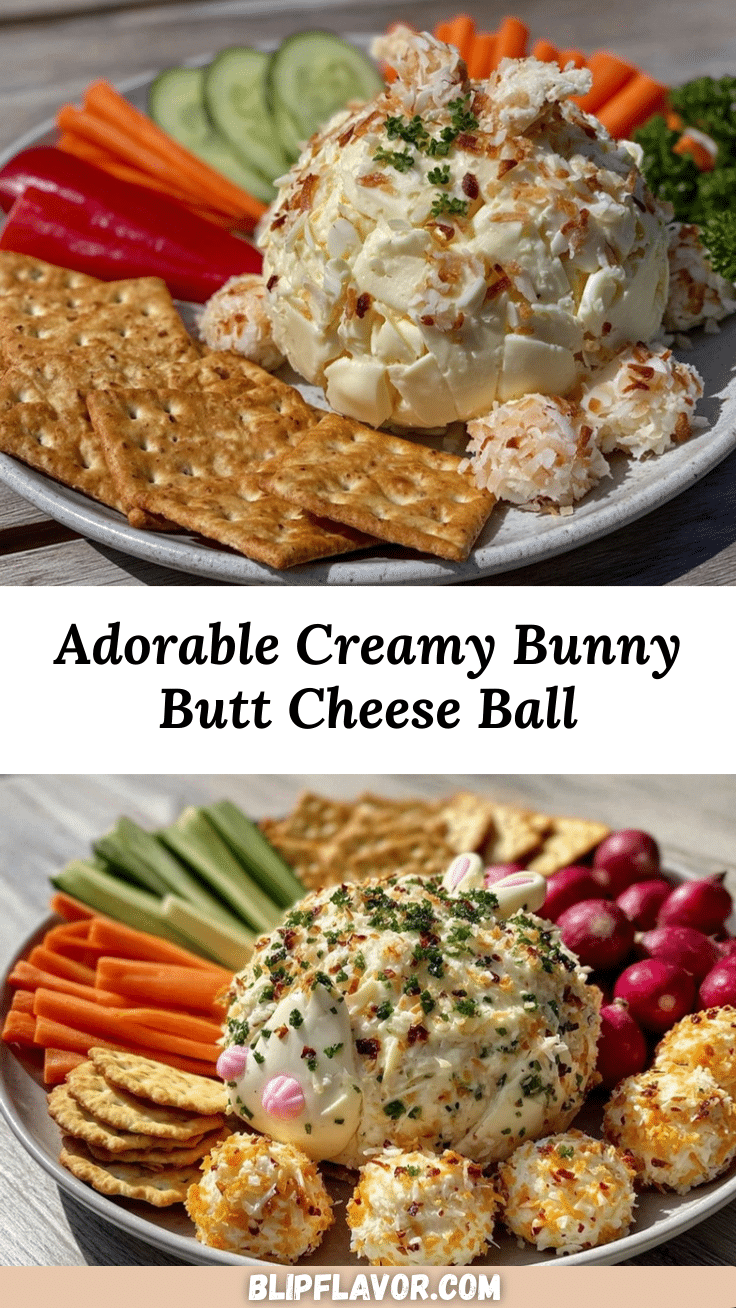
Picture this: the scent of savory cream cheese, sharp cheddar, and a hint of fresh dill mixing together, swirling through your kitchen as you gently form the most whimsical little bunny butt you’ve ever seen. I’m not kidding—when I first sculpted my Creamy Bunny Butt Cheese Ball, I found myself grinning like a kid on Easter morning. The first time I spotted one of these at a spring potluck, I was instantly enchanted by its cuteness (and maybe a little jealous I hadn’t thought of it sooner!).
There’s just something magical about transforming a simple cheese ball into a bunny’s fluffy backside, complete with perky little feet and a cottony tail. I remember the first time I made it for my kids—they gathered around the table, wide-eyed and giggling, as I arranged the veggies and crackers around our bunny. Honestly, I wish I’d discovered this recipe years ago; it’s the kind of showstopper that makes everyone reach for their phones before they dig in. And let’s face it, it’s dangerously easy to make (maybe a little too easy if you ask my waistband).
This Creamy Bunny Butt Cheese Ball has become a staple at our Easter gatherings, and not just because it’s adorable. It’s that perfect blend of creamy, tangy, and fresh, with just enough crunch from the “fur” coating. Whether you’re planning a playful brunch, a classroom party, or simply want to brighten up your Pinterest board, this appetizer brings pure, nostalgic comfort with a dash of whimsy. My family can’t stop sneaking bites off the platter—and honestly, I can’t blame them. After all the “taste testing” (in the name of research, of course), I can say with full confidence: you’re about to make a new holiday tradition. It feels like a warm hug on a cool spring day, and you’re going to want to bookmark this one for years to come.
Why You’ll Love This Creamy Bunny Butt Cheese Ball
After years of hosting Easter brunches and classroom parties, I’ve tested a lot of appetizers. But honestly, this Creamy Bunny Butt Cheese Ball stands out every single time. Here’s why you’re going to love it (and why it’s earned a permanent spot on our family menu):
- Quick & Easy: Comes together in about 20 minutes (plus chilling time), so you’re not stuck in the kitchen all afternoon. Perfect for those last-minute “Mom, don’t forget the party snack!” moments.
- Simple Ingredients: No fancy shopping list required—you probably have most of what you need already. Cream cheese, cheddar, a few pantry staples, and you’re golden.
- Perfect for Easter: This bunny-themed cheese ball is the ultimate centerpiece for your holiday table. It’s festive, playful, and totally Instagram-worthy (hello, Pinterest fans!).
- Crowd-Pleaser: Kids and adults both light up when they see this adorable appetizer. It’s savory enough for grown-ups, but cute enough to win over the pickiest eaters.
- Unbelievably Delicious: The creamy base, sharp cheddar, and hint of fresh herbs create a flavor combo that’s both classic and crave-worthy. The coconut or mozzarella “fur” adds a fun texture that keeps everyone coming back for more.
What makes this cheese ball different from the rest? I blend together whipped cream cheese with a little Greek yogurt for extra tang and fluffiness. Then, I add a dash of Worcestershire and fresh dill for depth, plus a pinch of garlic powder (because, let’s be honest, garlic makes everything better). Instead of just rolling the whole thing in nuts, I use shredded mozzarella (or coconut flakes for an extra fluffy look) to mimic bunny fur—so cute and allergy-friendly!
This isn’t just a cheese ball; it’s a moment of joy on your table. It’s the kind of recipe that makes you pause, close your eyes, and smile after that first bite. Whether you’re impressing guests, delighting your kids, or just treating yourself, this bunny butt is all about turning a simple snack into something truly memorable. There’s a reason it’s become a family legend at our house—give it a try and you’ll see what I mean!
What Ingredients You Will Need
This Creamy Bunny Butt Cheese Ball uses simple, everyday ingredients but delivers a burst of flavor (and cuteness!) that’ll have everyone asking for seconds. Here’s what you’ll need to bring your bunny to life:
- For the Cheese Ball:
- 2 blocks (16 oz/450g) cream cheese, softened (full-fat or light work—just make sure it’s soft!)
- 1 cup (115g) sharp cheddar cheese, finely shredded (I like Tillamook for the best flavor)
- 1/3 cup (75g) plain Greek yogurt (adds tang and extra creaminess; sour cream works too)
- 2 tablespoons fresh dill, minced (or 1 tsp dried dill if you’re in a pinch)
- 1 tablespoon Worcestershire sauce (deepens the flavor)
- 1/2 teaspoon garlic powder (for that savory punch)
- 1/4 teaspoon onion powder
- Pinch of salt and black pepper, to taste
- For Bunny Decoration:
- 1 cup (80g) shredded mozzarella or sweetened coconut flakes (for the “fur”)
- 2-3 baby carrots (for bunny feet and toes)
- 6-8 round crackers or oval-shaped crackers (for the bunny feet—you can use Ritz, Town House, or even cucumber slices)
- 1 cherry tomato or grape tomato (optional, for a cute nose or tail)
- Fresh parsley or lettuce leaves (for “grass” around your bunny—totally optional, but so cute for presentation!)
- For Serving:
- Assorted crackers, pretzels, veggie sticks, or pita chips
Ingredient Tips: If you want to make it nut-free, stick with mozzarella or coconut for the outside instead of nuts. For a gluten-free version, serve with gluten-free crackers and double-check your Worcestershire sauce (some brands contain wheat). If you’re feeling adventurous, swap in chopped chives or parsley for the dill, or add a pinch of smoked paprika for a little kick. The beauty of this recipe is how forgiving it is—seriously, you can’t mess it up!
Substitution Guidance: No Greek yogurt? Use sour cream or even a little mayonnaise in a pinch. Vegan? Use dairy-free cream cheese and cheddar alternatives, and plant-based yogurt. If you want less tang, skip the yogurt and add an extra splash of Worcestershire or a squeeze of fresh lemon juice.
Equipment Needed
- Medium Mixing Bowl: For blending all your cheesy ingredients together. If you’re doubling the recipe, go with a large bowl.
- Hand Mixer or Sturdy Spatula: A hand mixer makes the cheese ball super smooth and creamy, but a wooden spoon works if you put in a little elbow grease. I’ve done it both ways—sometimes old-school is just as good!
- Plastic Wrap: For shaping and chilling your cheese ball. I find it’s easier to mold the bunny butt with plastic wrap in place (less mess, too).
- Small Paring Knife: For cutting carrots into feet and toes. Kitchen scissors work for snipping herbs and trimming coconut, too.
- Serving Plate or Small Platter: A round plate works best for arranging your bunny and all the dippers. If you don’t have a fancy platter, a cutting board or baking sheet covered with parchment paper is just fine.
- Optional: Food Processor for shredding cheese (totally not necessary, but it makes life easier if you’re starting with a block of cheddar).
Equipment Tips: Don’t worry if you don’t have a hand mixer—just let your cream cheese come fully to room temp and mix by hand. For clean-up, I always rinse my hand mixer beaters right away before things get sticky. If you’re using coconut flakes for the fur, a quick pulse in the food processor makes them extra fluffy.
Budget-friendly tip: Dollar store mixing bowls and basic knives work just fine for this recipe—no need to splurge on tools you’ll only use once in a while!
How to Make a Creamy Bunny Butt Cheese Ball

- Mix the Cheese Ball Base: In a medium mixing bowl, combine 16 oz (450g) softened cream cheese, 1 cup (115g) shredded sharp cheddar, 1/3 cup (75g) Greek yogurt, 2 tablespoons minced dill, 1 tablespoon Worcestershire sauce, 1/2 teaspoon garlic powder, 1/4 teaspoon onion powder, and a pinch of salt and pepper. Beat with a hand mixer on medium speed for about 2 minutes, or until everything is well blended and fluffy. (If you’re using a spoon, stir vigorously for 3-4 minutes. You want it smooth with no big lumps.)
- Taste and Tweak: Give your cheese mix a little taste. Does it need more salt, pepper, or dill? Adjust as needed. (I usually add a bit more dill because I can never get enough!)
- Shape the Bunny Butt: Lay a large piece of plastic wrap on your counter. Scoop about 2/3 of the cheese mixture into the center and shape into a round ball for the bunny’s “butt” (about the size of a grapefruit). Place on your serving platter. Use the remaining cheese mixture to form two small oval shapes for the feet, and one tiny round ball for the tail. (If it gets sticky, wet your hands just a bit or chill the mixture for 10 minutes first.)
- Chill for Best Results: Wrap the shaped cheese in plastic wrap and refrigerate for at least 1 hour, or up to overnight. This helps it hold its shape. (If you’re in a rush, 30 minutes in the freezer does the trick.)
- Coat with “Fur”: Unwrap the chilled cheese ball and roll it gently in 1 cup (80g) shredded mozzarella or coconut flakes, pressing lightly so it sticks. For the feet and tail, do the same. Arrange the bunny butt, feet, and tail on your serving platter.
- Add the Bunny Details: Slice baby carrots into thin ovals for bunny foot pads and tiny circles for toes. Press these onto each bunny foot. For extra cuteness, add a cherry tomato or a little ball of coconut for the tail. Arrange fresh parsley or lettuce leaves around the bunny for a grassy effect.
- Serve with Dippers: Surround your bunny with assorted crackers, pretzels, and veggie sticks. I like to tuck a few radishes or cucumber slices around the platter for a pop of color.
- Troubleshooting: If your cheese ball feels too soft, pop it back in the fridge for 20 minutes. If it’s too firm, let it sit at room temp for 10 minutes before shaping. If the “fur” isn’t sticking, press gently and use clean, damp hands.
Personal Tips: I like to prep the cheese ball base a day ahead and decorate just before serving. If you’re making it with kids, let them help with the bunny feet—it’s messy fun and makes for great memories!
Cooking Tips & Techniques
- Let the Cream Cheese Soften Completely: Seriously, don’t rush this step. If your cream cheese is cold, you’ll get lumps and it’ll be tough to mix (I learned this the hard way more than once). Leave it on the counter for at least an hour.
- Use Fresh Herbs If You Can: Fresh dill or chives add a burst of flavor that dried can’t quite match. If you only have dried, use a bit less since the flavor is more concentrated.
- Don’t Skip the Chill: If you try to shape or decorate the cheese ball while it’s warm, it’ll be a sticky mess. I set a timer so I don’t get impatient (trust me, it’s worth the wait).
- Customize the “Fur”: If you’re using coconut, unsweetened works best for savory flavor. For mozzarella, use fine shreds for the fluffiest look.
- Make-Ahead Magic: This cheese ball actually tastes better after a few hours in the fridge—the flavors meld together and it becomes easier to shape. I often make the base a day ahead and assemble the bunny right before serving.
- Multitasking Tip: While your cheese ball chills, prep your platter with greens, slice your veggies, and set out the crackers so assembly is a breeze.
- Consistency Is Key: Use full-fat cream cheese for the best texture (light cream cheese works, but the ball may be a tad softer). If you want a firmer ball, add an extra 1/4 cup (25g) shredded cheddar.
- Fixing Mistakes: If your bunny feet crack or crumble, just patch them together with a little extra cheese mixture—nobody will ever know (and honestly, the fun is in the imperfections!).
I’ll admit, I’ve had a bunny butt collapse once because I tried to shape it before chilling. Lesson learned! Patience (and a little plastic wrap) is your friend.
Variations & Adaptations
- Dietary Swaps: For a gluten-free Bunny Butt Cheese Ball, serve with gluten-free crackers and double-check your Worcestershire sauce (some contain gluten). For a nut-free version, use mozzarella or coconut flakes for the coating instead of crushed nuts.
- Flavor Twists: Add a pinch of smoked paprika or a dash of hot sauce to the cheese mixture for a little kick. Stir in chopped green onions, sun-dried tomatoes, or roasted red peppers for a Mediterranean twist.
- Vegan Version: Use dairy-free cream cheese and cheddar shreds, and substitute coconut yogurt for Greek yogurt. I’ve tried this with Kite Hill and Daiya brands—worked like a charm!
- Seasonal Touches: In spring, tuck a few edible flowers around your bunny. For a Christmas party, shape the cheese ball into a snowman instead!
- Kid-Friendly Customization: Let little ones help decorate the bunny feet with sliced olives, radishes, or even pepperoni “pads.” The more playful, the better.
Personally, I love adding a little diced jalapeño to the mix for a grown-up, spicy bunny (just keep it away from the kiddos). This recipe is super forgiving—swap, add, or tweak to your heart’s content!
Serving & Storage Suggestions
For the cutest presentation, serve your Creamy Bunny Butt Cheese Ball chilled, arranged on a round platter with a bed of fresh parsley or lettuce leaves. I like to surround the bunny with a rainbow of crackers, pretzel rods, carrot sticks, and cucumber slices. Honestly, it’s almost too cute to eat (almost!).
Pair with a crisp white wine or a sparkling lemonade for a perfect spring combo. If you’re hosting brunch, it sits beautifully next to deviled eggs, veggie trays, or a fresh fruit salad.
To store leftovers, cover the cheese ball tightly with plastic wrap and keep in the refrigerator for up to 3 days. The flavors will deepen, and the “fur” may soften a bit, but it’s still delicious. If you need to freeze the cheese ball base (before decorating), wrap in two layers of plastic and freeze for up to 1 month. Thaw overnight in the fridge, then shape, coat, and serve as usual.
For reheating (if you want a slightly softer texture), place at room temperature for 20-30 minutes before serving. The flavor actually gets better on day two—just remember to freshen up the “fur” coating if it looks soggy.
Nutritional Information & Benefits
This Creamy Bunny Butt Cheese Ball is a treat, but it’s got a few sneaky nutrition perks too! Each serving (about 2 tablespoons) contains roughly 120 calories, 9g fat, 6g protein, and 2g carbs (not counting dippers). You’ll get a nice dose of calcium from the cream cheese and cheddar, plus a little probiotic boost if you use Greek yogurt.
The recipe is naturally gluten-free if you choose your dippers wisely and use gluten-free Worcestershire sauce. If you use coconut flakes instead of mozzarella, it’s also nut-free. Dairy content is high, so it’s not suitable for those with dairy allergies (vegan swaps above work well though!).
From a wellness perspective, I love that you can pack in fresh herbs and serve with lots of veggie dippers. It’s a “sometimes” food, but hey, celebrations are all about balance—and the smiles you’ll get are totally worth it.
Conclusion
Whether you’re a cheese ball newbie or a seasoned Easter party host, this Creamy Bunny Butt Cheese Ball is the kind of recipe that brings pure joy to any table. It’s irresistibly cute, crowd-pleasingly creamy, and so simple you’ll wonder why you ever bought those store-bought platters. I love how customizable it is—swap in your favorite flavors, let the kids help decorate, and make it your own tradition.
So go ahead—give this bunny butt a try! Snap a photo for your Pinterest board, share the laughs with your family, and don’t forget to drop a comment below with your own creative twists. This is one recipe you’ll want to revisit every spring, and I can’t wait to hear how it turns out for you. Happy Easter, happy snacking, and may your table (and your heart) be full!
FAQs about Creamy Bunny Butt Cheese Ball
Can I make this cheese ball ahead of time?
Absolutely! You can make the cheese ball base up to 2 days in advance—just shape and decorate right before serving for the freshest look.
What can I use instead of coconut for the “fur”?
Try shredded mozzarella cheese, finely grated white cheddar, or even thinly sliced radishes for a fun twist. All of them look adorable!
Is this recipe safe for nut allergies?
Yes, as long as you use coconut or mozzarella for the coating and check your other ingredients. No nuts are required!
How do I keep the cheese ball from sticking to my hands?
Wet your hands lightly with cold water or chill the cheese mixture before shaping. Plastic wrap helps too!
Can I freeze the finished cheese ball?
You can freeze the base cheese mixture before decorating. Thaw overnight in the fridge, then shape and decorate just before serving for best texture.
Pin This Recipe!
Creamy Bunny Butt Cheese Ball: Easy Easter Appetizer Kids Love

This whimsical cheese ball combines creamy cream cheese, sharp cheddar, fresh dill, and tangy Greek yogurt, shaped into an adorable bunny butt for a festive Easter centerpiece. It’s quick to make, crowd-pleasing, and perfect for kids and adults alike.
- Prep Time: 20 minutes
- Cook Time: 0 minutes
- Total Time: 1 hour 20 minutes (includes chilling)
- Yield: 10-12 servings 1x
- Category: Appetizer
- Cuisine: American
Ingredients
- 2 blocks (16 oz) cream cheese, softened
- 1 cup sharp cheddar cheese, finely shredded
- 1/3 cup plain Greek yogurt (or sour cream)
- 2 tablespoons fresh dill, minced (or 1 teaspoon dried dill)
- 1 tablespoon Worcestershire sauce
- 1/2 teaspoon garlic powder
- 1/4 teaspoon onion powder
- Pinch of salt and black pepper, to taste
- 1 cup shredded mozzarella or sweetened coconut flakes (for the “fur”)
- 2–3 baby carrots (for bunny feet and toes)
- 6–8 round or oval-shaped crackers (for bunny feet)
- 1 cherry tomato or grape tomato (optional, for nose or tail)
- Fresh parsley or lettuce leaves (optional, for “grass”)
- Assorted crackers, pretzels, veggie sticks, or pita chips (for serving)
Instructions
- In a medium mixing bowl, combine softened cream cheese, shredded cheddar, Greek yogurt, dill, Worcestershire sauce, garlic powder, onion powder, salt, and pepper. Beat with a hand mixer for about 2 minutes until well blended and fluffy.
- Taste the mixture and adjust seasoning as needed.
- Lay a large piece of plastic wrap on the counter. Scoop about 2/3 of the cheese mixture into the center and shape into a round ball for the bunny’s butt. Use the remaining mixture to form two small ovals for feet and one tiny ball for the tail.
- Wrap the shaped cheese in plastic wrap and refrigerate for at least 1 hour, or up to overnight. (Or freeze for 30 minutes if in a rush.)
- Unwrap and roll the cheese ball, feet, and tail in shredded mozzarella or coconut flakes to coat. Arrange on a serving platter.
- Slice baby carrots into thin ovals for foot pads and tiny circles for toes. Press onto each bunny foot. Add a cherry tomato or extra coconut for the tail if desired. Arrange parsley or lettuce leaves around the bunny for a grassy effect.
- Surround the bunny with assorted crackers, pretzels, and veggie sticks for dipping.
- If the cheese ball feels too soft, chill again for 20 minutes. If too firm, let sit at room temperature for 10 minutes before shaping. If “fur” isn’t sticking, press gently with damp hands.
Notes
Let cream cheese soften completely for best texture. Use fresh herbs for extra flavor. Chill the cheese ball before shaping and decorating to prevent sticking. For gluten-free, use gluten-free crackers and Worcestershire sauce. Make the base ahead and decorate just before serving. Kids love helping with the bunny feet!
Nutrition
- Serving Size: About 2 tablespoons
- Calories: 120
- Sugar: 1
- Sodium: 220
- Fat: 9
- Saturated Fat: 5
- Carbohydrates: 2
- Protein: 6
Keywords: Easter, cheese ball, bunny butt, appetizer, kid-friendly, party, spring, creamy, cheddar, cream cheese, holiday, nut-free, gluten-free option


