“You’re telling me we can skip the oven and still have a dessert that wows?” That’s exactly what I mumbled when I first tried these Easy No-Bake Strawberry Cheesecake Jars. Honestly, I was a bit skeptical—cheesecake without baking? But there I was, late on a hot summer afternoon with zero desire to heat up my kitchen, craving something sweet and fresh. My pantry had some cream cheese, a box of graham crackers, and a few strawberries sitting pretty in the fridge. It was a last-minute idea born out of pure kitchen laziness that somehow turned into an absolute winner.
The best part? These jars are as much about the experience as the taste. I remember sitting on my porch, the sun dipping low, a cool breeze mingling with the sweet scent of fresh strawberries, and just savoring the creamy, tangy bites layered perfectly with crunchy graham crumbs. It became my go-to treat not just for myself but whenever friends popped over unexpectedly, too—the kind of dessert that feels personal and impressive without demanding a ton of effort.
At first, I thought no-bake desserts were just for the impatient or those avoiding baking due to summer heat, but this recipe proved me wrong. It’s straightforward, forgiving, and seriously satisfying. Every spoonful brings that classic cheesecake flavor, but with a lightness that’s just right for warm weather. I guess what stuck with me the most is how this simple jar of layered goodness made me realize that sometimes, the easiest road leads to the most memorable moments—and desserts.
Why You’ll Love This Recipe
Having tested this recipe multiple times (yeah, I admit—I made it three times last week), I can tell you it’s a keeper. Here’s what makes these Easy No-Bake Strawberry Cheesecake Jars stand out:
- Quick & Easy: Ready in about 15 minutes, perfect for those evenings when you want dessert but not a lengthy baking session.
- Simple Ingredients: You probably have everything in your kitchen already—cream cheese, graham crackers, strawberries, and a few basics.
- Perfect for Summer: No oven heat, just cool, creamy layers with fresh fruit. Great for backyard gatherings or a solo treat on a sunny afternoon.
- Crowd-Pleaser: Friends and family keep asking for the recipe—especially the kids who love the sweet crunch and creamy filling.
- Unbelievably Delicious: The texture is just right—smooth cream cheese filling balanced by crumbly crust and juicy strawberries. Honestly, it’s that kind of comfort food you didn’t know you needed.
What sets this apart from other no-bake cheesecakes is the layering in individual jars—making it feel fancy without fuss. Plus, I’ve found that crushing the graham crackers just right (not too powdery, not too chunky) is key to the perfect texture contrast. And topping with a homemade strawberry compote instead of plain fruit adds a subtle zing that makes this dessert pop.
What Ingredients You Will Need
This recipe uses simple, wholesome ingredients to deliver bold flavor and satisfying texture without the fuss. Most are pantry staples or fresh items that are easy to find, and substitutions are straightforward if you want to customize.
- Graham crackers – finely crushed (I prefer Honey Maid for that perfect balance of sweetness and crunch)
- Unsalted butter – melted (adds richness and helps bind the crust)
- Cream cheese – softened (full-fat gives the creamiest results, but light cream cheese works too)
- Powdered sugar – sifted (for smooth sweetness without grain)
- Vanilla extract – pure, about 1 teaspoon (don’t skimp here—it lifts the flavor)
- Heavy cream – cold, for whipping (or use coconut cream for a dairy-free twist)
- Fresh strawberries – hulled and sliced (in summer, I love swapping some in for frozen berries if strawberries aren’t at their peak)
- Lemon juice – a splash to brighten the strawberry topping
- Optional: a pinch of salt to balance sweetness in the crust
If you’re looking for gluten-free options, almond flour or gluten-free graham crackers can replace the regular ones with excellent results. For dairy-free versions, swapping cream cheese with a plant-based alternative and using coconut cream works surprisingly well.
Equipment Needed
- Mixing bowls: A couple of medium size for crust and filling prep
- Electric mixer or whisk: For whipping the cream and blending the cheesecake filling smoothly (I’ve used both and an electric mixer saves time and effort)
- Measuring cups and spoons: To keep the ingredient ratios spot on
- Spatula: For folding the whipped cream into the cream cheese mixture gently
- Small jars or dessert cups: Mason jars or any small glass containers work perfectly for layering and serving
- Food processor or rolling pin: For crushing graham crackers finely (a rolling pin and ziplock bag works great if you don’t have a processor)
I once tried using a hand blender for the filling but it got a bit too thick and hard to manage, so I recommend a stand or handheld mixer for best texture. Also, make sure your cream cheese is softened to room temperature before mixing to avoid lumps—trust me, it makes a difference!
Preparation Method
- Prepare the crust: In a medium bowl, combine 1 ½ cups (150g) finely crushed graham crackers with 5 tablespoons (70g) melted unsalted butter and a pinch of salt. Mix until the crumbs are evenly coated and look like wet sand. This should take about 3 minutes.
- Assemble the crust layer: Spoon about 2 tablespoons of the crumb mixture into the bottom of each jar (serving 6 jars). Press down gently with the back of a spoon to compact slightly. Set aside while you make the filling. This step takes around 5 minutes.
- Make the cheesecake filling: In a large bowl, beat 16 ounces (450g) softened cream cheese with 3/4 cup (90g) powdered sugar and 1 teaspoon vanilla extract until smooth and creamy. This should take 4-5 minutes with an electric mixer on medium speed.
- Whip the cream: In a separate chilled bowl, whip 1 cup (240ml) heavy cream until stiff peaks form, about 3-4 minutes. Be careful not to overwhip, or your filling will turn grainy.
- Fold whipped cream into cream cheese: Gently fold the whipped cream into the cream cheese mixture using a spatula. Use gentle motions to keep the mixture light and airy. This takes about 2 minutes.
- Prepare the strawberry topping: In a small saucepan, combine 1 cup (150g) sliced strawberries with 2 tablespoons (30ml) lemon juice and 2 tablespoons (25g) sugar. Cook over medium heat for 5-7 minutes, stirring occasionally, until strawberries release juices and soften. Let cool.
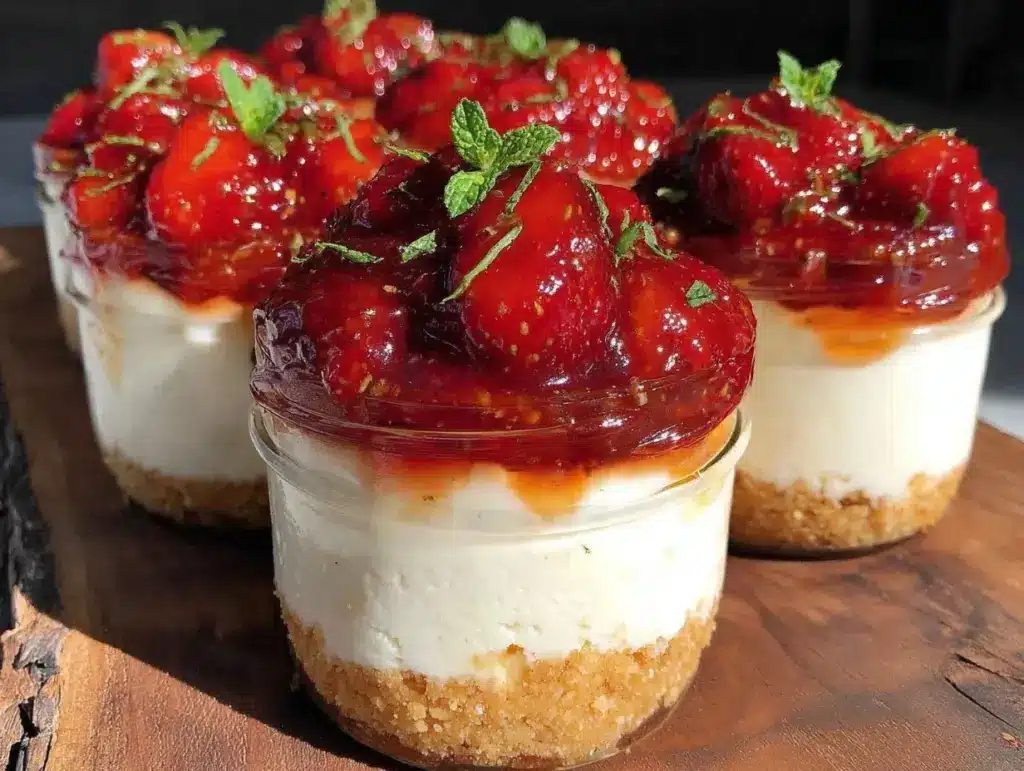
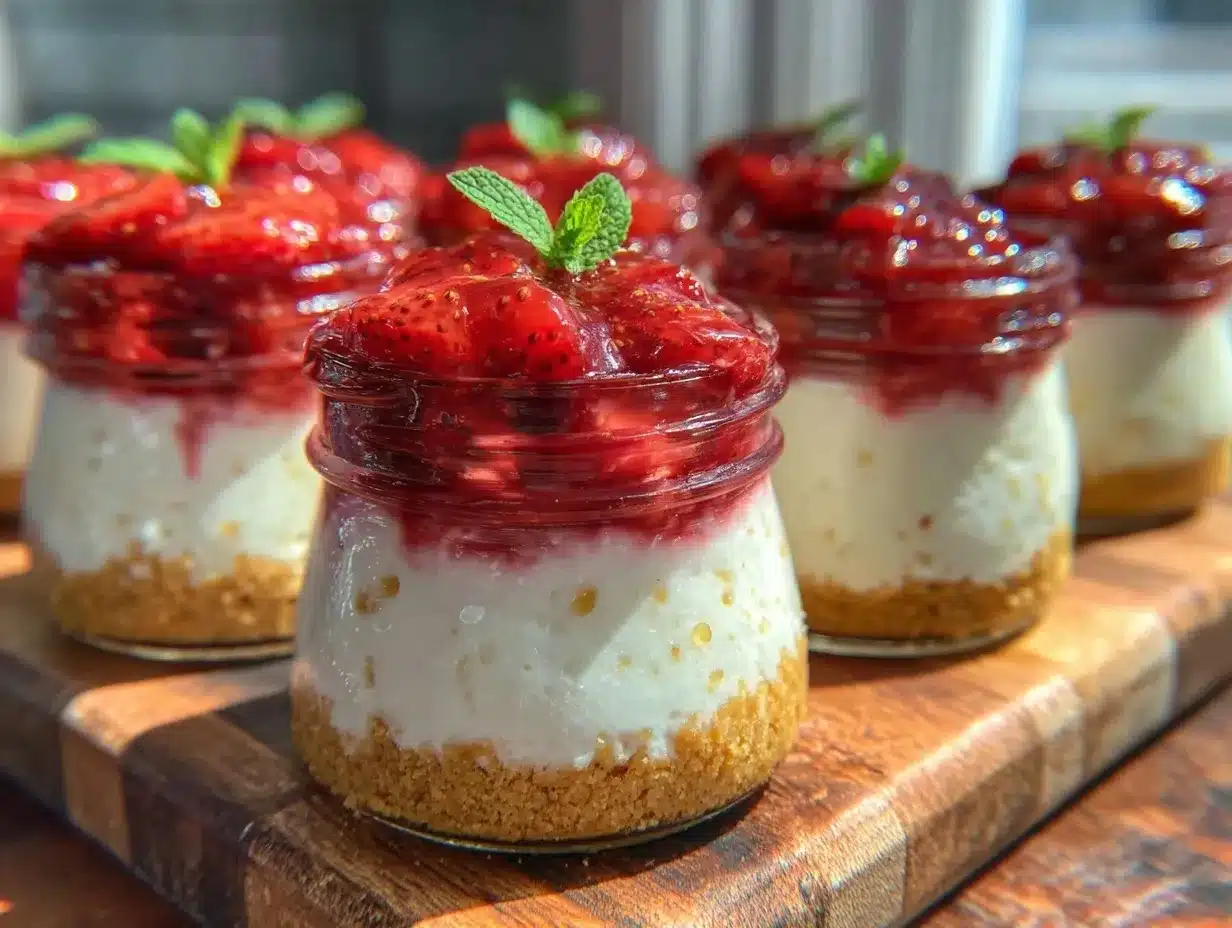
- Layer the jars: Spoon or pipe a generous layer of cheesecake filling over the crust in each jar. Add a spoonful of the cooled strawberry topping, then repeat layers as your jar allows. Usually, two layers of filling and topping work best. This assembly takes about 10 minutes.
- Chill: Refrigerate the jars for at least 2 hours or overnight to let the flavors meld and the filling set properly.
- Serve: Just before serving, garnish with fresh strawberry slices or a small mint leaf for a pop of color.
If the filling seems too loose at any point, a quick tip is to chill it for 10 minutes before folding in the whipped cream. Also, when cooking the strawberries, don’t let the mixture boil vigorously—that can make it too syrupy. A gentle simmer is all you need.
Cooking Tips & Techniques
Honestly, the secret to these cheesecake jars lies in texture balance and layering. Here are some tips from my own trial and error:
- Softened cream cheese is a must: Cold cream cheese can lead to lumps and a rough texture. Leave it out for 30 minutes before mixing.
- Don’t overwhip your cream: Overwhipping causes it to become grainy and separate. Stop once stiff peaks form and fold gently.
- Crush your graham crackers evenly: Too fine and the crust turns into mush; too chunky and it feels rough. I like a mix of fine crumbs and small bits for crunch.
- Layer evenly: When layering, avoid mixing the layers too much. Use a spoon or piping bag for neat layers that look pretty and taste balanced.
- Chill time is essential: The filling firms up in the fridge, so don’t skip the chilling step or you’ll end up with a runny dessert.
- Strawberry topping tweaks: If you prefer fresh fruit over cooked, just slice and layer them in, but cooked topping gives more flavor depth.
One time I didn’t press the crust firmly enough, and the bottom felt crumbly and loose—lesson learned! Also, multitasking helps: start chilling the crust while mixing the filling to save time.
Variations & Adaptations
There’s plenty of room to make these jars your own. Here are a few ideas I’ve played with:
- Berry Medley: Swap strawberries for mixed berries like blueberries, raspberries, and blackberries—fresh or lightly cooked with a bit of sugar.
- Chocolate Cheesecake: Add 2 tablespoons of cocoa powder to the cream cheese mixture and sprinkle mini chocolate chips between layers.
- Gluten-Free: Use almond flour or gluten-free graham crackers for the crust to suit dietary needs.
- Dairy-Free: Replace cream cheese with a plant-based alternative and heavy cream with coconut cream. The texture is a bit different but still delicious.
- Flavor Boost: Stir in a teaspoon of lemon zest or orange zest into the cheesecake filling for a citrusy twist.
For a personal touch, I once tried layering in a bit of lemon curd (from this lemon curd tart recipe inspiration) between crust and filling, which gave a tangy surprise that my guests loved.
Serving & Storage Suggestions
These jars are best served chilled straight from the fridge. The creamy filling holds up nicely, and the crust stays delightfully crumbly without getting soggy.
Serve them as a light summer dessert after a meal or pack a jar for a picnic treat. Pairing with a glass of sparkling rosé or a refreshing iced tea works beautifully.
To store, cover the jars tightly with lids or plastic wrap and refrigerate for up to 3 days. The flavors meld and deepen with time, making leftovers even better. If you want to prepare ahead, just keep the crust separate and assemble the jars the day of serving to keep that satisfying crunch.
Reheating isn’t recommended since it’s a cold dessert, but if you want to soften the strawberry topping, a quick 10-second zap in the microwave (lid off) works.
Nutritional Information & Benefits
Each serving of these cheesecake jars packs roughly 300-350 calories, depending on the exact ingredient brands and portion size. The recipe provides a good source of calcium and protein from the cream cheese and cream, while the fresh strawberries add vitamin C and antioxidants.
Using fresh fruit instead of sugary jams or sauces keeps the sugar content moderate. For those watching carbs, this dessert can be adapted by using a sugar substitute and almond flour crust to lower the count.
This recipe is naturally gluten-free if you select gluten-free crackers, and with dairy-free swaps, it fits vegan diets as well. I personally appreciate that this dessert feels indulgent without being overly heavy—perfect for a realistic, health-conscious sweet treat that still satisfies cravings.
Conclusion
Easy No-Bake Strawberry Cheesecake Jars have earned a permanent spot in my summer dessert rotation. They’re quick, forgiving, and honestly a little fun to put together (the layering is oddly satisfying). What I love most is their straightforward charm—no complicated steps, no baking stress, just fresh, creamy, and sweet bites that bring a quiet joy to any table.
Feel free to make this recipe your own by swapping fruits or adding flavors that speak to you. This dessert’s flexibility means it can fit your mood or occasion without hassle.
Give it a try, and when you do, I’d love to hear how you tweaked it or what moments you paired it with. There’s something special about sharing simple pleasures like these jars—so let’s keep the conversation going!
Frequently Asked Questions
Can I make these cheesecake jars ahead of time?
Absolutely! They taste even better after chilling for a few hours or overnight. Just cover the jars tightly and refrigerate.
What can I use instead of graham crackers for the crust?
Almond flour, gluten-free crackers, or crushed digestive biscuits work well as alternatives.
How long do these jars keep in the fridge?
They stay fresh for up to 3 days when stored properly in the refrigerator.
Can I freeze the cheesecake jars?
Freezing isn’t recommended because the texture of the cream cheese filling may become grainy after thawing.
Is it possible to make this recipe vegan?
Yes! Use vegan cream cheese and coconut cream instead of dairy, and check that your crust ingredients are vegan-friendly.
For a brunch twist, these jars also pair wonderfully with fluffy lemon ricotta pancakes and a fresh strawberry pie—both recipes you can find on the site to make your summer mornings even more special.
Pin This Recipe!
Easy No-Bake Strawberry Cheesecake Jars
A quick and easy no-bake dessert featuring creamy cheesecake layers and fresh strawberry topping served in individual jars, perfect for summer.
- Prep Time: 15 minutes
- Cook Time: 7 minutes
- Total Time: 2 hours 22 minutes
- Yield: 6 servings 1x
- Category: Dessert
- Cuisine: American
Ingredients
- 1 ½ cups (150g) finely crushed graham crackers
- 5 tablespoons (70g) unsalted butter, melted
- Pinch of salt (optional)
- 16 ounces (450g) cream cheese, softened
- 3/4 cup (90g) powdered sugar, sifted
- 1 teaspoon pure vanilla extract
- 1 cup (240ml) heavy cream, cold
- 1 cup (150g) fresh strawberries, hulled and sliced
- 2 tablespoons (30ml) lemon juice
- 2 tablespoons (25g) sugar
Instructions
- Prepare the crust: In a medium bowl, combine crushed graham crackers, melted butter, and a pinch of salt. Mix until crumbs are evenly coated and resemble wet sand, about 3 minutes.
- Assemble the crust layer: Spoon about 2 tablespoons of the crumb mixture into the bottom of each jar (serving 6 jars). Press down gently to compact. Set aside.
- Make the cheesecake filling: Beat softened cream cheese with powdered sugar and vanilla extract until smooth and creamy, about 4-5 minutes using an electric mixer on medium speed.
- Whip the cream: In a separate chilled bowl, whip heavy cream until stiff peaks form, about 3-4 minutes. Avoid overwhipping.
- Fold whipped cream into cream cheese mixture gently using a spatula to keep it light and airy, about 2 minutes.
- Prepare the strawberry topping: In a small saucepan, combine sliced strawberries, lemon juice, and sugar. Cook over medium heat for 5-7 minutes until strawberries soften and release juices. Let cool.
- Layer the jars: Spoon or pipe a layer of cheesecake filling over the crust in each jar, add a spoonful of cooled strawberry topping, then repeat layers as space allows (usually two layers).
- Chill: Refrigerate jars for at least 2 hours or overnight to let flavors meld and filling set.
- Serve: Garnish with fresh strawberry slices or a mint leaf just before serving.
Notes
Use softened cream cheese to avoid lumps. Do not overwhip the cream to prevent grainy texture. Crush graham crackers to a mix of fine crumbs and small bits for best texture. Chill filling if too loose before folding in whipped cream. Cook strawberry topping on gentle simmer to avoid syrupy texture. For gluten-free, use almond flour or gluten-free crackers. For dairy-free or vegan, substitute cream cheese and heavy cream with plant-based alternatives.
Nutrition
- Serving Size: 1 jar
- Calories: 325
- Sugar: 18
- Sodium: 180
- Fat: 22
- Saturated Fat: 13
- Carbohydrates: 26
- Fiber: 1
- Protein: 5
Keywords: no-bake cheesecake, strawberry cheesecake, summer dessert, easy dessert, cheesecake jars, no oven dessert


