
Let me tell you, the scent of rich, melted chocolate mingling with buttery crust wafting from the kitchen is enough to make anyone’s mouth water. The first time I baked this creamy chocolate cream pie, I was instantly hooked—the kind of moment where you pause, take a deep breath, and just smile because you know you’re onto something truly special. I remember when I was knee-high to a grasshopper, my grandma would make her famous chocolate desserts, but this particular pie recipe came to me years ago during a rainy weekend experiment when I was trying to recreate that nostalgic comfort with a homemade twist.
Honestly, my family couldn’t stop sneaking slices off the cooling rack (and I can’t really blame them). It’s dangerously easy to make yet tastes like a decadent treat from a fancy bakery. You know what? This creamy chocolate cream pie with whipped cream delight is perfect for potlucks, a sweet surprise for your kids after school, or even to brighten up your Pinterest cookie board with something a little more indulgent. After testing this recipe multiple times—in the name of research, of course—it’s become a staple for family gatherings and gifting during the holidays. It feels like a warm hug in dessert form, and you’re going to want to bookmark this one.
Why You’ll Love This Recipe
This creamy chocolate cream pie recipe isn’t just good—it’s the kind of dessert that makes you close your eyes after the first bite. Here’s why you’ll want to make it again and again:
- Quick & Easy: Comes together in under an hour, perfect for busy weeknights or last-minute sweet cravings.
- Simple Ingredients: No fancy grocery trips needed; you likely already have everything in your kitchen pantry.
- Perfect for Any Occasion: Whether it’s a cozy dinner, holiday celebration, or casual get-together, this pie hits the spot.
- Crowd-Pleaser: Kids and adults alike rave about the silky chocolate filling topped with fluffy homemade whipped cream.
- Unbelievably Delicious: The creamy texture paired with a buttery crust and light whipped cream is next-level comfort food.
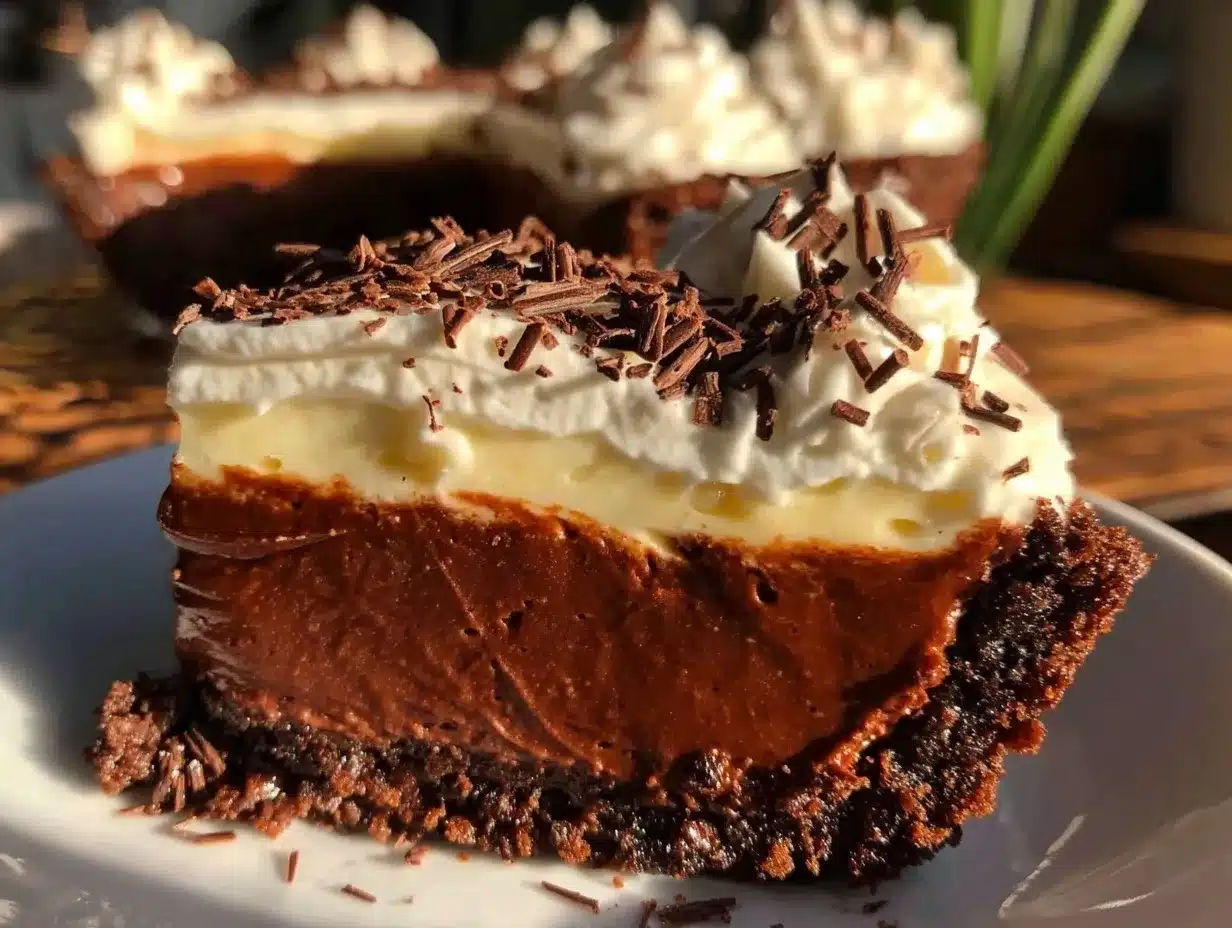
What sets this recipe apart is the perfectly balanced silky chocolate custard that’s thick yet velvety, thanks to a special technique of tempering the eggs slowly with warm milk and cocoa. The homemade whipped cream topping isn’t just an afterthought either—it’s whipped to airy peaks with a hint of vanilla that complements the chocolate without overpowering it. This isn’t just another chocolate pie; it’s comfort food reimagined—faster, easier, but with the same soul-soothing satisfaction you crave. Whether you’re aiming to impress guests without stress or just want to turn a simple dessert into something memorable, this creamy chocolate cream pie with whipped cream delight has your back.
What Ingredients You Will Need
This recipe uses simple, wholesome ingredients to deliver bold flavor and satisfying texture without the fuss. Most of these are pantry staples, and substitutions are easy if you need them.
- For the Crust:
- 1 ¼ cups (150g) all-purpose flour
- ¼ cup (50g) granulated sugar
- ½ tsp salt
- ½ cup (115g) unsalted butter, cold and cubed (I recommend Land O’Lakes for best flavor)
- 3-4 tbsp ice water
- For the Chocolate Filling:
- 2 cups (480ml) whole milk, warmed (use dairy-free milk like oat milk for a vegan option)
- ¾ cup (150g) granulated sugar
- ⅓ cup (35g) unsweetened cocoa powder (preferably Dutch-processed for richer taste)
- ¼ cup (30g) cornstarch
- 4 large egg yolks, room temperature
- 3 tbsp (43g) unsalted butter, softened (adds richness)
- 1 tsp pure vanilla extract
- Pinch of salt
- For the Whipped Cream Delight:
- 1 cup (240ml) heavy whipping cream, cold
- 2 tbsp powdered sugar
- 1 tsp vanilla extract
Feel free to swap the all-purpose flour in the crust with almond flour to make it gluten-free (though the texture will be more crumbly). If you have a sweet tooth, adding a tablespoon of espresso powder to the filling really amps up the chocolate flavor without tasting like coffee. For the whipped cream, I find that chilling your mixing bowl and beaters in the freezer before whipping leads to better volume—trust me, it makes a big difference!
Equipment Needed
- 9-inch (23cm) pie dish (glass or ceramic works best for even baking)
- Mixing bowls (medium and large sizes)
- Whisk and rubber spatula
- Rolling pin (or a clean bottle if you don’t have one)
- Fine mesh sieve (for sifting cocoa powder and cornstarch)
- Medium saucepan
- Electric mixer or stand mixer with whisk attachment (for whipping cream)
- Measuring cups and spoons
If you don’t have a rolling pin, a clean wine bottle works just fine in a pinch (I’ve used this trick during a kitchen emergency!). For whipping cream, a hand mixer is perfectly fine, but a stand mixer makes the job hands-free and super easy. When it comes to pie dishes, glass lets you peek at the crust browning so you don’t burn it—a little trick I learned after a few smoky pies in the oven!
Preparation Method
- Prepare the Pie Crust: In a large bowl, whisk together the flour, sugar, and salt. Add cold cubed butter. Using a pastry cutter or your fingers, work the butter into the flour until the mixture resembles coarse crumbs (pea-sized bits are perfect). This step is key for a flaky crust. Slowly add ice water, one tablespoon at a time, mixing gently until dough just comes together. Avoid overworking!
- Chill the Dough: Shape the dough into a flat disc, wrap it in plastic wrap, and refrigerate for at least 30 minutes. This rest time relaxes the gluten and solidifies the butter for a tender crust.
- Roll and Bake the Crust: On a lightly floured surface, roll the dough out to a 12-inch (30cm) circle. Transfer to your 9-inch pie dish, gently pressing it into the edges. Trim excess dough and crimp edges as you like. Chill the crust for 15 minutes to prevent shrinking. Preheat oven to 375°F (190°C). Line the crust with parchment and fill with pie weights or dried beans. Bake for 15 minutes, then remove weights and parchment, and bake for another 10 minutes until golden and firm. Let cool completely.
- Make the Chocolate Filling: In a medium saucepan, whisk sugar, cocoa powder, cornstarch, and salt until combined. Gradually whisk in warm milk, making sure no lumps remain. Place over medium heat, stirring constantly until mixture thickens and just begins to bubble (about 5-7 minutes). Remove from heat.
- Temper the Egg Yolks: In a small bowl, lightly beat egg yolks. Slowly pour about ½ cup (120ml) of the hot chocolate mixture into the yolks, whisking constantly to prevent scrambling. Then, pour the yolk mixture back into the saucepan. Return to medium heat, stir constantly for 2 minutes until thick and glossy. Remove from heat and stir in butter and vanilla extract until smooth.
- Cool the Filling: Pour the chocolate custard into the baked crust. Press plastic wrap directly onto the surface to prevent a skin from forming. Refrigerate for at least 4 hours, preferably overnight, to set firmly.
- Whip the Cream: Just before serving, beat the cold heavy cream with powdered sugar and vanilla on medium-high speed until soft peaks form. Don’t overbeat—stop when peaks hold but still look fluffy.
- Assemble: Spread or pipe the whipped cream over the chilled chocolate filling. Garnish with chocolate shavings, cocoa powder dusting, or fresh berries if desired. Serve immediately for best texture.
Pro tip: If your filling looks grainy or lumpy after cooking, whisk vigorously off the heat for a minute or two and strain through a fine mesh sieve—this little trick saved me once when I rushed the stirring!
Cooking Tips & Techniques
Making creamy chocolate cream pie with whipped cream delight is honestly straightforward, but a few tips can make your pie feel like it came from a pastry chef’s kitchen. First, when blending the cocoa powder into the milk, sift it first to avoid clumps—no one likes gritty chocolate filling.
One of the most common mistakes is overheating the egg yolks, which can scramble them and ruin the smooth texture. That’s why tempering the yolks by slowly adding hot liquid is crucial. Patience here pays off big time.
When baking the crust, chilling the dough before rolling and again after fitting it in the pan helps prevent shrinkage. Also, blind baking with weights keeps the crust from puffing up or bubbling, so don’t skip that step.
For the whipped cream, cold cream whips better and faster. I learned the hard way that slightly warm cream just won’t fluff up properly. If you’re multitasking, chill your bowl and beaters beforehand to speed things up.
Finally, be mindful of your pie’s temperature. The filling sets best after several hours in the fridge, so plan ahead. Trying to slice it too soon will lead to a messy pie and disappointed taste buds.
Variations & Adaptations
- Salted Caramel Chocolate Pie: Drizzle homemade salted caramel sauce over the chocolate filling before chilling. Sprinkle a pinch of flaky sea salt on top for a delicious sweet-salty combo.
- Vegan Version: Use coconut milk or almond milk in place of dairy, substitute butter with coconut oil, and replace eggs with cornstarch slurry or agar powder. Whip coconut cream for the topping. It’s surprisingly satisfying!
- Nutty Twist: Add a layer of chopped toasted hazelnuts or almonds on the crust before pouring in the chocolate filling. Adds crunch and a lovely nutty flavor.
For different cooking methods, you can try making mini cream pies in tart pans or even no-bake versions using crushed cookies for the crust and gelatin or agar thickening for the filling. I once swapped berries into the whipped cream for a fresh, fruity contrast—it was a hit at a summer picnic!
Serving & Storage Suggestions
This creamy chocolate cream pie is best served chilled, straight from the fridge. Let it sit at room temperature for about 10 minutes before slicing to soften the filling slightly—makes cutting cleaner and flavors more pronounced. I like to garnish mine with a dusting of cocoa powder or a few fresh raspberries for a pop of color.
Pair this pie with a cup of strong coffee, a glass of cold milk, or even a bold red wine for a grown-up treat. It also goes great alongside simple vanilla ice cream if you want to add an extra scoop of indulgence.
Store leftovers tightly covered in the refrigerator for up to 3 days. The whipped cream topping is best fresh but can be gently re-whipped if it settles. You can freeze the pie (without the whipped cream) wrapped well for up to a month; thaw overnight in the fridge before topping and serving. Flavors deepen after resting, so if you make it a day ahead, it’s even better.
Nutritional Information & Benefits
Each slice of this creamy chocolate cream pie (based on 8 servings) contains approximately 350 calories, with 20g fat, 40g carbohydrates, and 5g protein. The heavy cream and butter provide richness and satiating fats, while the cocoa powder offers antioxidants and a mood boost thanks to its natural compounds.
For those watching carbs, you can reduce sugar or swap to a sugar substitute, and using almond flour crust lowers the carb count as well. This dessert is gluten-free if you use a gluten-free crust option. Note that the recipe contains dairy and eggs, so it’s not suitable for those with allergies to those ingredients unless adapted.
From a wellness perspective, indulging in a slice of this pie occasionally is a lovely way to treat yourself without guilt—it’s homemade, free of preservatives, and made with love.
Conclusion
If you’re looking for a creamy chocolate cream pie recipe that’s easy to make and downright irresistible, this one’s the real deal. From the flaky, buttery crust to the silky chocolate filling and the cloud-like whipped cream delight, it’s a dessert that feels like a celebration in every bite. You can customize it to your taste, swap ingredients if needed, and make it your own.
I love this recipe because it brings back warm memories, yet it’s simple enough to whip up on a whim. I’d be thrilled if you gave it a try—don’t forget to come back and share your variations or any tips you discover. Go ahead, treat yourself and your loved ones—you’ll be glad you did!
Frequently Asked Questions
Can I make this pie ahead of time?
Absolutely! The pie actually tastes better when chilled overnight, allowing the filling to set perfectly and flavors to meld.
What can I use if I don’t have cornstarch?
You can substitute with arrowroot powder or tapioca starch in equal amounts to thicken the filling.
How do I prevent the pie crust from getting soggy?
Blind baking the crust with weights before adding the filling creates a barrier and keeps it crisp.
Can I use whipped topping instead of homemade whipped cream?
Yes, but homemade whipped cream offers a fresher taste and better texture with less sweetness.
Is it possible to make this dairy-free?
Yes! Use plant-based milk and butter substitutes, and whip coconut cream instead of dairy heavy cream for topping.
Pin This Recipe!
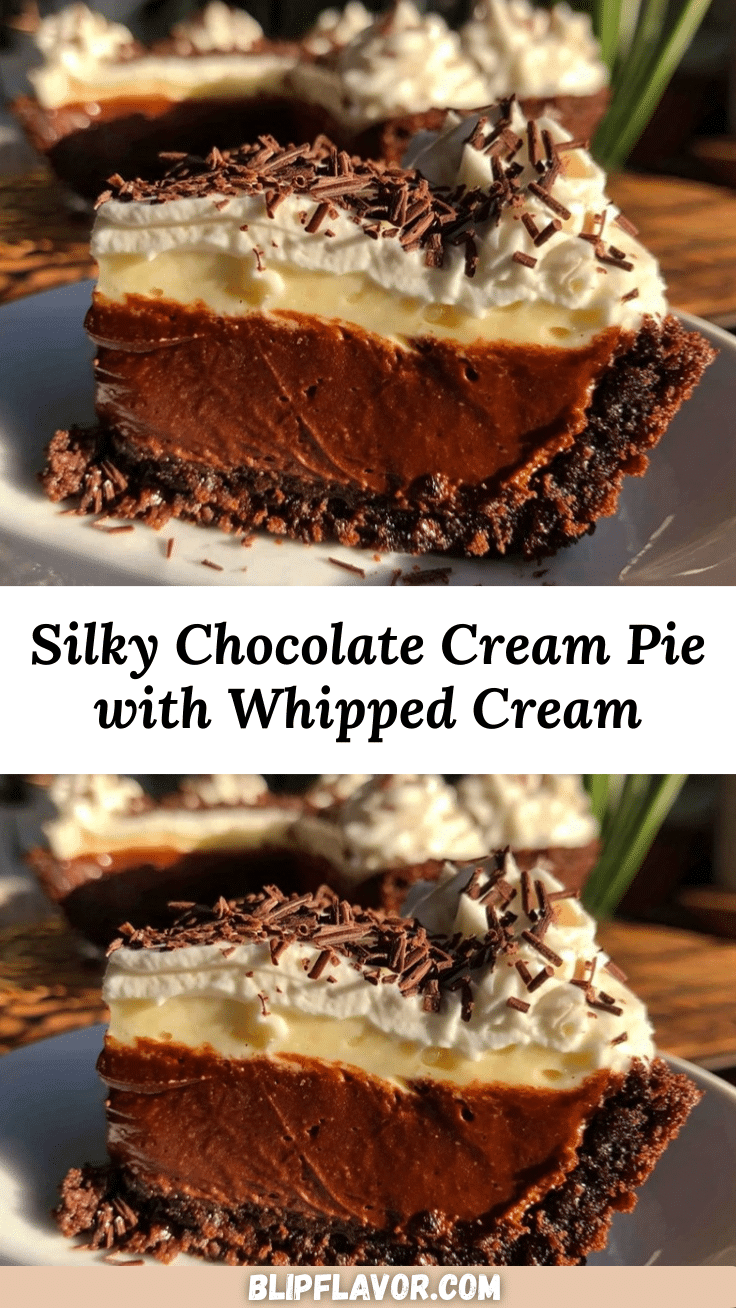
Creamy Chocolate Cream Pie Recipe Easy Homemade Whipped Cream Delight

A rich and silky chocolate cream pie with a flaky buttery crust topped with fluffy homemade whipped cream. Perfect for any occasion and easy to make with simple pantry ingredients.
- Prep Time: 30 minutes
- Cook Time: 25 minutes
- Total Time: 5 hours 55 minutes
- Yield: 8 servings 1x
- Category: Dessert
- Cuisine: American
Ingredients
- 1 1/4 cups (150g) all-purpose flour
- 1/4 cup (50g) granulated sugar
- 1/2 tsp salt
- 1/2 cup (115g) unsalted butter, cold and cubed
- 3–4 tbsp ice water
- 2 cups (480ml) whole milk, warmed
- 3/4 cup (150g) granulated sugar
- 1/3 cup (35g) unsweetened cocoa powder
- 1/4 cup (30g) cornstarch
- 4 large egg yolks, room temperature
- 3 tbsp (43g) unsalted butter, softened
- 1 tsp pure vanilla extract
- Pinch of salt
- 1 cup (240ml) heavy whipping cream, cold
- 2 tbsp powdered sugar
- 1 tsp vanilla extract
Instructions
- Prepare the Pie Crust: In a large bowl, whisk together the flour, sugar, and salt. Add cold cubed butter. Using a pastry cutter or your fingers, work the butter into the flour until the mixture resembles coarse crumbs. Slowly add ice water, one tablespoon at a time, mixing gently until dough just comes together. Avoid overworking.
- Chill the Dough: Shape the dough into a flat disc, wrap it in plastic wrap, and refrigerate for at least 30 minutes.
- Roll and Bake the Crust: On a lightly floured surface, roll the dough out to a 12-inch circle. Transfer to a 9-inch pie dish, gently pressing it into the edges. Trim excess dough and crimp edges. Chill the crust for 15 minutes. Preheat oven to 375°F (190°C). Line the crust with parchment and fill with pie weights or dried beans. Bake for 15 minutes, then remove weights and parchment, and bake for another 10 minutes until golden and firm. Let cool completely.
- Make the Chocolate Filling: In a medium saucepan, whisk sugar, cocoa powder, cornstarch, and salt until combined. Gradually whisk in warm milk, making sure no lumps remain. Place over medium heat, stirring constantly until mixture thickens and just begins to bubble (about 5-7 minutes). Remove from heat.
- Temper the Egg Yolks: In a small bowl, lightly beat egg yolks. Slowly pour about 1/2 cup of the hot chocolate mixture into the yolks, whisking constantly to prevent scrambling. Pour the yolk mixture back into the saucepan. Return to medium heat, stir constantly for 2 minutes until thick and glossy. Remove from heat and stir in butter and vanilla extract until smooth.
- Cool the Filling: Pour the chocolate custard into the baked crust. Press plastic wrap directly onto the surface to prevent a skin from forming. Refrigerate for at least 4 hours, preferably overnight.
- Whip the Cream: Just before serving, beat the cold heavy cream with powdered sugar and vanilla on medium-high speed until soft peaks form. Do not overbeat.
- Assemble: Spread or pipe the whipped cream over the chilled chocolate filling. Garnish with chocolate shavings, cocoa powder dusting, or fresh berries if desired. Serve immediately.
Notes
Chill the dough before rolling and after fitting in the pan to prevent shrinkage. Blind bake the crust with weights to keep it crisp. Sift cocoa powder and cornstarch to avoid lumps. Temper egg yolks slowly to prevent scrambling. Chill mixing bowl and beaters before whipping cream for better volume. Let pie chill overnight for best texture and flavor. If filling is grainy, whisk off heat and strain through sieve.
Nutrition
- Serving Size: 1 slice (1/8 of pie)
- Calories: 350
- Sugar: 25
- Sodium: 150
- Fat: 20
- Saturated Fat: 12
- Carbohydrates: 40
- Fiber: 3
- Protein: 5
Keywords: chocolate cream pie, homemade whipped cream, easy chocolate pie, creamy chocolate dessert, chocolate custard pie, potluck dessert, family dessert


