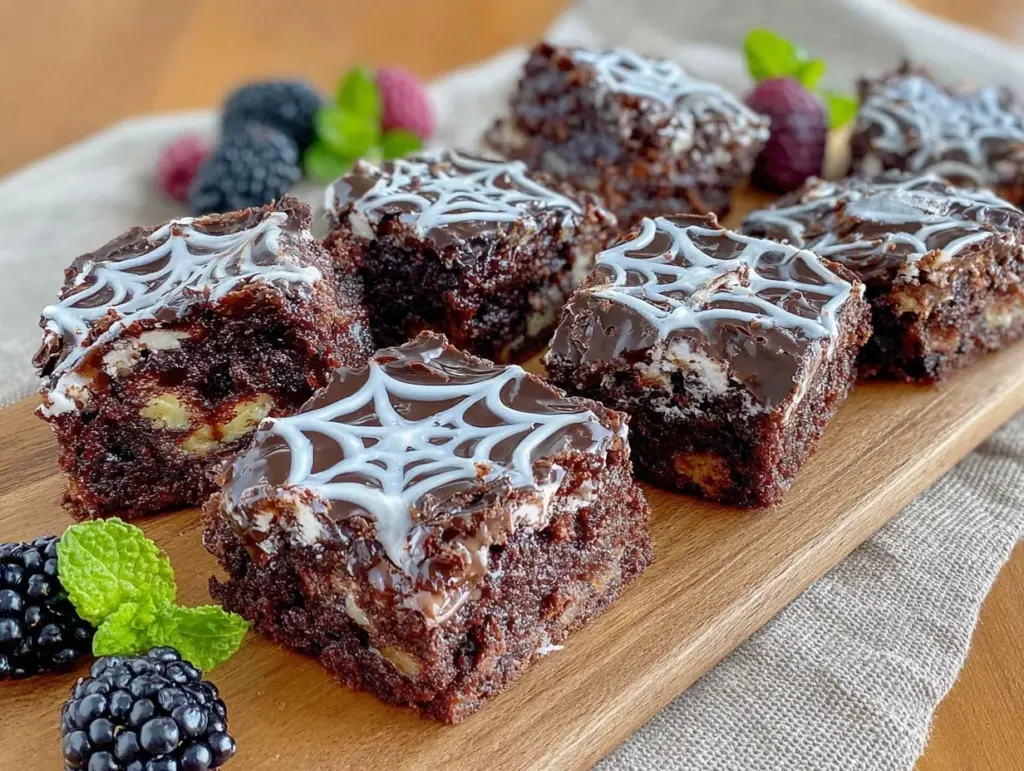
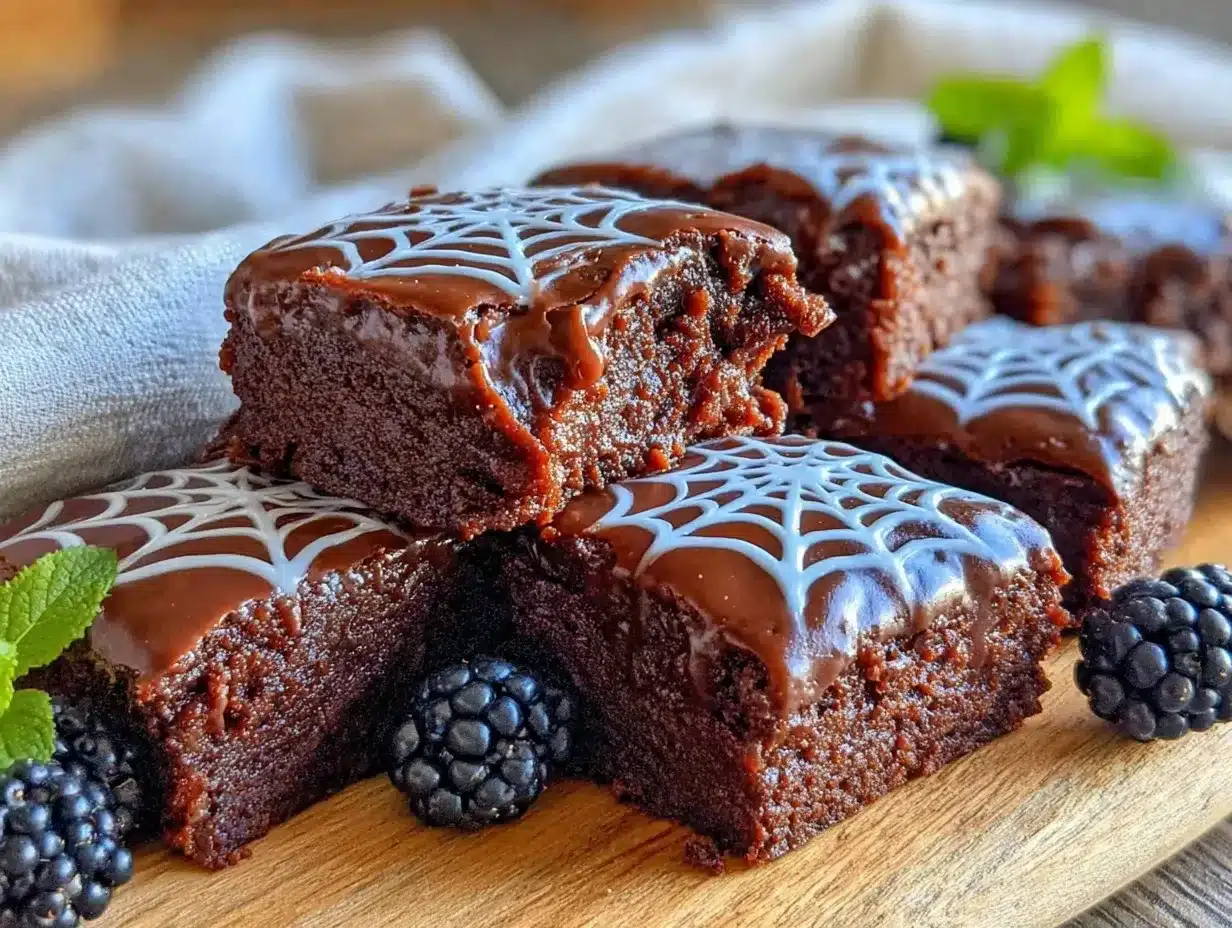
Let me tell you, the scent of rich chocolate mingling with a hint of vanilla and melting butter wafting from my oven is enough to make anyone’s mouth water—especially when those brownies come out looking like spooky spider webs. The first time I baked these fudgy spider web brownies, it was a chilly October evening, and I was instantly hooked. There was this kind of moment where you pause, take a deep breath, and just smile because you know you’re onto something truly special. Honestly, these brownies feel like a warm hug wrapped in Halloween magic.
Years ago, when I was knee-high to a grasshopper, Halloween meant trick-or-treating and homemade goodies from Grandma’s kitchen. I remember her mysterious spider web cake that made every kid in the neighborhood stare in awe. I wanted to recreate that nostalgic vibe but with a fudgy twist that would thrill both kids and adults. My family couldn’t stop sneaking these brownies off the cooling rack (and I can’t really blame them). They’re dangerously easy to make and perfect to brighten up your Pinterest cookie board or as a sweet treat for your kids’ spooky parties.
You know what? After testing this recipe multiple times in the name of research, of course, it has become a staple for our family gatherings and even for gifting. If you’re looking for a Halloween dessert that’s not only visually fun but also rich and indulgently fudgy, these spider web brownies are your go-to. You’re going to want to bookmark this one.
Why You’ll Love This Recipe
These fudgy spider web brownies aren’t just another chocolate treat—they’ve got that perfect balance that keeps you coming back for more. Based on my many trials (and a few kitchen mishaps), here’s why they stand out:
- Quick & Easy: Comes together in under 45 minutes, perfect when you’ve got last-minute Halloween plans or need a fast dessert fix.
- Simple Ingredients: No fancy grocery trips needed; you likely already have everything in your kitchen pantry.
- Perfect for Halloween Parties: The spider web design adds that festive spooky touch that’s sure to impress.
- Crowd-Pleaser: Kids adore the fun design, and adults love the deep chocolate flavor and fudgy texture.
- Unbelievably Delicious: The texture is dense and moist, with a slight crackly top that gives way to a melt-in-your-mouth center.
This recipe stands apart because of the spider web decoration technique—using a simple white icing to create that eerie web effect without fuss. Plus, the brownies themselves have no artificial flavorings, just pure, honest ingredients. It’s the kind of recipe that makes you close your eyes after the first bite and say, “Yeah, this is comfort food with a bit of Halloween spirit.” Whether you’re aiming to impress guests or just want a cozy treat for yourself, these brownies deliver every time.
What Ingredients You Will Need
This recipe uses simple, wholesome ingredients to deliver bold chocolate flavor and a fudgy, tender texture without the fuss. Most are pantry staples, making it easy to whip up even if you surprise yourself with a sudden sweet tooth.
- Unsalted butter, 1 cup (227g), melted (adds richness and helps achieve that fudgy texture)
- Semi-sweet chocolate chips, 8 ounces (225g) (I prefer Ghirardelli for best melt and flavor)
- Granulated sugar, 1 ½ cups (300g)
- Large eggs, 3, room temperature (helps with the structure and moisture)
- Pure vanilla extract, 2 teaspoons (adds depth of flavor)
- All-purpose flour, 1 cup (125g) (for a gluten-free option, try almond flour but expect a slightly different texture)
- Unsweetened cocoa powder, ¾ cup (75g) (preferably Dutch-processed for a smoother taste)
- Salt, ¼ teaspoon (balances sweetness and enhances chocolate flavor)
- Powdered sugar, 1 cup (120g) (for spider web icing)
- Milk, 2-3 tablespoons (30-45ml), for icing (use dairy-free milk if needed)
- Black food coloring or edible gel (optional, for spider web detailing)
Keep in mind, the quality of chocolate really makes a difference here. I recommend choosing chocolate chips with at least 60% cocoa for that rich, intense flavor. If you’re planning to add a little extra flair, black food coloring helps the spider web pop, but plain white icing works just as well for a classic look.
Equipment Needed
- 9×9 inch (23×23 cm) square baking pan – I prefer a metal pan for even heat distribution, but glass works fine too.
- Mixing bowls – One medium and one large for mixing wet and dry ingredients separately.
- Whisk and rubber spatula – For stirring and folding ingredients without over-mixing.
- Microwave-safe bowl or double boiler – To melt butter and chocolate smoothly.
- Piping bag or resealable plastic bag – For piping the spider web icing (a small zip-top bag with a tiny corner snipped works wonders).
- Cooling rack – To cool brownies evenly and prevent sogginess.
If you don’t have a piping bag, you can always use a small spoon and drizzle carefully. I once tried using a toothpick for the web design, but it’s tricky and messy—stick with a piping bag or plastic bag for best results. For budget-friendly options, a basic silicone spatula and a metal baking pan will do the job just fine. Just make sure your baking pan is well-greased or lined with parchment paper to avoid sticky situations.
Preparation Method
- Preheat your oven to 350°F (175°C) and prepare your 9×9 inch pan by greasing it lightly or lining it with parchment paper. This step makes sure your brownies come out clean and easy to slice. (About 10 minutes)
- Melt the butter and chocolate chips together in a microwave-safe bowl in 30-second bursts, stirring in between until smooth. Alternatively, use a double boiler on the stove. This is key for that silky base. (5 minutes)
- Whisk the sugar into the melted chocolate mixture while it’s still warm, then add the eggs one at a time, whisking well after each addition. The batter will look glossy and thick—this is a good sign!
- Stir in the vanilla extract. At this point, your kitchen will smell dangerously inviting.
- In a separate bowl, sift together the flour, cocoa powder, and salt. Sifting avoids lumps and ensures an even texture.
- Gently fold the dry ingredients into the wet chocolate batter using a rubber spatula. Be careful not to over-mix; a few streaks of flour are okay. The batter should be thick and fudgy.
- Pour the batter into your prepared pan, spreading it evenly with the spatula. Tap the pan lightly on the counter to release air bubbles.
- Bake for 25-30 minutes. Check around 25 minutes by inserting a toothpick in the center—it should come out with a few moist crumbs, not wet batter. Overbaking dries them out (and we don’t want that).
- Cool the brownies completely on a wire rack before decorating. This helps the icing hold its shape instead of melting into the warm brownies.
- Prepare the spider web icing: Mix powdered sugar with milk, starting with 2 tablespoons and adding more as needed to get a thick but pipeable consistency.
- Transfer icing to a piping bag or plastic bag, then pipe concentric circles on the brownie surface.
- Use a toothpick or skewer to drag lines from the center outward to create the spider web effect. (Try to do this gently for clean lines.)
- Let the icing set for at least 20 minutes before slicing and serving.
Pro tip: If your icing is too runny, add a little more powdered sugar; too thick, add a splash more milk. Getting the spider web just right takes a bit of patience but trust me, it’s worth it for the wow factor.
Cooking Tips & Techniques
Making fudgy brownies that look like spider webs is mostly about timing and texture. Here are some tips I’ve learned along the way:
- Don’t overbake: The biggest mistake is baking brownies too long. They continue cooking after you pull them out, so aim for a slightly underdone center for that fudgy feel.
- Room temperature eggs: This helps the batter come together smoothly, avoiding lumps or curdling.
- Melting chocolate and butter: Take it slow. Microwave in short bursts or use a double boiler to prevent burning. Burnt chocolate is bitter and ruins the whole batch.
- Folding technique: Gently fold dry ingredients into wet ones rather than stirring vigorously. This keeps the brownies tender.
- Spider web icing: Pipe the circles first, then drag lines outward quickly before the icing sets. If your lines look messy, don’t fret—practice makes perfect!
- Multitasking trick: While brownies bake, prep your icing ingredients and piping bag to save time and keep the flow going.
Honestly, the spider web design is fun and forgiving. Even if your first attempt looks a bit wonky, it still tastes fantastic and adds a festive touch. I remember the first time I tried piping the web, I was nervous, but after a couple of tries, it became second nature.
Variations & Adaptations
These fudgy spider web brownies are quite adaptable. Here are some ways to make them your own:
- Dietary: Use almond flour or gluten-free baking mix instead of all-purpose flour for gluten-free brownies. Swap dairy butter and milk for coconut oil and almond milk for a dairy-free version.
- Seasonal: Add a handful of chopped walnuts or pecans into the batter for a crunchy surprise. For a festive twist, stir in orange zest to brighten the chocolate flavor.
- Flavor: Mix in a teaspoon of espresso powder to deepen the chocolate notes. Or, swirl in some peanut butter or raspberry jam before baking for a marbled effect.
- Cooking method: You can bake these in a muffin tin for individual brownie bites—reduce baking time to about 18-20 minutes.
- Decoration: Instead of white icing, try colored icing or edible glitter for extra sparkle. I once used orange icing for a pumpkin patch theme, and it was a hit!
Serving & Storage Suggestions
These brownies are best served at room temperature so the fudgy texture shines through. I like to slice them into small squares and arrange them on a Halloween-themed plate for that extra festive feel.
They pair beautifully with a cold glass of milk, hot cocoa, or even a spiced pumpkin latte if you’re feeling fancy. For a grown-up twist, try serving with a scoop of vanilla ice cream or a drizzle of caramel sauce.
To store, place brownies in an airtight container at room temperature for up to 3 days. They also freeze wonderfully—wrap tightly in plastic wrap and foil, then freeze for up to 2 months. Thaw overnight in the fridge and bring to room temp before serving.
The spider web icing holds up surprisingly well in the fridge, but if you want to keep that fresh piping look, store them in a single layer and avoid stacking. Flavors actually deepen after a day or two, so if you can wait, it’s worth it.
Nutritional Information & Benefits
While these fudgy spider web brownies are an indulgent treat, here’s a rough idea of what you’re getting per serving (based on 16 servings):
| Calories | 230 kcal |
|---|---|
| Fat | 14g |
| Carbohydrates | 25g |
| Protein | 3g |
| Sugar | 18g |
The cocoa powder and dark chocolate provide antioxidants, and using real butter and eggs adds some beneficial fats and protein. Of course, this recipe contains gluten and dairy, so keep that in mind if you’re serving friends with allergies.
I like to see this treat as a special occasion indulgence—perfect for cozying up with loved ones on a crisp Halloween night. Balance it out with wholesome meals during the day, and you’re golden.
Conclusion
These fudgy spider web brownies are more than just a Halloween dessert—they’re a cozy, nostalgic treat that brings a little magic to your kitchen. Whether you’re baking for kids, friends, or just yourself, they’re simple to make, stunning to look at, and delightfully rich in flavor.
Feel free to customize the spider web design or try out some of the variations I’ve shared. Honestly, I love how this recipe combines fun and comfort in one bite. Don’t be shy—give it a whirl, and share how your spider web brownies turned out in the comments below. I’d love to hear your creative spins!
Happy baking, and here’s to making your Halloween extra sweet and spooky!
FAQs About Fudgy Spider Web Brownies
How do I make the brownies extra fudgy?
Use melted butter and avoid overbaking. Taking the brownies out when a toothpick comes out with a few moist crumbs keeps them dense and moist.
Can I make the spider web icing ahead of time?
Yes! You can prepare the icing a day before and keep it covered in the fridge. Just give it a quick stir before piping.
What if I don’t have a piping bag for the spider web?
No worries! Use a resealable plastic bag and snip a tiny corner off to pipe the icing. Alternatively, drizzle carefully with a small spoon.
Can I add nuts or other mix-ins?
Absolutely! Chopped walnuts, pecans, or even chocolate chunks add great texture. Just fold them into the batter before baking.
How should I store leftover brownies?
Keep them in an airtight container at room temperature for up to 3 days or freeze tightly wrapped for up to 2 months. Thaw before serving for best texture.
Pin This Recipe!

Fudgy Spider Web Brownies
These fudgy spider web brownies are a perfect Halloween treat with a rich chocolate flavor, dense and moist texture, and a festive spider web icing design that delights both kids and adults.
- Prep Time: 15 minutes
- Cook Time: 30 minutes
- Total Time: 45 minutes
- Yield: 16 servings 1x
- Category: Dessert
- Cuisine: American
Ingredients
- 1 cup (2 sticks or 227g) unsalted butter, melted
- 8 ounces (225g) semi-sweet chocolate chips
- 1 ½ cups (300g) granulated sugar
- 3 large eggs, room temperature
- 2 teaspoons pure vanilla extract
- 1 cup (125g) all-purpose flour (or almond flour for gluten-free)
- ¾ cup (75g) unsweetened cocoa powder (preferably Dutch-processed)
- ¼ teaspoon salt
- 1 cup (120g) powdered sugar (for spider web icing)
- 2–3 tablespoons (30-45ml) milk (use dairy-free milk if needed)
- Black food coloring or edible gel (optional, for spider web detailing)
Instructions
- Preheat your oven to 350°F (175°C) and prepare a 9×9 inch baking pan by greasing it lightly or lining it with parchment paper.
- Melt the butter and chocolate chips together in a microwave-safe bowl in 30-second bursts, stirring in between until smooth, or use a double boiler on the stove.
- Whisk the granulated sugar into the melted chocolate mixture while it’s still warm, then add the eggs one at a time, whisking well after each addition until the batter is glossy and thick.
- Stir in the vanilla extract.
- In a separate bowl, sift together the flour, cocoa powder, and salt.
- Gently fold the dry ingredients into the wet chocolate batter using a rubber spatula, being careful not to over-mix; a few streaks of flour are okay.
- Pour the batter into the prepared pan and spread evenly. Tap the pan lightly on the counter to release air bubbles.
- Bake for 25-30 minutes. Check at 25 minutes by inserting a toothpick in the center; it should come out with a few moist crumbs but not wet batter.
- Cool the brownies completely on a wire rack before decorating.
- Prepare the spider web icing by mixing powdered sugar with milk, starting with 2 tablespoons and adding more as needed to get a thick but pipeable consistency.
- Transfer icing to a piping bag or resealable plastic bag and pipe concentric circles on the brownie surface.
- Use a toothpick or skewer to drag lines from the center outward to create the spider web effect.
- Let the icing set for at least 20 minutes before slicing and serving.
Notes
Do not overbake the brownies to keep them fudgy. Use room temperature eggs for smooth batter. Melt chocolate and butter slowly to avoid burning. Pipe spider web icing carefully for best results. Icing can be prepared a day ahead and stored in the fridge.
Nutrition
- Serving Size: 1 brownie (1/16th of
- Calories: 230
- Sugar: 18
- Fat: 14
- Carbohydrates: 25
- Protein: 3
Keywords: brownies, fudgy brownies, Halloween treats, spider web brownies, chocolate dessert, easy brownies, spooky dessert


